Import data from CSV
If you have data in CSV format, there are two ways of import into a running
Memgraph instance: using the LOAD CSV Cypher clause
or directly through Memgraph Lab using a CSV file
import method.
In this section of documentation, we’ll dive deeper into the recommended method for CSV import, using the LOAD CSV Cypher clause. If you’re interested in exploring the CSV file import method, visit the import example under the CSV file import documentation.
If the data imports slower than expected, you can speed up the import by creating indexes on nodes to improve the import speed of relationships or switching the storage mode to analytical.
Learn more about the shortest path to import data into Memgraph by reading best practices for import. If the import speed remains unsatisfactory, don’t hesitate to reach out on Discord.
LOAD CSV Cypher clause
The LOAD CSV clause reads row by row from a CSV file, binds the contents of the
parsed row to the specified variable, and populates the database if it is empty,
or appends new data to an existing dataset. Memgraph supports the Excel CSV
dialect, as it’s the most common one.
LOAD CSV clause syntax
Memgraph Cloud instances do not have direct access to files stored on a user’s
local machine or private network. To use LOAD CSV within Memgraph Cloud,
upload your CSV file to a public URL and import data directly from there.
Here is an example of the Cypher query:
LOAD CSV FROM "https://example.com/path/to/your-data.csv" WITH HEADER AS rowThe syntax of the LOAD CSV clause is:
LOAD CSV FROM <csv-location> ( WITH CONFIG configsMap=configMap ) ? ( WITH | NO ) HEADER [IGNORE BAD] [DELIMITER <delimiter-string>] [QUOTE <quote-string>] [NULLIF <nullif-string>] AS <variable-name>-
<csv-location>is a string of the location of the CSV file.
Without a URL protocol, it refers to a file path. There are no restrictions on where in your file system the file can be located, as long as the path is valid (i.e., the file exists). CSV files can also be imported from the S3. In that case you need to set AWS authentication config options.If you are using Docker to run Memgraph, you will need to copy the files from your local directory into Docker container where Memgraph can access them.
If usinghttp://,https://, orftp://the CSV file will be fetched over the network. -
<configs>Represents an optional configuration map through which you can specify configuration options:aws_region,aws_access_key,aws_secret_keyandaws_endpoint_url.<aws_region>: The region in which your S3 service is being located<aws_access_key>: Access key used to connect to S3 service<aws_secret_key>: Secret key used to connect S3 service<aws_endpoint_url>: Optional configuration parameter. Can be used to set the URL of the S3 compatible storage.
-
( WITH | NO ) HEADERflag specifies whether the CSV file has a header, in which case it will be parsed as a map, or it doesn’t have a header, in which case it will be parsed as a list.If the
WITH HEADERoption is set, the very first line in the file will be parsed as the header, and any remaining rows will be parsed as regular rows. The value bound to the row variable will be a map of the form:{ ( "header_field" : "row_value" )? ( , "header_field" : "row_value" )* }If the
NO HEADERoption is set, then each row is parsed as a list of values. The contents of the row can be accessed using the list index syntax. Note that in this mode, there are no restrictions on the number of values a row contains. This isn’t recommended, as the user must manually handle the varying number of values in a row.
-
IGNORE BADflag specifies whether rows containing errors should be ignored or not. If it’s set, the parser attempts to return the first valid row from the CSV file. If it isn’t set, an exception will be thrown on the first invalid row encountered. -
DELIMITER <delimiter-string>option enables the user to specify the CSV delimiter character. If it isn’t set, the default delimiter character,is assumed. -
QUOTE <quote-string>option enables the user to specify the CSV quote character. If it isn’t set, the default quote character"is assumed. -
NULLIF <nullif-string>option enables you to specify a sequence of characters that will be parsed as null. By default, all empty columns in Memgraph are treated as empty strings, so if this option is not used, no values will be treated as null. -
<variable-name>is a symbolic name representing the variable to which the contents of the parsed row will be bound to, enabling access to the row contents later in the query. The variable doesn’t have to be used in any subsequent clause.
LOAD CSV clause specificities
When using the LOAD CSV clause please keep in mind:
-
The parser parses the values as strings so it’s up to the user to convert the parsed row values to the appropriate type. This can be done using the built-in conversion functions such as
ToInteger,ToFloat,ToBooleanetc. Consult the documentation on the available conversion functions.If all values are indeed strings and the file has a header, you can import data using the following query:
LOAD CSV FROM "/people.csv" WITH HEADER AS row CREATE (p:People) SET p += row; -
The
LOAD CSVclause is not a standalone clause, meaning a valid query must contain at least one more clause, for example:LOAD CSV FROM "/people.csv" WITH HEADER AS row CREATE (p:People) SET p += row;In this regard, the following query will throw an exception:
LOAD CSV FROM "/file.csv" WITH HEADER AS row;Adding a
MATCHorMERGEclause before LOAD CSV allows you to match certain entities in the graph before running LOAD CSV, optimizing the process as matched entities do not need to be searched for every row in the CSV file.But, the
MATCHorMERGEclause can be used prior theLOAD CSVclause only if the clause returns only one row. Returning multiple rows before calling theLOAD CSVclause will cause a Memgraph runtime error. -
The
LOAD CSVclause can be used at most once per query, so queries like the one below will throw an exception:LOAD CSV FROM "/x.csv" WITH HEADER as x LOAD CSV FROM "/y.csv" WITH HEADER as y CREATE (n:A {p1 : x, p2 : y});
Load from remote sources
The LOAD CSV clause supports loading files from HTTP/HTTPS/FTP URLs and S3 buckets.
Load from HTTP/HTTPS/FTP
When loading from HTTP, HTTPS, or FTP URLs, the file will be downloaded to the /tmp directory before being imported:
LOAD CSV FROM "https://public-assets.memgraph.com/import-data/load-csv-cypher/one-type-nodes/people_nodes_wh.csv" WITH HEADER AS row
CREATE (n:Person {id: row.id, name: row.name});
You can also use FTP URLs:
LOAD CSV FROM "ftp://example.com/data/nodes.csv" WITH HEADER AS row
CREATE (n:Node) SET n += row;
Load from S3
To load files from S3, you can provide AWS credentials in three ways:
1. Using WITH CONFIG clause (Recommended for query-specific credentials)
LOAD CSV FROM "s3://my-bucket/path/to/file.csv"
WITH CONFIG {
  aws_region: "us-east-1",
  aws_access_key: "YOUR_ACCESS_KEY",
  aws_secret_key: "YOUR_SECRET_KEY"
}
WITH HEADER AS row
CREATE (n:Node) SET n += row;
For S3-compatible services (like MinIO), you can also specify the endpoint URL:
LOAD CSV FROM "s3://my-bucket/data/nodes.csv"
WITH CONFIG {
  aws_region: "us-east-1",
  aws_access_key: "YOUR_ACCESS_KEY",
  aws_secret_key: "YOUR_SECRET_KEY",
  aws_endpoint_url: "https://s3-compatible-service.example.com"
}
WITH HEADER AS row
CREATE (n:Node) SET n += row;
2. Using environment variables
Set environment variables before starting Memgraph:
export AWS_REGION="us-east-1"
export AWS_ACCESS_KEY="YOUR_ACCESS_KEY"
export AWS_SECRET_KEY="YOUR_SECRET_KEY"
export AWS_ENDPOINT_URL="https://s3-compatible-service.example.com"  # Optional
Then you can load files without specifying credentials in the query:
LOAD CSV FROM "s3://my-bucket/path/to/file.csv" WITH HEADER AS row
CREATE (n:Node) SET n += row;
3. Using database settings
Set database-level AWS credentials:
SET DATABASE SETTING 'aws.region' TO 'us-east-1';
SET DATABASE SETTING 'aws.access_key' TO 'YOUR_ACCESS_KEY';
SET DATABASE SETTING 'aws.secret_key' TO 'YOUR_SECRET_KEY';
SET DATABASE SETTING 'aws.endpoint_url' TO 'https://s3-compatible-service.example.com';  -- Optional
Then load files without credentials in the query:
LOAD CSV FROM "s3://my-bucket/path/to/file.csv" WITH HEADER AS row
CREATE (n:Node) SET n += row;
Credential precedence: If credentials are provided in multiple ways, the order of precedence is:
- WITH CONFIG clause in the query (highest priority)
- Environment variables
- Database settings (lowest priority)
When loading files from remote locations (HTTP, FTP, or S3), the file is first
downloaded to /tmp before being loaded into memory. Ensure you have sufficient
disk space for large files. The download can be interrupted using TERMINATE TRANSACTIONS <tx_id> without waiting for the full download to complete. To
find the transaction ID, use SHOW TRANSACTIONS.
Use file.download_conn_timeout_sec run-time configuration to specify the connection timeout when establishing a connection to the remote server.
| Option | Required | Description |
|---|---|---|
| aws_region | Yes | The AWS region where your S3 bucket is located (e.g., “us-east-1”) |
| aws_access_key | Yes | Your AWS access key ID |
| aws_secret_key | Yes | Your AWS secret access key |
| aws_endpoint_url | No | Custom endpoint URL for S3-compatible services |
Increase import speed
The LOAD CSV clause will create relationships much faster and consequently
speed up data import if you create indexes on nodes or
node properties once you import them:
CREATE INDEX ON :Node(id);If the LOAD CSV clause is merging data instead of creating it, create indexes before running the LOAD CSV clause.
You can also speed up import if you switch Memgraph to analytical storage mode. In the analytical storage mode there are no ACID guarantees besides manually created snapshots but it does increase the import speed up to 6 times with 6 times less memory consumption. After import you can switch the storage mode back to transactional and enable ACID guarantees.
You can switch between modes within the session using the following query:
STORAGE MODE IN_MEMORY_{TRANSACTIONAL|ANALYTICAL};If you use IN_MEMORY_ANALYTICAL mode and have nodes and relationships stored in
separate CSV files, you can run multiple concurrent LOAD CSV queries to import data even faster.
In order to achieve the best import performance, split your nodes and relationships
files into smaller files and run multiple LOAD CSV queries in parallel.
The key is to run all LOAD CSV queries, which create nodes first. After that, run
all LOAD CSV queries that create relationships.
The LOAD CSV clause can handle CSVs that are compressed with gzip or bzip2. This
can speed up the time it takes to fetch and/or load the file.
If you are using on-disk storage mode, consider using Edge import mode to get the best import performance.
Import files WITH and NO HEADER
The goal of this example is to import two CSV files.
One file contains data we will use to create nodes labeled :Person, and the
other file will be used to connect those nodes with the :IS_FRIENDS_WITH relationship.
There are also two variations of the files: files with a header and files without a header.
Download the files
people_nodes_wh.csv
The file contains the following data:id,name,label 100,Daniel,Person 101,Alex,Person 102,Sarah,Person 103,Mia,Person 104,Lucy,Personpeople_relationships_wh.csv
The file contains the following data:id_from,id_to,type 100,101,IS_FRIENDS_WITH 100,102,IS_FRIENDS_WITH 100,103,IS_FRIENDS_WITH 101,103,IS_FRIENDS_WITH 102,104,IS_FRIENDS_WITH
Check the location of the CSV files
If you are working with Docker, copy the files from your local directory into the Docker container so that Memgraph can access them.
Import nodes
These CSV files have a header, which means the HEADER option of the LOAD CSV clause needs
to be set to WITH. Each row will be parsed as a map, and the fields can be accessed using the
property lookup syntax (e.g. id:row.id).
The following query will load row by row from the people_nodes_wh CSV file, and create a
new node for each row with properties based on the parsed row values:
LOAD CSV FROM "/path-to/people_nodes_wh.csv" WITH HEADER AS row
CREATE (p:row.label {id: row.id, name: row.name});
If successful, you should receive an Empty set (0.014 sec) message.
Notice how *node labels can be dynamically created from the CSV file.
Create indexes
Creating an index on a
property used to connect nodes with relationships, in this case, the id
property of the :Person nodes, will speed up the import of relationships,
especially with large datasets:
CREATE INDEX ON :Person(id);Import relationships
Import the data from the people_relationships_wh.csv file:
LOAD CSV FROM "/path-to/people_relationships_wh.csv" WITH HEADER AS row
MATCH (p1:Person {id: row.id_from}), (p2:Person {id: row.id_to})
CREATE (p1)-[:row.type]->(p2);
If successful, you should receive an Empty set (0.014 sec) message.
Notice how relationship types can be dynamically created from the CSV file.
Final result
Run the following query to see how the imported data looks as a graph:
MATCH p=()-[]-() RETURN p;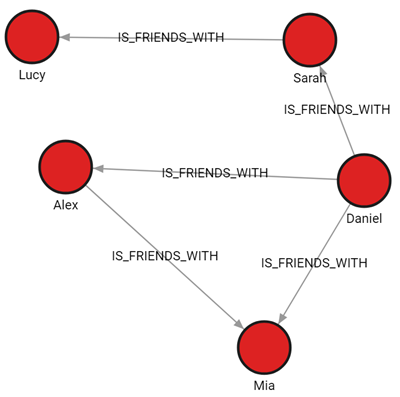
Import data from a single CSV file containing both nodes and relationships
This example will show how to use set of Cypher queries to import data into Memgraph from a single CSV file containing both nodes and relationships. This file has header row.
The people_friendship.csv file is structured to contain both people and their relationships:
type: Indicates the type of record. It has two possible values:PERSONfor individual records andIS_FRIENDfor relationships.id: Unique identifier for a person. This is filled only forPERSONrecords.name: Name of the person. This is also filled only forPERSONrecords.id_fromandid_to: Used to denote relationships. ForIS_FRIENDrecords,id_fromis the ID of the person from whom the friendship originates, andid_tois the ID of the friend.
This structure allows representation of both nodes (persons) and their relationships (friendships) within a single CSV file.
Download the file
people_friendship.csv. The file contains the following data:
type,id,name,id_from,id_to
PERSON,100,Daniel,,
PERSON,101,Alex,,
PERSON,102,Sarah,,
PERSON,103,Mia,,
PERSON,104,Lucy,,
IS_FRIEND,,,100,101
IS_FRIEND,,,100,102
IS_FRIEND,,,100,103
IS_FRIEND,,,101,103
IS_FRIEND,,,102,104
Import nodes
First, import the individual records (people) from the CSV file. Only rows with non-empty id and name columns are processed.
LOAD CSV FROM "/path-to/people_friendship.csv" WITH HEADER AS row
WITH row WHERE row.type = 'PERSON'
CREATE (:Person {id: row.id, name: row.name});
Create indexes
Create an index on the id property of :Person nodes to enhance the performance of the relationship import process.
CREATE INDEX ON :Person(id);Import relationships
Finally, import the relationships from the CSV file, focusing on rows where id_from and id_to are not empty.
LOAD CSV FROM "/path-to/people_friendship.csv" WITH HEADER AS row
WITH row WHERE row.type = 'IS_FRIEND'
MATCH (p1:Person {id: row.id_from}), (p2:Person {id: row.id_to})
CREATE (p1)-[:IS_FRIENDS_WITH]->(p2);
Final result
Run the following query to see how the imported data looks as a graph:
MATCH p=()-[]-() RETURN p;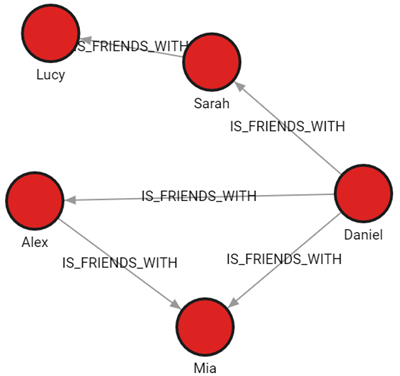
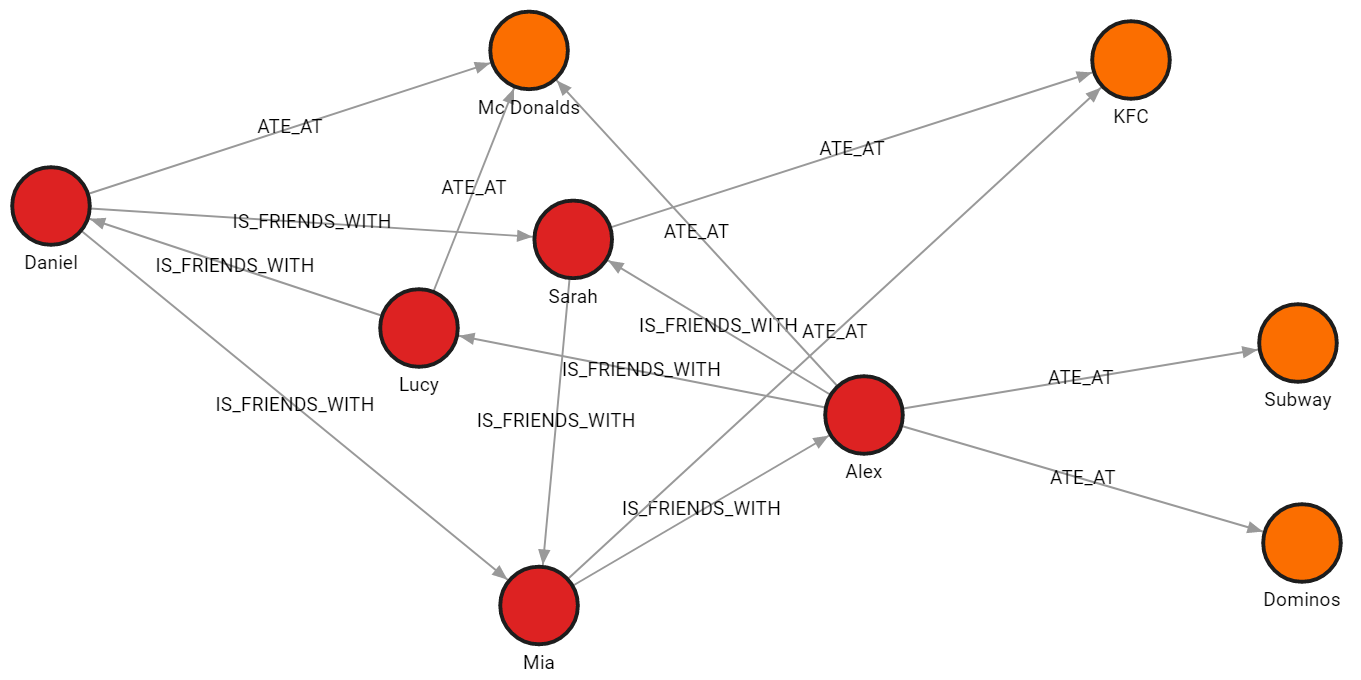
Import multiple CSV files with distinct graph objects
In this example, the data is split across four files, each file contains nodes of a single label or relationships of a single type. All files have a header.
Download the files
-
people_nodes.csvis used to create nodes labeled:Person.
The file contains the following data:id,name,age,city 100,Daniel,30,London 101,Alex,15,Paris 102,Sarah,17,London 103,Mia,25,Zagreb 104,Lucy,21,Paris -
restaurants_nodes.csvis used to create nodes labeled:Restaurants.
The file contains the following data:id,name,menu 200,Mc Donalds,Fries;BigMac;McChicken;Apple Pie 201,KFC,Fried Chicken;Fries;Chicken Bucket 202,Subway,Ham Sandwich;Turkey Sandwich;Foot-long 203,Dominos,Pepperoni Pizza;Double Dish Pizza;Cheese filled Crust -
people_relationships.csvis used to connect people with the:IS_FRIENDS_WITHrelationship.
The file contains the following data:first_person,second_person,met_in 100,102,2014 103,101,2021 102,103,2005 101,104,2005 104,100,2018 101,102,2017 100,103,2001 -
restaurants_relationships.csvis used to connect people with restaurants using the:ATE_ATrelationship.
The file contains the following data:PERSON_ID,REST_ID,liked 100,200,true 103,201,false 104,200,true 101,202,false 101,203,false 101,200,true 102,201,true
Check the location of the CSV files
If you are working with Docker, copy the files from your local directory into the Docker container so that Memgraph can access them.
Import nodes
The CSV files have a header, which means the HEADER option of the LOAD CSV
clause needs to be set to WITH. Each row will be parsed as a map, and the
fields can be accessed using the property lookup syntax (e.g. id: row.id).
The following query will load row by row from the file, and create a new node for each row with properties based on the parsed row values:
LOAD CSV FROM "/path-to/people_nodes_wh.csv" WITH HEADER AS row
CREATE (n:Person {id: row.id, name: row.name, age: ToInteger(row.age), city: row.city});
In the same manner, the following query will create new nodes for each restaurant:
LOAD CSV FROM "/path-to/restaurants_nodes.csv" WITH HEADER AS row
CREATE (n:Restaurant {id: row.id, name: row.name, menu: row.menu});
Create indexes
Creating an index on a property used to connect nodes
with relationships, in this case, the id property of the :Person nodes,
will speed up the import of relationships, especially with large datasets:
CREATE INDEX ON :Person(id);Import relationships
The following query will create relationships between the people nodes:
LOAD CSV FROM "/path-to/people_relationships.csv" WITH HEADER AS row
MATCH (p1:Person {id: row.first_person})
MATCH (p2:Person {id: row.second_person})
CREATE (p1)-[f:IS_FRIENDS_WITH]->(p2)
SET f.met_in = row.met_in;
The following query will create relationships between people and restaurants where they ate:
LOAD CSV FROM "/path-to/restaurants_relationships.csv" WITH HEADER AS row
MATCH (p1:Person {id: row.PERSON_ID})
MATCH (re:Restaurant {id: row.REST_ID})
CREATE (p1)-[ate:ATE_AT]->(re)
SET ate.liked = ToBoolean(row.liked);
Final result
Run the following query to see how the imported data looks as a graph:
MATCH p=()-[]-() RETURN p;