CSV file import
The CSV file import tool reads row by row from loaded CSV files, each containing separate data for a specific node label or a relationship type. It binds the contents of the parsed row to the specified variable and either merges the data with the current dataset or drops the database and starts from scratch, depending on the user’s choice.
For larger datasets, it is still recommended to use LOAD CSV as the best practice for importing. The CSV file import tool is convenient for importing smaller amounts of data or for providing code snippets of Cypher queries for import, eliminating the struggle of constructing them yourself.
Import files WITH and NO HEADER
The goal of this example is to import two CSV files.
One file contains data we will use to create nodes labeled :Person and the
other file will be used to connect those nodes with the :IS_FRIENDS_WITH
relationship.
There are also two variations of the files, files with a header and files without a header.
Download the files
people_nodes_wh.csv
This file contains the following data:id,name 100,Daniel 101,Alex 102,Sarah 103,Mia 104,Lucypeople_relationships_wh.csv
The file contains the following data:id_from,id_to 100,101 100,102 100,103 101,103 102,104
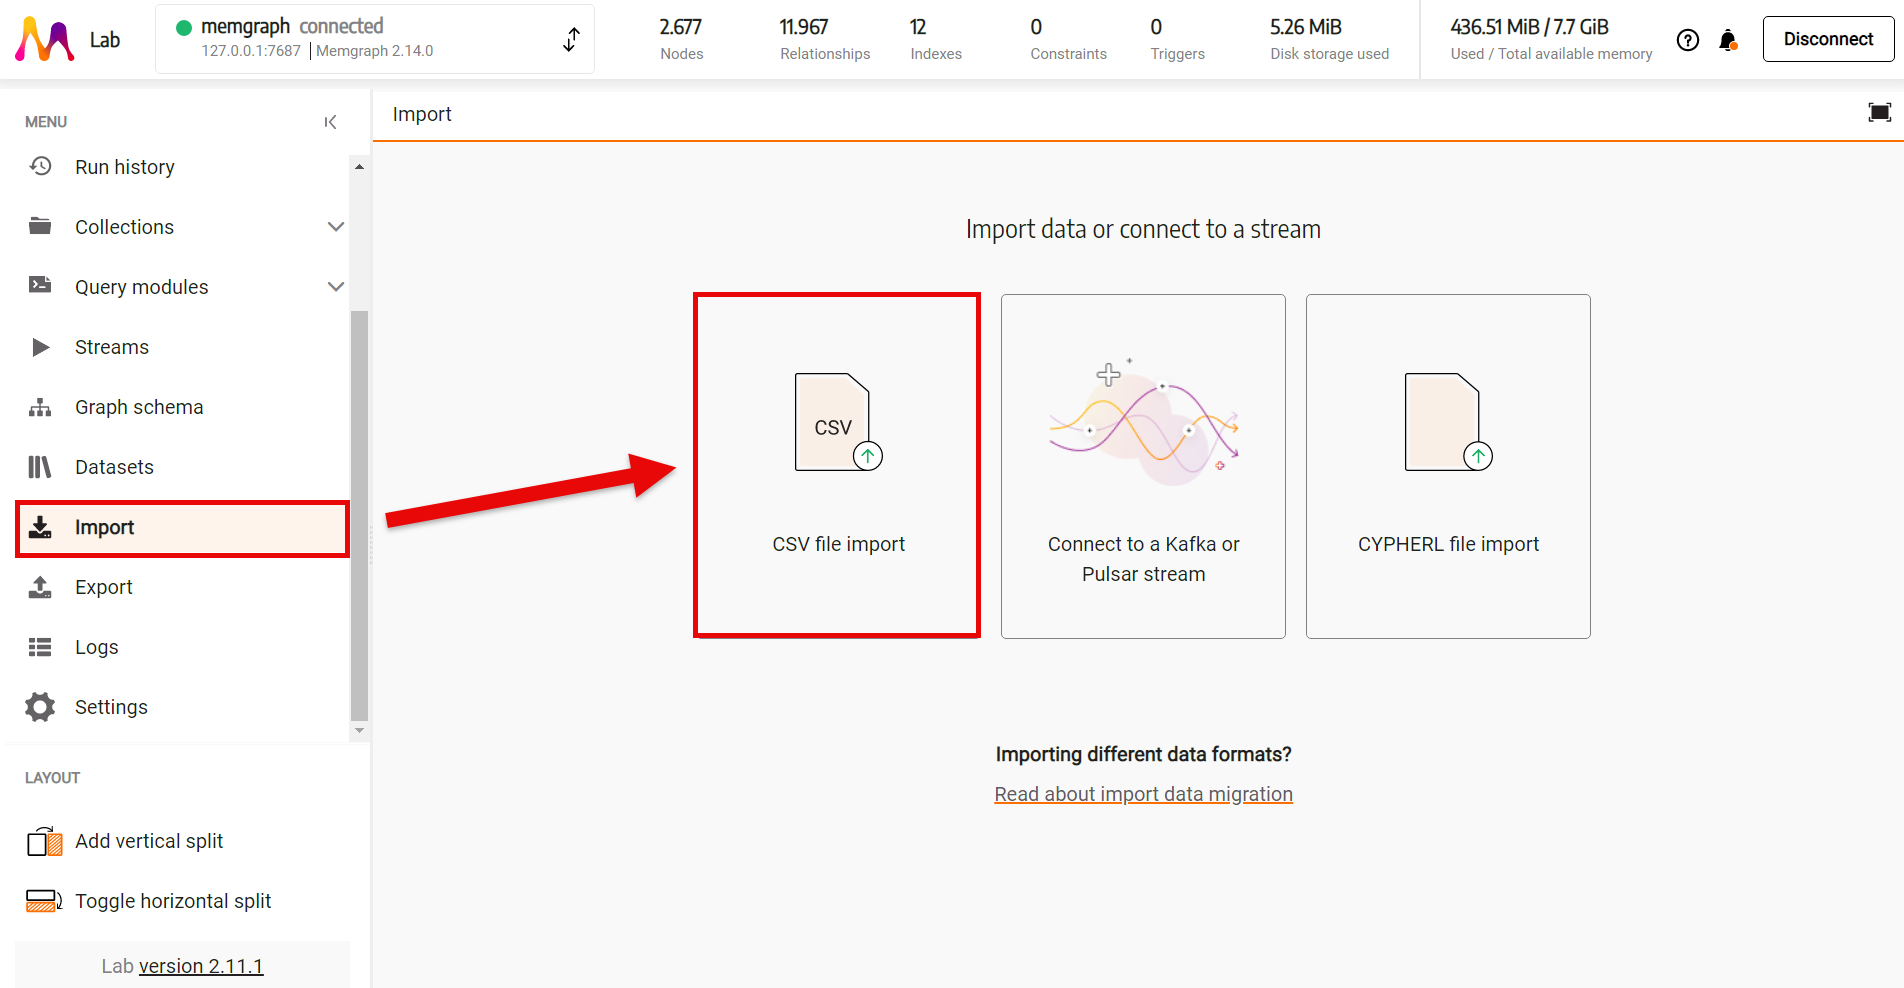
Upload files
Upload your files by selecting them from your local filesystem or using a drag and drop method. Once all your files are uploaded, proceed to configure each one separately.
Let’s start by configuring the nodes by clicking on the people_nodes.csv file.

If your CSV files use a delimiter other than a comma, you can adjust the default delimiter before uploading the files:

Alternatively, you can set a specific delimiter for each file after uploading, which is useful if your files use different delimiters:

Configure nodes
After clicking on the + Add node button for our CSV file with a header, make sure you select the checkbox on the left side of the interface indicating that the file has a header row. Just below that checkbox, the preview of the detected properties and the first row of your file will be displayed.
During configuration, start by adding a Node label and choose whether to include an index with the label.
Index data carefully as indexes do speed up queries but also take up memory.
Let’s add the label :Person and leave the index checkbox empty since we currently only have one type of node and using an index won’t impact performance.
Next, add properties. In the dropdown, you can choose from the properties identified by the import tool from the header of the file. Select the ones you need and customize each property by renaming it, defining the type and specifying whether it should be Unique, Required or Indexed.
Finally, choose how to handle duplicates: Import everything, Merge or Skip.
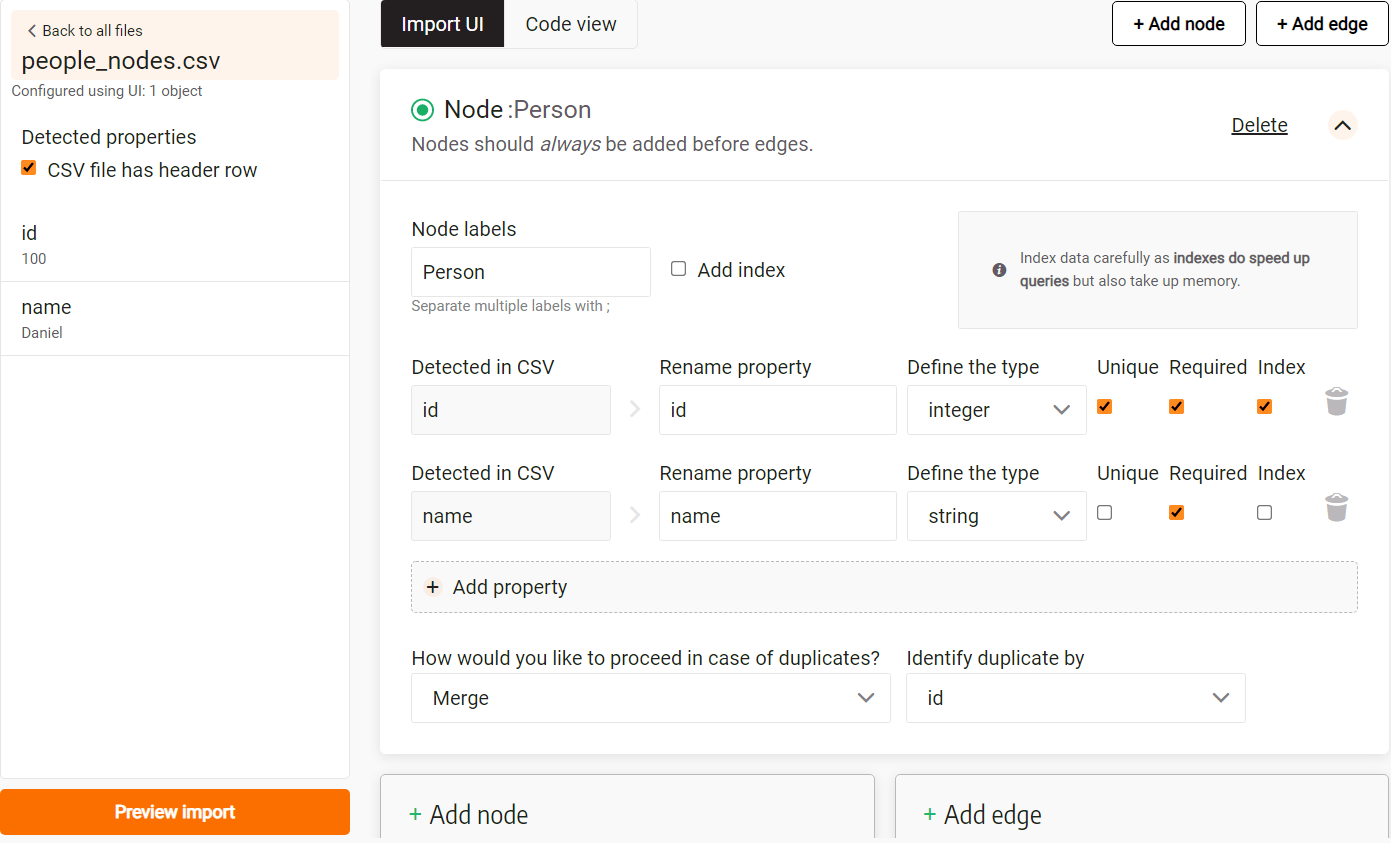
The image below illustrates a possible configuration:
- Since nodes are identified by the
idproperty, the selected checkboxes indicate uniqueness, requirement, and indexing of that property. - For the configuration of the
nameproperty, not all nodes need unique names, but having that property is necessary, so the required checkbox is marked.

Configure relationships
Let’s now start with configuring the relationships by clicking on the
people_relationships.csv file.
After clicking on the + Add edge button for our CSV file with a header,
make sure you select the checkbox on the left side of the interface
indicating that the file has a header row. Again, the preview of the
detected properties and the first row of your file will be displayed.
During configuration, start by adding an Edge type, in our case
IS_FRIENDS_WITH.
Moving on, let’s add the Node labels for both the starting and ending
nodes of the relationship. Since all our nodes have the label :Person,
we’ll select the :Person label for both.
It’s important to understand the schema of your data at this point to
choose the appropriate labels.
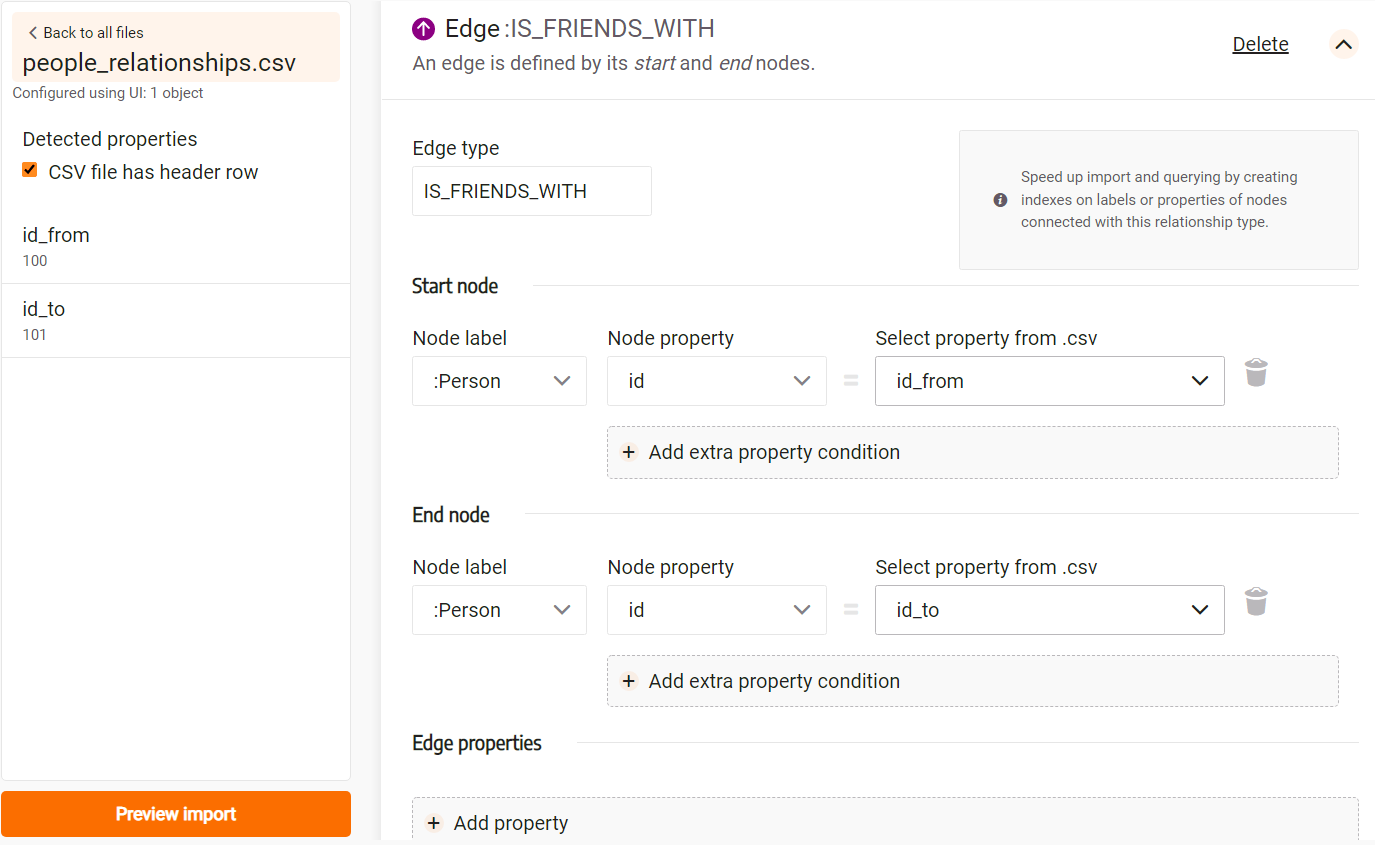
After selecting labels, add the extra property condition that specifies which node property corresponds to the selected property from the CSV file containing relationships.
There’s an option to add edge properties, but since our relationships don’t have any properties, we can skip that step.
Once again, finalize your configuration by choosing how to handle
duplicates: Import everything, Merge or Skip.
The image below illustrates a possible relationship configuration:

Import data
Once you’ve configured your files, Memgraph proceeds through four steps to import data:
- Validating files: Ensuring the consistency of data format across all CSV files.
- Uploading to Memgraph: Uploading files to prepare them for validation.
- Import progress: Setting up the database, creating constraints (selected in the configuration, such as uniqueness and existence), establishing indexes and importing nodes and relationships.
- Database cleanup: Removing the files from Memgraph.
The import process is complete! The data has been successfully imported into
Memgraph and now it’s time to head over to the Query execution window to
explore your dataset and execute queries.

Final result
Run the following query to see how the imported data looks as a graph:
MATCH p=()-[]-() RETURN p;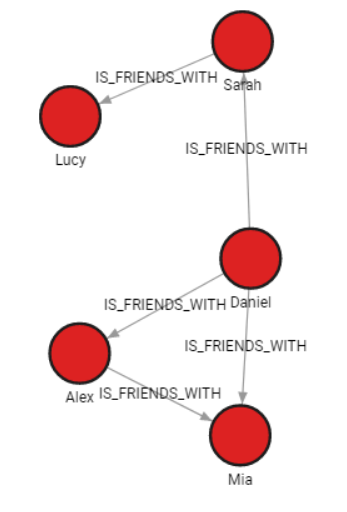
Import data from a single CSV file
In this example, we’ll use the same data from the previous section, but imported from the same CSV file.
Download the file
nodes_and_relationships.csvis used to create nodes and relationships.
The file contains four columns, two containing properties id and name for
nodes labeled with :Person and two containing id property of nodes the
relationship :IS_FRIENDS_WITH is connecting.
Configure nodes
After uploading the file, we need to configure it.
Let’s start by configuring nodes. Select the + Add node button and assign
the label :Person to the nodes. After adding the label, choose properties
from the dropdown from the CSV related to the nodes, in this case, id and
name.
The image below illustrates a possible configuration:
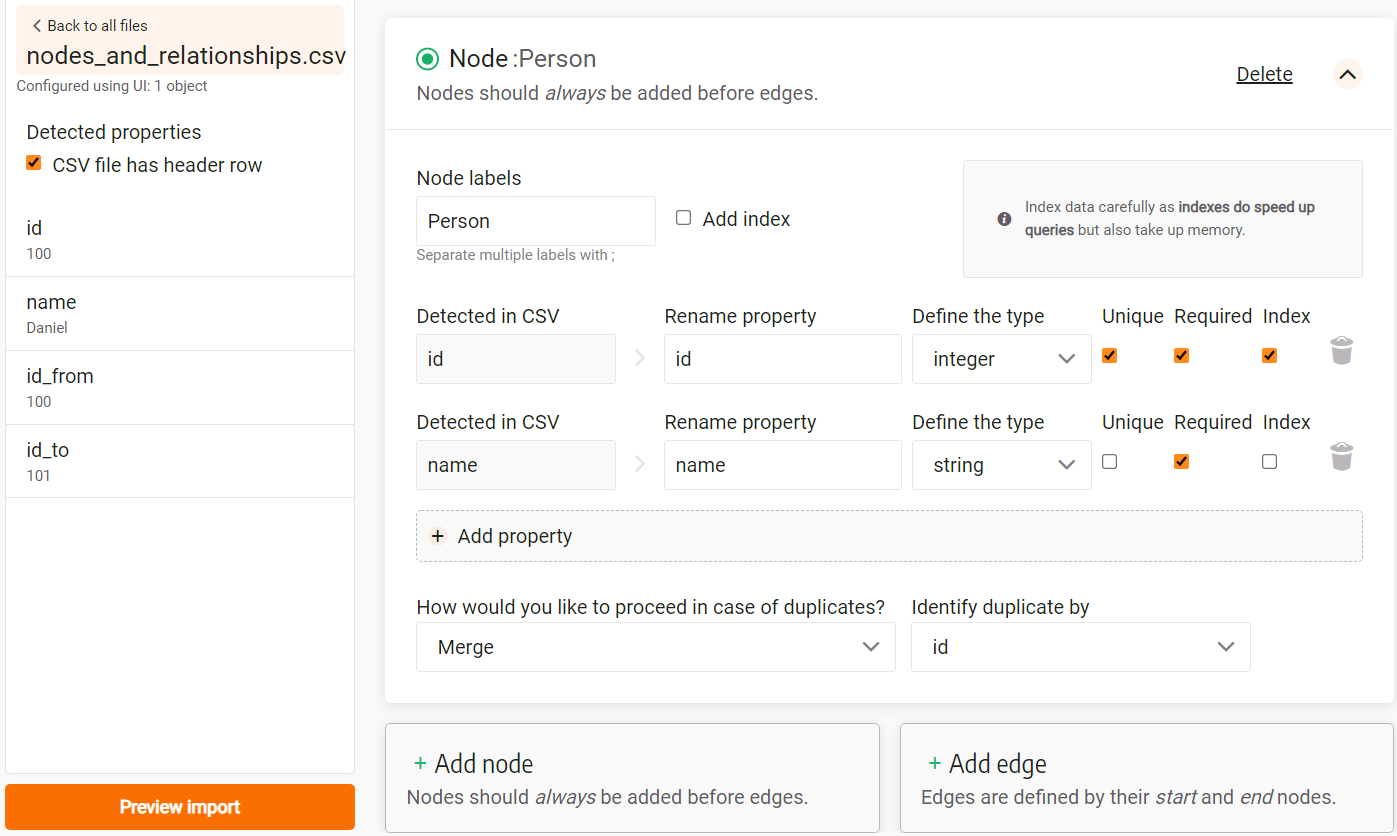
- Since
idis the key property for identifying nodes, it needs to be unique, required and optionally indexed. - The
nameproperty is a string property required for a node, but not every node needs to have a unique name property.
Finally, choose how to handle duplicates: Import everything, Merge or Skip.
Configure relationships
Let’s now configure edges connecting the nodes, with relationship type
IS_FRIENDS_WITH.
After selecting + Add Edge, assign the IS_FRIENDS_WITH relationship type.
We now need to choose the Start node and the End node label.
Since relationship type IS_FRIENDS_WITH only connects nodes with :Person
label, both our Start node label and End node label is going to be
:Person.
Select the properties from the CSV file that corresponds to the id of the person relationship is connecting and add edge properties if they exists.
The image below illustrates a possible configuration:
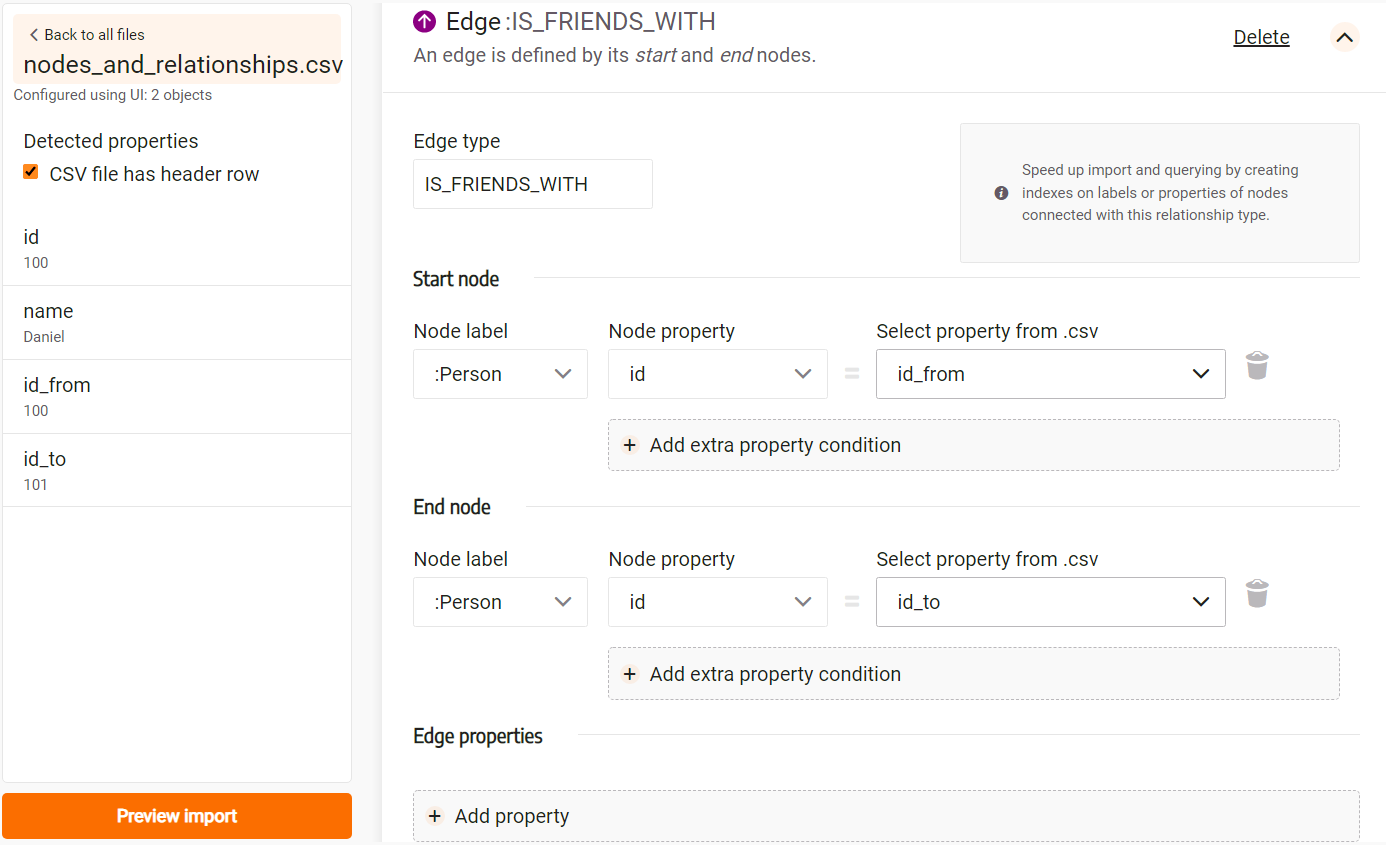
Finally, choose how to handle duplicates: Import everything, Merge or Skip.
Final result
After configuring files and successfully importing data into Memgraph, navigate to the Query execution window and execute the following query to visualize the imported data as a graph:
MATCH p=()-[]-() RETURN p;
Import data from multiple CSV files
In this example, the same data from the previous example is split across four files, each file containing nodes of a single label or relationships of a single type. All files have a header.
Download the files
-
people_nodes.csvis used to create nodes labeled:Person.
The file contains the following data:id,name,age,city 100,Daniel,30,London 101,Alex,15,Paris 102,Sarah,17,London 103,Mia,25,Zagreb 104,Lucy,21,Paris -
restaurants_nodes.csvis used to create nodes labeled:Restaurants.
The file contains the following data:id,name,menu 200,Mc Donalds,Fries;BigMac;McChicken;Apple Pie 201,KFC,Fried Chicken;Fries;Chicken Bucket 202,Subway,Ham Sandwich;Turkey Sandwich;Foot-long 203,Dominos,Pepperoni Pizza;Double Dish Pizza;Cheese filled Crust -
people_relationships.csvis used to connect people with the:IS_FRIENDS_WITHrelationship.
The file contains the following data:first_person,second_person,met_in 100,102,2014 103,101,2021 102,103,2005 101,104,2005 104,100,2018 101,102,2017 100,103,2001 -
restaurants_relationships.csvis used to connect people with restaurants using the:ATE_ATrelationship.
The file contains the following data:PERSON_ID,REST_ID,liked 100,200,true 103,201,false 104,200,true 101,202,false 101,203,false 101,200,true 102,201,true
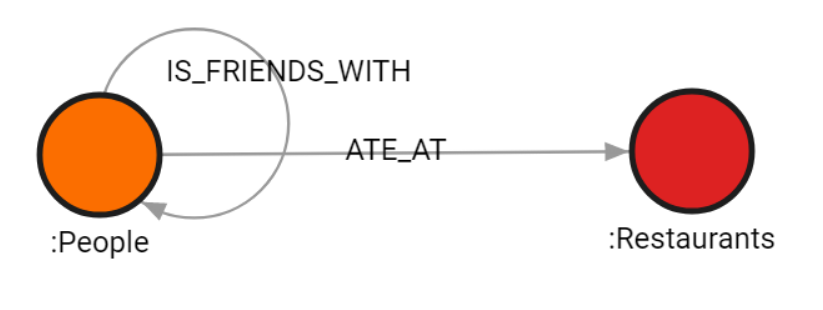
Data schema
When configuring files, it’s important to understand the schema of the data being imported.
The image below illustrates the structure of the data schema:
Configure nodes
After uploading all four files in the import window, we need to configure each
one individually. Let’s start by configuring the files containing nodes,
people_nodes.csv and restaurants_nodes.csv.
For the people_nodes.csv file, we’ll assign the :People label. Since we
now have more than one type of node labels, we’ll add an index to enhance the
query speed.
Next, let’s add properties. In the dropdown, select all available properties:
id, name, age and city.
The image below illustrates a possible configuration:
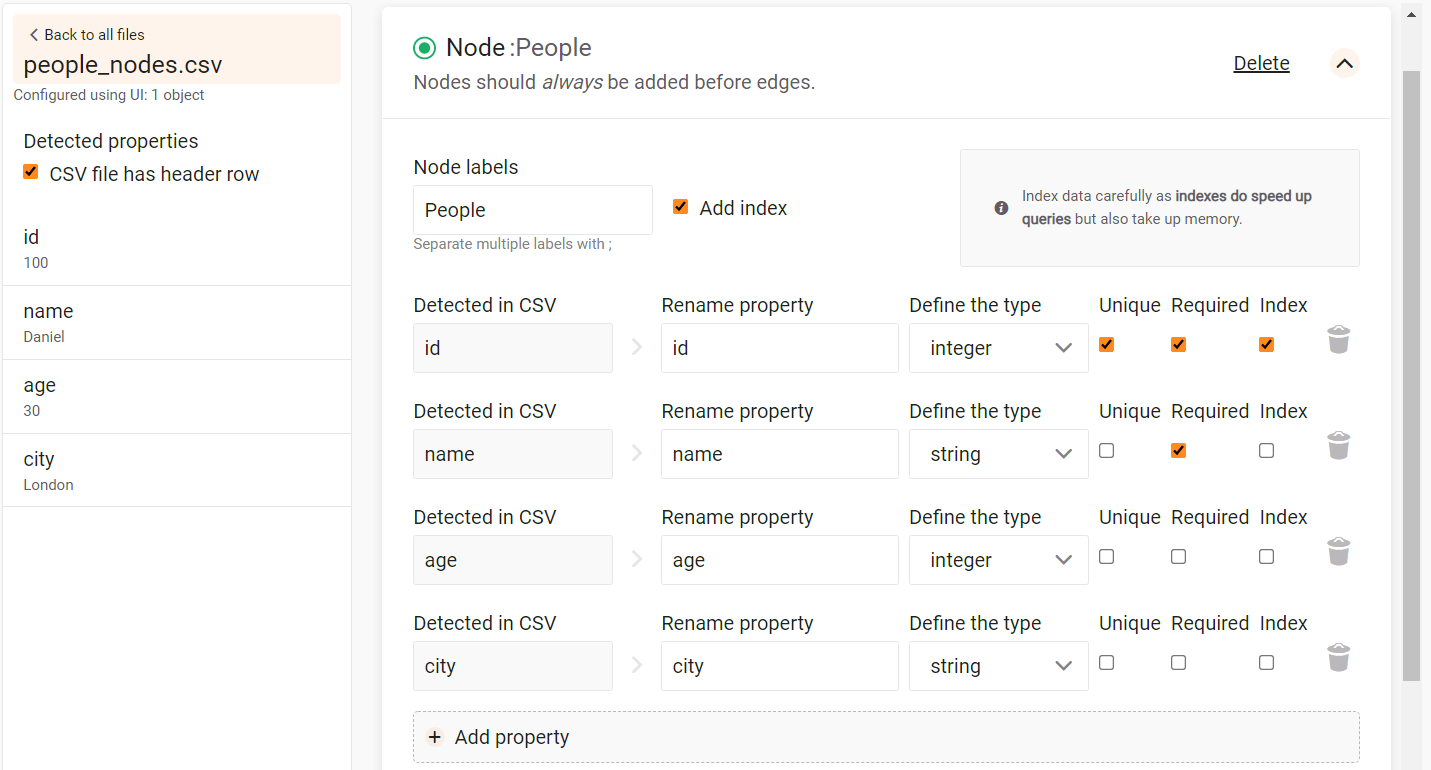
- Since
idis the key property for identifying nodes, it needs to be unique, required and optionally indexed. - The
nameproperty is a string property required for a node, but not every node needs to have a unique name property. - The
ageproperty is an optional integer property that neither has to exist nor be unique. - The
cityis an optional string property that neither has to exist nor be unique as well.
Finally, choose how to handle duplicates: Import everything, Merge or Skip.
For the restaurant_nodes.csv file, we’ll assign the :Restaurants label and
again add an index to the label.
Next, let’s add properties. In the dropdown, select all available properties:
id, name and menu.
The image below illustrates a possible configuration:

- Since
idis the key property for identifying nodes, it needs to be unique, required and optionally indexed. - The
nameproperty is a string property required for a node, but not every node needs to have a unique name property. - The
menuis an optional string property that neither has to exist nor be unique.
Finally, choose how to handle duplicates: Import everything, Merge or Skip.
Configure relationships
Let’s now configure the files containing relationships, people_relationships.csv
and restaurants_relationships.csv.
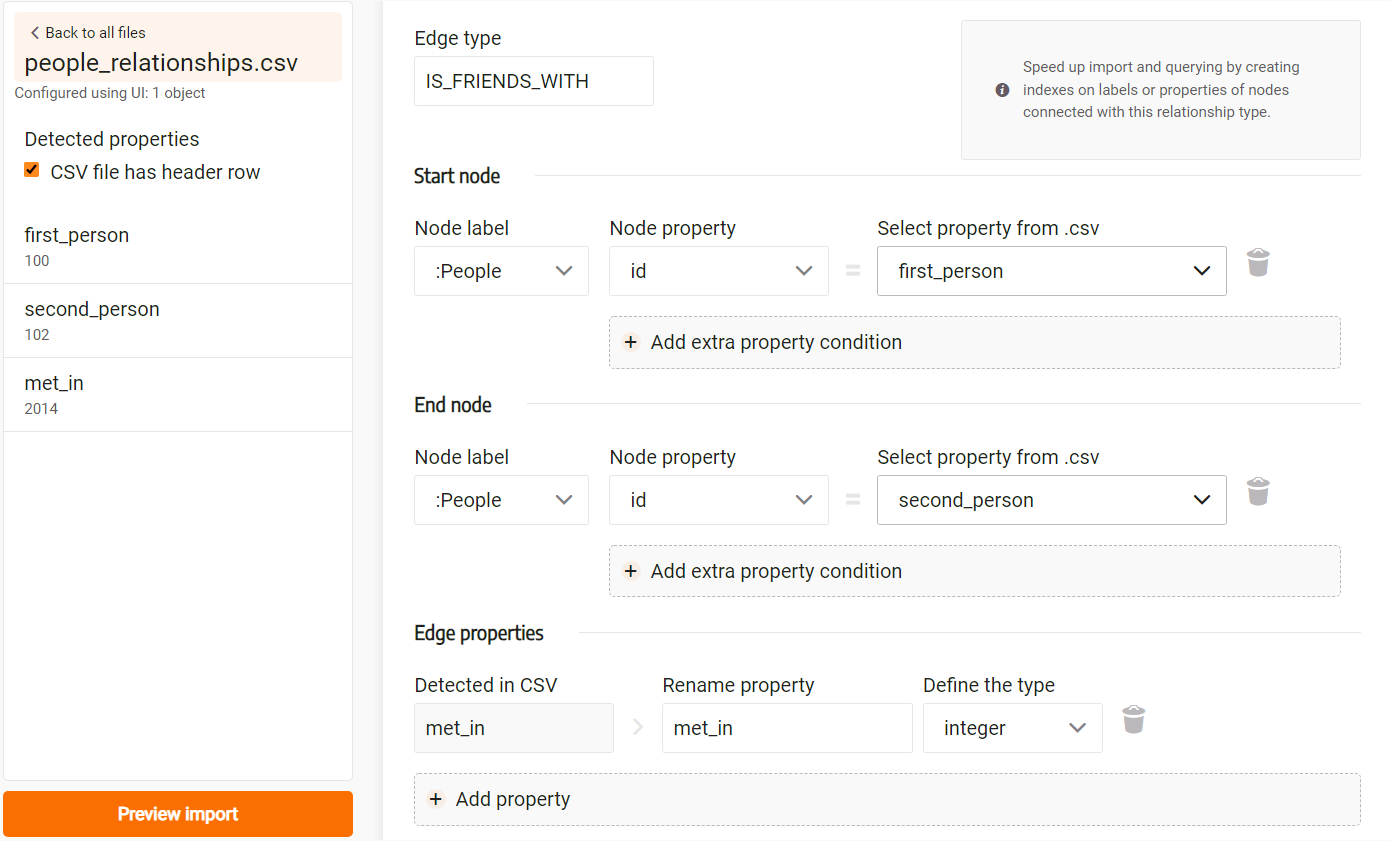
For the people_relationships.csv file, we’ll assign the IS_FRIENDS_WITH
relationship type. We also need to choose the Start node and the
End node label.
For this step, it’s important to know the schema of the data. Since
relationship type IS_FRIENDS_WITH only connects nodes with :People label,
both our Start node label and End node label is going to be :People.
Next, let’s add properties. In the dropdown, select the property met_in.
The image below illustrates a possible configuration:
Finally, choose how to handle duplicates: Import everything, Merge or Skip.
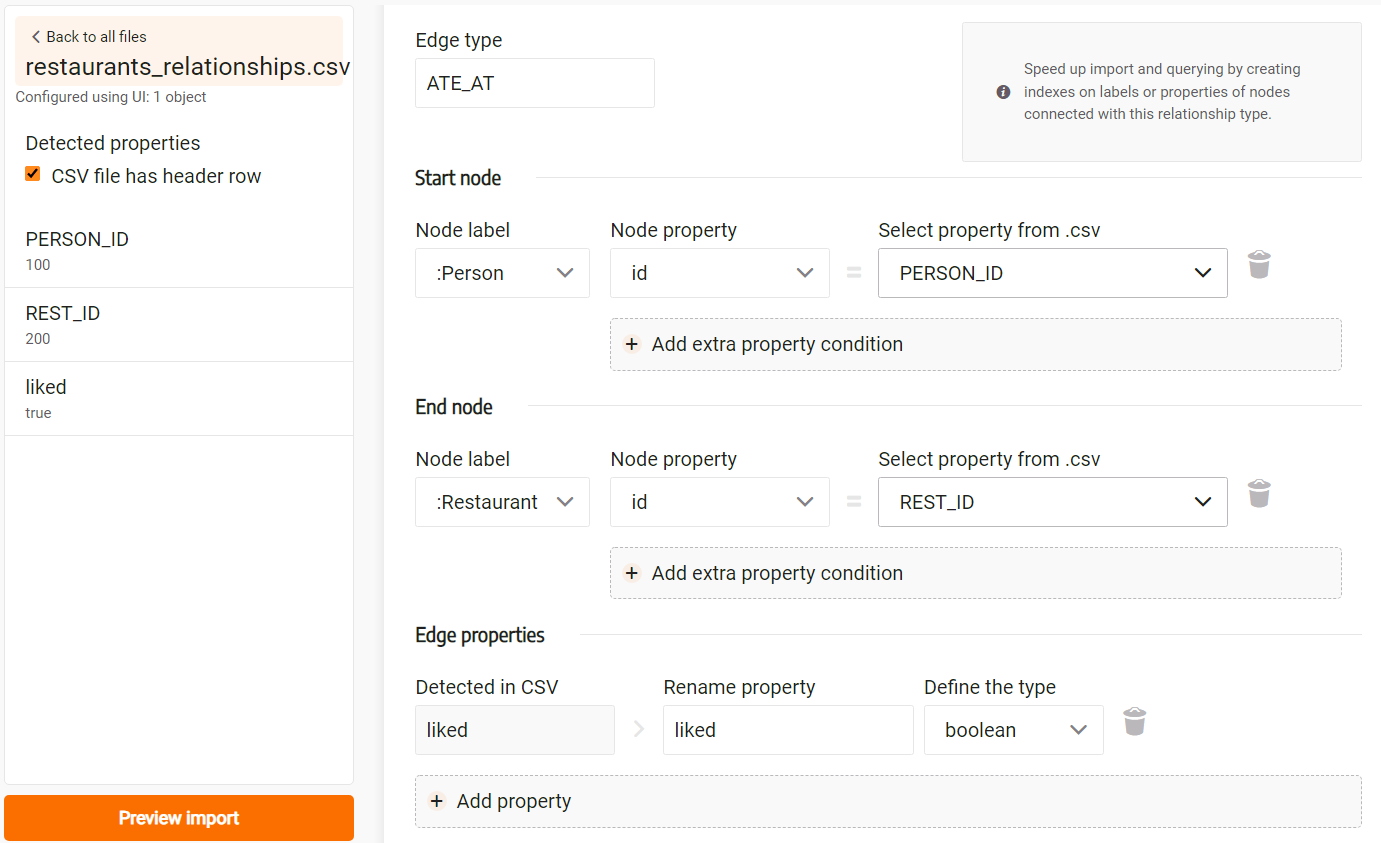
For the restaurants_relationships.csv file, we’ll assign the ATE_AT
relationship type. We also need to choose the Start node and the End node
label. From our data schema, relationship type ATE_AT connects nodes with
:People label to nodes with :Restaurants label.
Next, let’s add properties. In the dropdown, select the property liked.
Since values of that property are either true or false, the type of the
property can be defined as boolean.
The image below illustrates a possible configuration:
Finally, choose how to handle duplicates: Import everything, Merge or Skip.
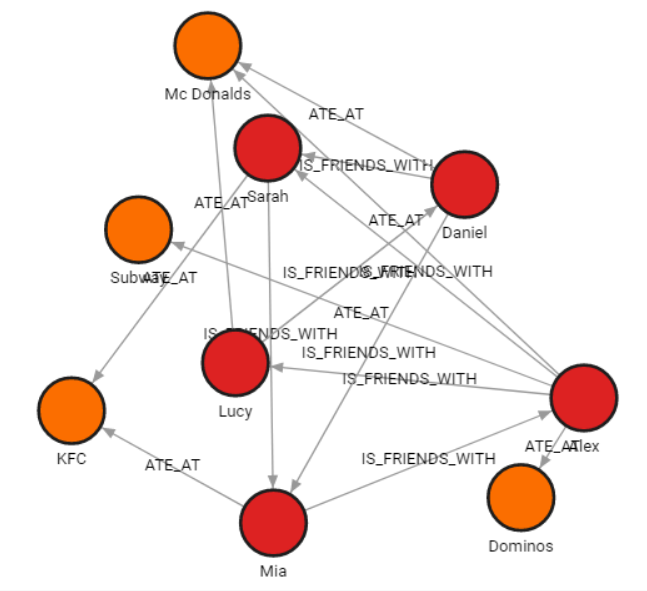
Final result
After configuring files and successfully importing data into Memgraph, navigate to the Query execution window and execute the following query to visualize the imported data as a graph:
MATCH p=()-[]-() RETURN p;