Import Cypher queries (CYPHERL format)
If your data is in the form of Cypher queries (for example, CREATE and MERGE
clauses) within a CYPHERL file it can be imported via the visual interface
Memgraph Lab or mgconsole.
The benefit of importing data using the CYPHERL file is that you need only one file to import both nodes and relationships. But it can be tricky to actually write the queries for creating nodes and relationships yourself.
To speed up import time consider creating indexes on appropriate nodes or node properties. If you are using on-disk storage mode consider using Edge import mode.
Cypher queries can be imported concurrently, speeding up the import process. Read more about concurrent import. Learn more about the shortest path to import data into Memgraph by reading best practices for import.
Import via Memgraph Lab
Once your Memgraph instance is running and you’ve connected to it via Memgraph Lab, go to the Import section. To import your data, select CYPHERL file import. From there, choose to either merge with your current dataset or drop the database and start from scratch.
You can import up to 1 million nodes and relationships via Memgraph Lab using the CYPHERL file.

Import via mgconsole
If you installed and started Memgraph using Docker, follow these steps:
- Open a new terminal and check the Docker container ID by running
docker ps. - Copy the
queries.cypherlto your Docker container. - Run the following command
docker exec -i CONTAINER_ID cat file.cypherl | mgconsoleFor more information about mgconsole options run:
docker exec -i CONTAINER_ID mgconsole --helpExamples
Below, you can find two examples of how to import data within the .cypherl file
based on the complexity of your data:
One type of nodes and relationships
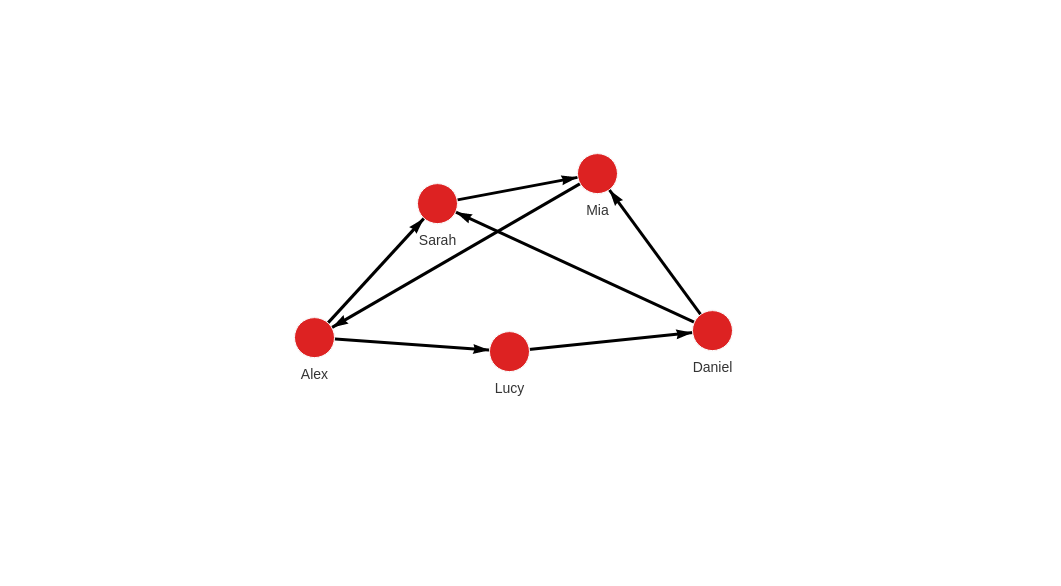
Let’s import data from queries.cypherl file with the following content:
CREATE (:Person {id: "100", name: "Daniel", age: 30, city: "London"});
CREATE (:Person {id: "101", name: "Alex", age: 15, city: "Paris"});
CREATE (:Person {id: "102", name: "Sarah", age: 101, city: "London"});
CREATE (:Person {id: "103", name: "Mia", age: 25, city: "Zagreb"});
CREATE (:Person {id: "104", name: "Lucy", age: 21, city: "Paris"});
MATCH (u:Person), (v:Person) WHERE u.id = "100" AND v.id = "102" CREATE (u)-[:IS_FRIENDS_WITH]->(v);
MATCH (u:Person), (v:Person) WHERE u.id = "100" AND v.id = "103" CREATE (u)-[:IS_FRIENDS_WITH]->(v);
MATCH (u:Person), (v:Person) WHERE u.id = "101" AND v.id = "104" CREATE (u)-[:IS_FRIENDS_WITH]->(v);
MATCH (u:Person), (v:Person) WHERE u.id = "101" AND v.id = "102" CREATE (u)-[:IS_FRIENDS_WITH]->(v);
MATCH (u:Person), (v:Person) WHERE u.id = "102" AND v.id = "103" CREATE (u)-[:IS_FRIENDS_WITH]->(v);
MATCH (u:Person), (v:Person) WHERE u.id = "103" AND v.id = "101" CREATE (u)-[:IS_FRIENDS_WITH]->(v);
MATCH (u:Person), (v:Person) WHERE u.id = "104" AND v.id = "100" CREATE (u)-[:IS_FRIENDS_WITH]->(v);In a CYPHERL file, each Cypher query must be written in a new row.
The first five queries create nodes for people, and the rest of the queries create relationships between these nodes.
If you installed Memgraph using Docker, open a new terminal, position yourself in the directory where the CYPHERL file is located and run the following commands:
- Check the Docker container ID by running
docker ps - Run the following command
docker exec -i CONTAINER_ID cat file.cypherl | mgconsoleThis is how the graph should look like in Memgraph after the import:
Multiple types of nodes and relationships
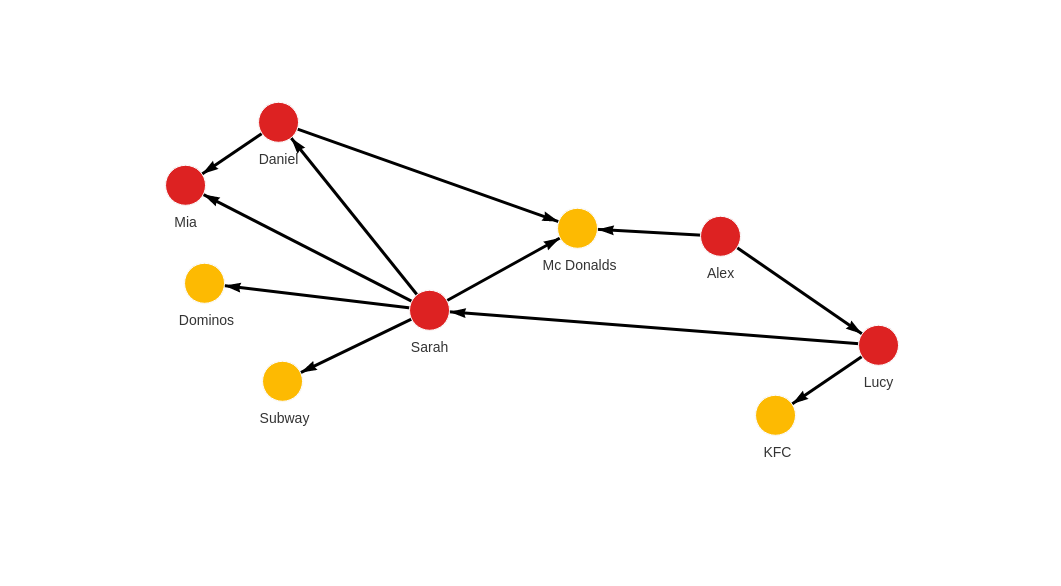
Let’s import data from queries.cypherl file with the following content:
CREATE (p:Person {id: "100", name: "Daniel", age: 30, city: "London"});
CREATE (p:Person {id: "101", name: "Alex", age: 15, city: "Paris"});
CREATE (p:Person {id: "102", name: "Sarah", age: 17, city: "London"});
CREATE (p:Person {id: "103", name: "Mia", age: 25, city: "Zagreb"});
CREATE (p:Person {id: "104", name: "Lucy", age: 21, city: "Paris"});
CREATE (r:Restaurant {id: "200", name: "McDonalds", menu: "Fries BigMac McChicken Apple Pie"});
CREATE (r:Restaurant {id: "201", name: "KFC", menu: "Fried Chicken Fries Chicken Bucket"});
CREATE (r:Restaurant {id: "202", name: "Subway", menu: "Ham Sandwich Turkey Sandwich Foot-long"});
CREATE (r:Restaurant {id: "203", name: "Dominos", menu: "Pepperoni Pizza Double Dish Pizza Cheese filled Crust"});
MATCH (u:Person), (v:Person) WHERE u.id = "100" AND v.id = "103" CREATE (u)-[:IS_FRIENDS_WITH {met_in: "2014"}]->(v);
MATCH (u:Person), (v:Person) WHERE u.id = "101" AND v.id = "104" CREATE (u)-[:IS_FRIENDS_WITH {met_in: "2001"}]->(v);
MATCH (u:Person), (v:Person) WHERE u.id = "102" AND v.id = "100" CREATE (u)-[:IS_FRIENDS_WITH {met_in: "2005"}]->(v);
MATCH (u:Person), (v:Person) WHERE u.id = "102" AND v.id = "103" CREATE (u)-[:IS_FRIENDS_WITH {met_in: "2017"}]->(v);
MATCH (u:Person), (v:Person) WHERE u.id = "103" AND v.id = "104" CREATE (u)-[:IS_FRIENDS_WITH {met_in: "2005"}]->(v);
MATCH (u:Person), (v:Person) WHERE u.id = "104" AND v.id = "102" CREATE (u)-[:IS_FRIENDS_WITH {met_in: "2021"}]->(v);
MATCH (u:Person), (v:Restaurant) WHERE u.id = "100" AND v.id = "200" CREATE (u)-[:ATE_AT {liked: true}]->(v);
MATCH (u:Person), (v:Restaurant) WHERE u.id = "102" AND v.id = "202" CREATE (u)-[:ATE_AT {liked: false}]->(v);
MATCH (u:Person), (v:Restaurant) WHERE u.id = "102" AND v.id = "203" CREATE (u)-[:ATE_AT {liked: false}]->(v);
MATCH (u:Person), (v:Restaurant) WHERE u.id = "102" AND v.id = "200" CREATE (u)-[:ATE_AT {liked: true}]->(v);
MATCH (u:Person), (v:Restaurant) WHERE u.id = "103" AND v.id = "201" CREATE (u)-[:ATE_AT {liked: true}]->(v);
MATCH (u:Person), (v:Restaurant) WHERE u.id = "104" AND v.id = "201" CREATE (u)-[:ATE_AT {liked: false}]->(v);
MATCH (u:Person), (v:Restaurant) WHERE u.id = "101" AND v.id = "200" CREATE (u)-[:ATE_AT {liked: true}]->(v);
The first five queries create nodes for people, and the following four queries create nodes for restaurants. The rest of the queries are used to define relationships between nodes. As said before, you can define different types of nodes and relationships in one file.
If you installed Memgraph using Docker, open a new terminal, position yourself in the directory where the CYPHERL file is located and run the following commands:
- Check the Docker container ID by running
docker ps - Run the following command
docker exec -i CONTAINER_ID cat file.cypherl | mgconsoleThis is how the graph should look like in Memgraph after the import:
Concurrent import
If you are using a client library to import data from your CYPHERL file, you can leverage concurrent import to speed up the import process.
Split a file into smaller chunks of nodes and relationships, which can be imported concurrently. Here is the basic flow:
- Open and read the file with the Cypher queries.
- Split the CYPHERL file into a list of nodes and relationships.
- Split the list of nodes and relationships into smaller chunks.
- Import node chunks concurrently.
- Import relationship chunks concurrently.
For details on how to achieve this, please refer to the documentation of the client library you are using.