Install Memgraph with Docker
Docker is a containerization platform that packages software and its dependencies into isolated environments called containers. Memgraph provides official Docker images to help you quickly set up the database, tools and analytics.
Using a coding agent? Connect it to the Memgraph docs MCP server so it answers from the current docs. In Claude Code:
claude mcp add --transport http memgraph-docs https://mcp-docs.memgraph.comFor Cursor, VS Code and other clients, see MCP server for docs.
This page covers:
- Quickstart: fastest way to run Memgraph with Docker.
- Available Docker images: what each Docker image includes.
- FIPS 140-3 compliant image: running Memgraph in FIPS approved mode.
- Using Docker Compose: if you prefer a multi-containered setup
- Install downloaded image: Load Memgraph from a .tar.gz file.
- Configuration
- Running with cuGraph: GPU-accelerated support.
- Troubleshooting: solutions for common problems.
Quickstart
Run Memgraph MAGE
docker run -p 7687:7687 -p 7444:7444 --name memgraph memgraph/memgraph-mageThis command launches Memgraph MAGE, the main Docker image which includes:
- Memgraph database
- MAGE (Memgraph Advanced Graph Extensions): a library of powerful, ready-to-use graph algorithms (e.g., PageRank, Community Detection)
The container maps the following ports for communication and monitoring:
7687: Used by client applications (e.g., Memgraph Lab, mgconsole, drivers) to connect and execute queries on the Memgraph database.7444: Streams Memgraph logs to Memgraph Lab for real-time monitoring (optional but recommended).
Connect via CLI
The simplest way to execute Cypher queries against Memgraph is through its command-line tool, mgconsole. If you’re running Memgraph in Docker, you can start the CLI with:
docker exec -it memgraph mgconsoleThis connects directly to your running Memgraph instance.
For more detailed instructions, visit our CLI documentation.
Connect via Memgraph Lab
If you prefer more visual approach, Memgraph Lab offers a user-friendly UI to interact with your data and run Cypher queries. You have two options:
Option 1: Run Memgraph Lab via Docker
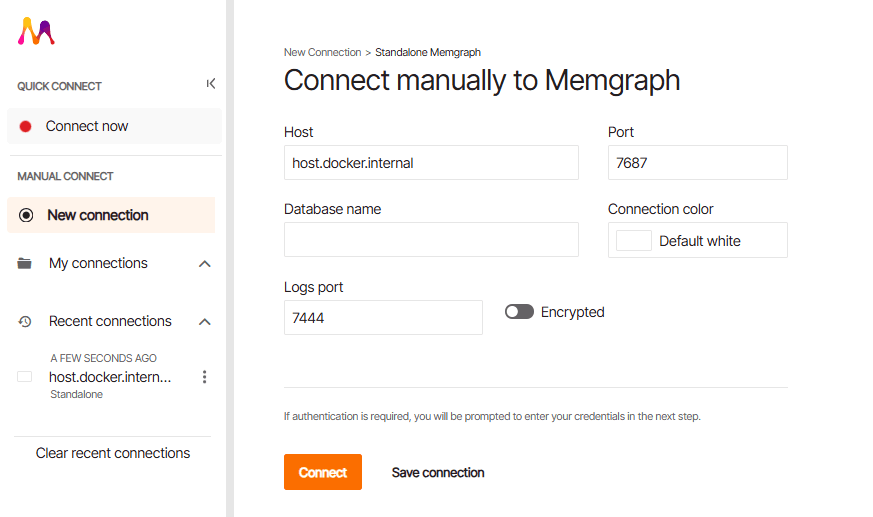
docker run -d -p 3000:3000 --name lab memgraph/labOnce running, open your browser and go to localhost:3000, click on New
Connection, and enter host.docker.internal to connect to your running
instance and start using Memgraph Lab.
Option 2: Download the app
Alternatively, you can download Memgraph Lab and connect it to your existing Memgraph instance.
For more information, visit our Memgraph Lab documentation.
Available Docker images
All Memgraph Docker images are available at Memgraph’s Docker Hub. There you will find the exact Docker image tags you can use to install Memgraph with.
Core images
| Image | Includes |
|---|---|
memgraph/memgraph-mage | Memgraph DB + CLI + MAGE library |
memgraph/memgraph | Memgraph DB + CLI (no graph algorithms) |
Use
memgraph/memgraph-mageunless you have a reason to use the slim or separate components.
Standalone tools
| Image | Description |
|---|---|
memgraph/mgconsole | CLI client to interact with Memgraph |
memgraph/lab | Web interface for querying and visualization |
FIPS 140-3 compliant image
FIPS support is experimental and requires a Memgraph Enterprise license. Enabling it on a database that already has users locks those users out until their passwords are reset — see Upgrading an existing database before you switch.
Memgraph publishes a FIPS 140-3 variant of the memgraph/memgraph image,
tagged with a -fips suffix:
docker pull memgraph/memgraph:3.13.1-fipsIt is a separate image rather than a flag on the standard one, because the difference is in the image contents, not just the configuration.
What differs from the standard image
memgraph/memgraph:3.13.1 | memgraph/memgraph:3.13.1-fips | |
|---|---|---|
| OpenSSL | Stock Ubuntu OpenSSL | OpenSSL + the validated FIPS provider (fips.so) |
OPENSSL_CONF | Distribution default | /etc/ssl/openssl-fips.cnf — activates the FIPS and base providers only |
| Python support | Included | Not included — no Python query modules, no Python auth modules |
| Approved mode | Not available | Opt-in with --fips-mode=true |
Python is excluded deliberately. The Python auth-module wheels (cryptography,
xmlsec) bundle their own statically linked OpenSSL, which would place a
second, unvalidated cryptographic module inside the image on the SAML/JWT
authentication path.
The image is verified at build time: the build fails unless the FIPS provider
is present in OpenSSL’s module directory, reports status: active (a module
that fails its power-on self-test still appears in the provider list), and
supplies the DRBG (Deterministic Random Bit Generator).
There is currently no FIPS variant of memgraph/memgraph-mage. MAGE query modules are
loaded in-process and can carry their own cryptographic primitives, which
approved mode cannot constrain.
Running the image
Pulling the image is not enough — approved mode is opt-in per process. Pass
--fips-mode=true along with your Enterprise license:
docker run -p 7687:7687 -p 7444:7444 --name memgraph \
  -e MEMGRAPH_ENTERPRISE_LICENSE="<your-license-key>" \
  -e MEMGRAPH_ORGANIZATION_NAME="<your-organization>" \
  memgraph/memgraph:3.13.1-fips --fips-mode=true
Without --fips-mode=true the container starts normally and uses the FIPS
provider for anything routed through OpenSSL, but Memgraph does not enforce the
approved-mode restrictions described below.
If approved mode cannot be entered, Memgraph refuses to start with a distinct exit code rather than serving traffic under a compliance claim that is not true:
| Exit code | Meaning |
|---|---|
14 | The OpenSSL FIPS provider is unavailable or not operational |
15 | --password-encryption-algorithm is set to a non-approved algorithm |
16 | No valid Enterprise license |
What approved mode enforces
- Password hashing is restricted to
pbkdf2-sha256(PBKDF2-HMAC-SHA256, 600,000 iterations, 128-bit salt from the module’s DRBG). If you do not set--password-encryption-algorithm, Memgraph selects it automatically; if you set it tobcrypt,sha256orsha256-multiple, startup fails with exit 15. - TLS negotiates a minimum of TLS 1.2 on every connection Memgraph accepts or makes, including replication and the coordinator’s Raft port.
- Pre-computed password hashes (
CREATE USER … IDENTIFIED BY 'bcrypt:$2a$…') are rejected.
Verifying approved mode
Run SHOW FIPS INFO to confirm what is actually in force, including the
identity of the validated module:
SHOW FIPS INFO;+----------------------+----------------------------+
| fips info | value |
+----------------------+----------------------------+
| "enabled" | true |
| "module_name" | "OpenSSL FIPS Provider" |
| "module_version" | "3.1.2" |
| "password_algorithm" | "pbkdf2-sha256" |
| "tls_min_version" | "TLSv1.2" |
+----------------------+----------------------------+On an image that is not in approved mode, enabled is false and the module
fields are empty.
Upgrading an existing database
A password hash cannot be converted between algorithms — that needs the
plaintext password, which Memgraph does not store. Every user hashed with
bcrypt (the default), sha256 or sha256-multiple therefore cannot
authenticate in approved mode, and their passwords must be reset. Memgraph
lists the affected users at startup, before it accepts connections.
The least disruptive approach is to move the hashes across before enabling FIPS, on your existing non-FIPS instance, so nobody is ever locked out:
Switch the hashing algorithm
Restart your current instance with --password-encryption-algorithm=pbkdf2-sha256.
Existing users keep their old hashes and can still log in; only new hashes use
the approved algorithm.
Reset each password
As an administrator, reset every user’s password. This writes a new
pbkdf2-sha256 hash and does not read the old one:
SET PASSWORD FOR alice TO 'new-password';Switch to the FIPS image
Start the -fips image with --fips-mode=true. The startup log should report
no locked-out users.
If you have already enabled FIPS and locked yourself out, recover with
--init-file, which runs before the Bolt server starts and does not
authenticate:
SET PASSWORD FOR admin TO 'new-password';
SET PASSWORD FOR alice TO 'new-password';
docker run -p 7687:7687 --name memgraph \
-e MEMGRAPH_ENTERPRISE_LICENSE="<your-license-key>" \
-e MEMGRAPH_ORGANIZATION_NAME="<your-organization>" \
-v /path/to/reset.cypherl:/etc/memgraph/reset.cypherl:ro \
memgraph/memgraph:3.13.1-fips \
--fips-mode=true --init-file=/etc/memgraph/reset.cypherlThe init file contains plaintext passwords and re-runs on every startup,
resetting those passwords each time. Remove the --init-file flag and delete
the file once you have recovered access.
Init files also do not support comments — every non-empty line is parsed as a
query, so a // line causes a parse error.
Verify image signatures and attestations
Image signing and supply-chain attestations are available for the
memgraph/memgraph and memgraph/memgraph-mage images from version 3.12.0
onwards. Earlier releases are not signed, so cosign verify will report no
signatures for them.
From 3.12.0, Memgraph publishes its Docker images with
Sigstore cosign signatures and attaches two
supply-chain attestations to each image:
- a CycloneDX SBOM (software bill of materials), and
- SLSA build provenance.
Signing is keyless, so verification checks who signed — Memgraph’s release workflow running in GitHub Actions — rather than a static public key.
Install cosign
Follow the cosign installation guide. For example, on Linux (amd64):
curl -fsSL -o cosign https://github.com/sigstore/cosign/releases/latest/download/cosign-linux-amd64
chmod +x cosign && sudo mv cosign /usr/local/bin/
Verify the image signature
Replace <version> with the tag you are verifying (for example 3.12.0). Use
memgraph/memgraph-mage in place of memgraph/memgraph to verify the MAGE
image:
cosign verify \
  --certificate-identity-regexp '^https://github\.com/memgraph/memgraph/\.github/workflows/promote_rc_release\.yml@' \
  --certificate-oidc-issuer 'https://token.actions.githubusercontent.com' \
  memgraph/memgraph:<version>
A successful run prints a report confirming that the cosign claims, the
transparency-log entry, and the code-signing certificate were all validated. If
the image is unsigned or the signing identity does not match, cosign exits with
an error such as no matching signatures.
The two --certificate-* flags are the trust anchor: they require the signature
to come from Memgraph’s release workflow (promote_rc_release.yml in the
memgraph/memgraph repository) running in GitHub Actions.
Inspect the SBOM and provenance
The following commands verify the attestation and extract its contents; they
pipe through jq and base64.
Verify and save the CycloneDX SBOM to a file:
cosign verify-attestation --type cyclonedx \
  --certificate-identity-regexp '^https://github\.com/memgraph/memgraph/\.github/workflows/promote_rc_release\.yml@' \
  --certificate-oidc-issuer 'https://token.actions.githubusercontent.com' \
  memgraph/memgraph:<version> \
  | jq -r '.payload' | base64 -d | jq '.predicate' > sbom.cdx.json
Verify the SLSA build provenance:
cosign verify-attestation --type slsaprovenance \
  --certificate-identity-regexp '^https://github\.com/memgraph/memgraph/\.github/workflows/promote_rc_release\.yml@' \
  --certificate-oidc-issuer 'https://token.actions.githubusercontent.com' \
  memgraph/memgraph:<version>
Verification is keyless, so cosign needs network access to Sigstore’s Fulcio
and Rekor services.
Using Docker Compose
To manage Memgraph and its tools (e.g. Memgraph Lab) as a single app in a multi-containered setup, use Docker Compose.
Create a docker-compose.yml:
version: "3"
services:
  memgraph:
    image: memgraph/memgraph-mage
    ports:
      - "7687:7687"
      - "7444:7444"
  lab:
    image: memgraph/lab
    ports:
      - "3000:3000"
    environment:
      QUICK_CONNECT_MG_HOST: memgraph
Then run:
docker-compose upThis will launch both Memgraph database and Memgraph Lab.
We provided a basic setup in the example above, but for more details, visit our Docker Compose documentation.
Install from a downloaded image
If you’ve downloaded the Memgraph Docker image directly from the Memgraph
download hub, you’ll receive a file named
similar to memgraph-3.2.0-docker.tar.gz (the exact file name varies based on
the version you’ve downloaded).
To load this image into Docker, do the following:
Load the image into Docker
Use the docker load command to load the
image into Docker:
docker load -i memgraph-3.2.0-docker.tar.gzRun the Memgraph image
After loading the image, you can run it using the docker run command. Here’s
an example command to start the Memgraph Docker container:
docker run -p 7687:7687 -p 7444:7444 --name memgraph memgraph/memgraph:3.2.0Configuration options
Memgraph accepts configuration options via command line. Example:
docker run memgraph/memgraph --bolt-port=7687 --log-level=TRACEFor full configuration settings, refer to the Memgraph Configuration docs.
Advanced: cuGraph Support
To run GPU-accelerated graph analytics (if using an older version):
- Ensure you have a Pascal+ NVIDIA GPU and required drivers.
- Install:
- Docker CE v19.03+
- nvidia-container-toolkit
- CUDA Toolkit >=13.1
- NVIDIA GPU Driver >=590
Run Memgraph MAGE + cuGraph:
docker run --rm --gpus all -p 7687:7687 -p 7444:7444 memgraph/memgraph-mage:3.8.0-relwithdebinfo-cugraphTroubleshooting
Docker not running?
- Launch Docker Desktop and wait for it to start.
- Run:
docker psto verify it’s working. - If needed, restart your instance.
Memgraph Lab can’t connect?
Connection issues between Memgraph Lab and Memgraph often depend on your
deployment method and operating system. The behavior of the
QUICK_CONNECT_MG_HOST environment variable varies by platform:
-
Mac & Windows: Use
host.docker.internalto allow Docker containers to communicate with services running on the host machine. Set this as the value ofQUICK_CONNECT_MG_HOSTwhen running Memgraph Lab to connect to a host-based Memgraph instance:docker run -d -p 3000:3000 -e QUICK_CONNECT_MG_HOST=host.docker.internal --name lab memgraph/lab -
Linux: You usually don’t need to set
QUICK_CONNECT_MG_HOST. It defaults tolocalhost, which works if Memgraph is running directly on the host.
Additionally, you can specify a custom port using the QUICK_CONNECT_MG_PORT
environment variable. For example:
-e QUICK_CONNECT_MG_PORT=7688This allows Memgraph Lab to connect using a different port if needed.
Connection failure
Let’s say you’ve encountered the following error:
Connection failure: Couldn't connect to 127.0.0.1:7687!To fix this issue, just replace HOST from the first command with
host.docker.internal. To find out more about networking in Docker, take a look
at Networking in Docker Desktop guide.
Issues with the IP address
While uncommon, some users may face connectivity issues after installing
Memgraph via Docker. Instead of running on localhost, the Memgraph container
might be assigned a custom IP address. You can identify and use this IP address
by following these steps:
Find the container ID
First, list your running Docker containers:
docker psYou’ll see an output like:
CONTAINER ID    IMAGE       COMMAND                  CREATED
9397623cd87e    memgraph    "/usr/lib/memgraph/m…"   2 seconds ago
Take note of the CONTAINER ID for the Memgraph image — in this case, it’s
9397623cd87e.
Get the container's IP address
Next, retrieve the container’s internal IP address using the ID:
docker inspect -f '{{range.NetworkSettings.Networks}}{{.IPAddress}}{{end}}' 9397623cd87eThis IP is the address you’ll use to connect via Memgraph Lab or mgconsole.
Use the IP to connect
Replace HOST in the following command with the IP address you just retrieved:
docker run -it --entrypoint=mgconsole memgraph/memgraph-platform --host HOSTThis ensures you’re connecting directly to the Memgraph instance running in Docker.