Migrate from RDBMS to Memgraph using CSV files
This tutorial will help you import your data from a MySQL database into Memgraph using CSV files.
This way of migrating data into Memgraph requires exporting the data from the source relational database system into CSV files, and then importing them into Memgraph. For direct data import from a relational database system to Memgraph, please check out our guide for using migration modules inside Memgraph MAGE.
In two of our blog posts, we’ve covered the differences between relational and graph database and outlined the benefits of graph databases.
In essence, graph databases replace tables with nodes connected through relationships. Opting for a graph database is an excellent choice if the data is highly connected and require frequent retrieval with a flexible data model. If you’re seeking a quick and reliable database that allows effortless modifications of data model and properties, a graph database is the way to go.
If you have a SQL data model and want to migrate to Memgraph, you can try out our Agent that leverages the LLM to automate the process of modeling and migration.
Prerequisites
To follow along, you will need:
- Memgraph MAGE which includes Memgraph and MAGE, an advanced graph algorithms and modules library. To install the Memgraph MAGE and set it up, please follow the getting started guide.
- (optional) A running relational database either with your own schema and data or the data we provided to populate the tables.
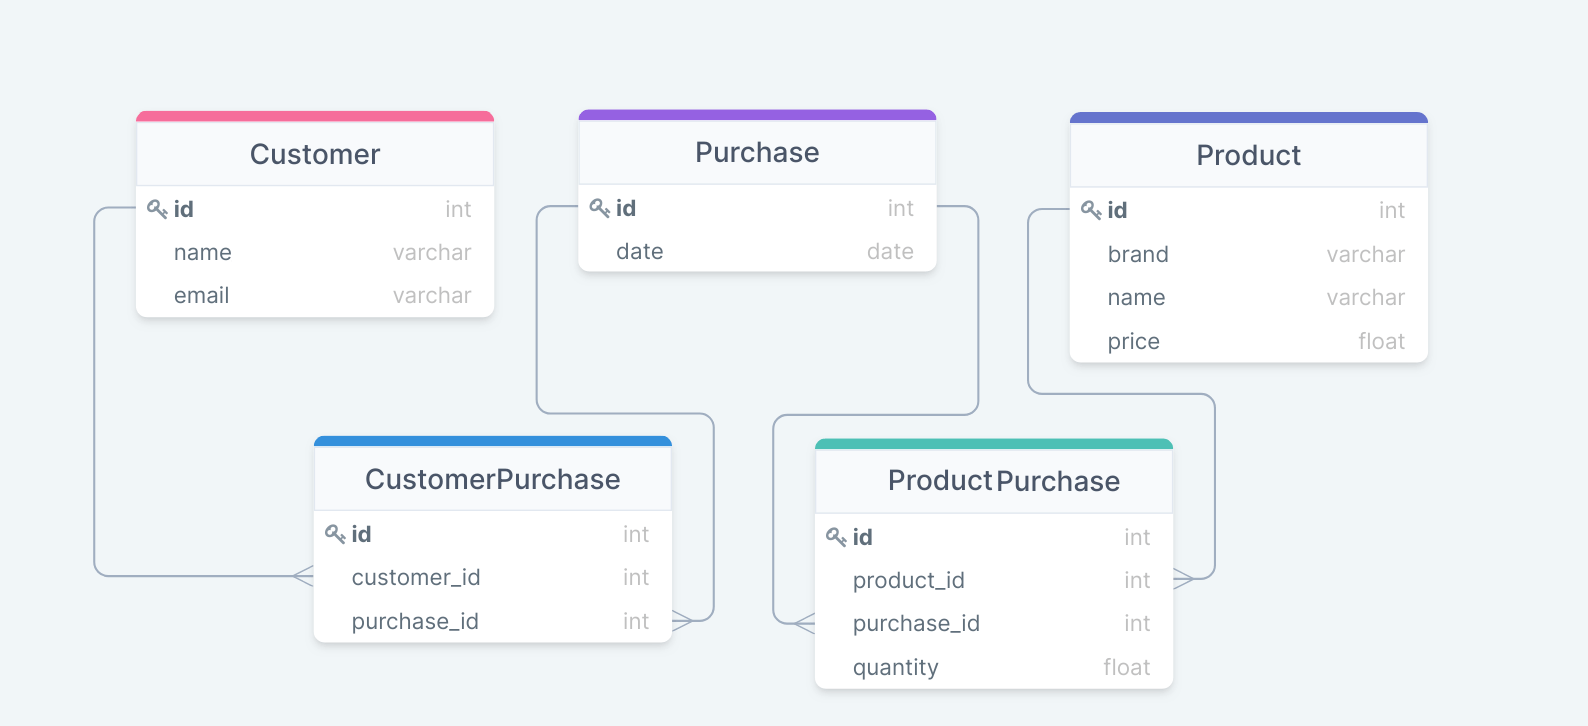
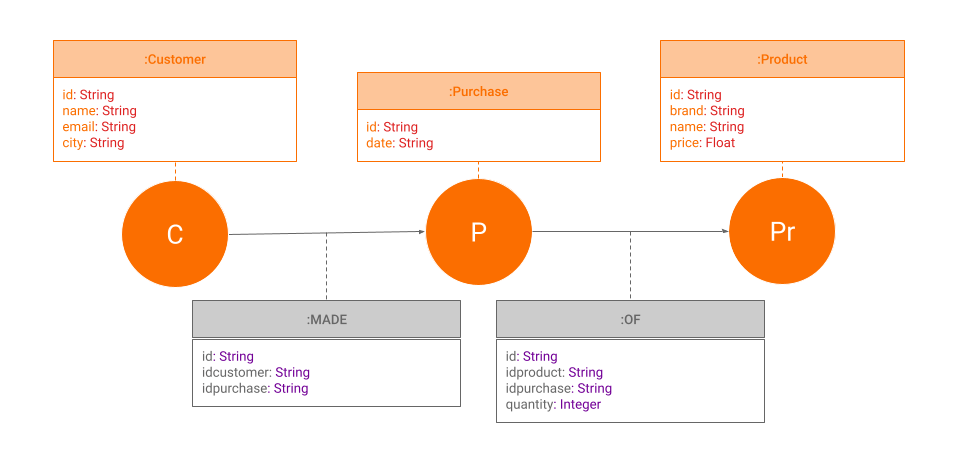
Data Model
We will learn how to import data from a relational database to Memgraph using the example of an online store. The data model of the relational database that we will use for this tutorial includes 5 tables with the following properties:
Migrate data using CSV files
Export the data from a table to a CSV file
To begin, you need to export the existing data into CSV files table by table either using the Export Wizard or by running a query.
Exporting data using the Export Wizard
In this example, we are using the Export Wizard in the MySQL Workbench. To export the Customer table, right-click on the table name and select the Table Data Export Wizard.
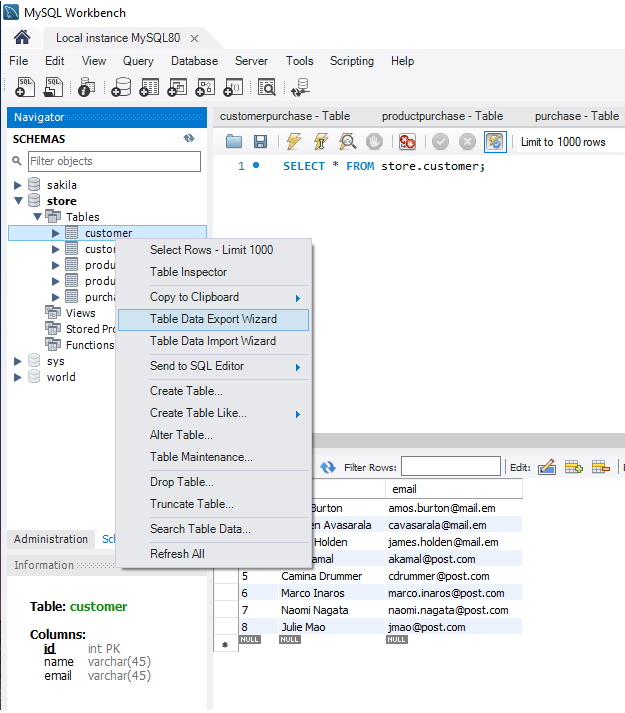
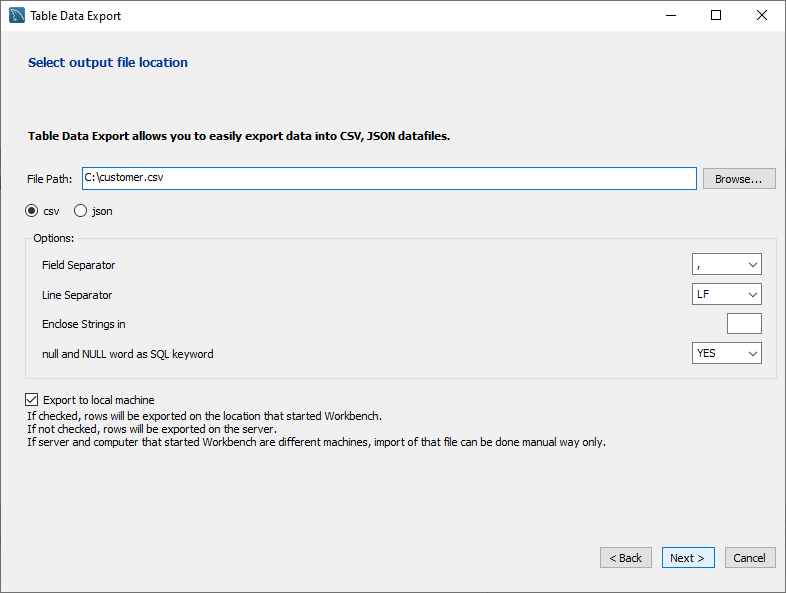
Click Next and on the second step of the Wizard do the following:
- Define the File Path. Usually, you can choose any location, but for this tutorial place the files in the root and name the file the same as the table.
- Select the CSV format if it isn’t already selected.
- Select comma as a Field Separator.
- Leave the Line Separator as LF.
- Delete the quotations from the Enclose Strings option and leave it empty.
Continue clicking Next until Finish.
In the root folder of your computer, you should find the customer.csv file. When opened in a text editor or a spreadsheet program, the data from the customer table should look like this:
id,name,email
1,Amos Burton,amos.burton@mail.em
2,Chrisjen Avasarala,cavasarala@mail.em
3,James Holden,james.holden@mail.em
4,Alex Kamal,akamal@post.com
5,Camina Drummer,cdrummer@post.com
6,Marco Inaros,marco.inaros@post.com
7,Naomi Nagata,naomi.nagata@post.com
8,Julie Mao,jmao@post.com
Exporting data by running a query
You can also export data by writing a query, but the data can be exported only to a specific file location you can locate by running the following query:
SHOW VARIABLES LIKE "secure_file_priv";I got this value as a response 'secure_file_priv', 'C:\ProgramData\MySQL\MySQL Server 8.0\Uploads\', which I can now use as a destination for my CSV file.

Check that you’ve selected the database you want to export data from as your default one. If the database is selected the name is bolded. If it is not, double-click on it.
To export the customerpurchase table, execute the query below. Notice how we changed the backslashes into slashes to avoid getting an error. You can also write double backslashes:
SELECT 'id', 'idcustomer', 'idpurchase'
UNION
SELECT
id,
idcustomer,
idpurchase
FROM customerpurchase INTO OUTFILE 'C:/ProgramData/MySQL/MySQL Server 8.0/Uploads/customerpurchase.csv'
FIELDS TERMINATED BY ','
LINES TERMINATED BY '\r\n';
In the first line we defined the headings, and then selected fields from a table
that will be exported to a specified field. We also defined the comma sign as a
field terminator and lines will be terminated by \r\n.
Exported CSV files
Export the rest of the tables using the preferred process and place all the CSV files in the root directory.
Below are the CSV files we exported from our relational database. Feel free to download them, place them in the root directory and use them for the rest of this tutorial.
To place the files in the root directory you need Admin rights on your computer.
Transfer CSV files into a Docker container
Now we need to copy the CSV files from your local directory into the Docker container so Memgraph can access them.
- Start your Memgraph instance by writing the following command in a terminal:
docker run -p 7687:7687 -p 7444:7444 --name memgraph memgraph/memgraph-mage- Open a new terminal and find the
CONTAINER IDof the Memgraph Docker container:
docker ps- Place yourself in the root directory and copy files into the container with
the following command. You should replace
CONTAINER IDand for each file change the source and destination path:
docker cp source.csv <CONTAINER ID>:/destination.csvIn the directory where your files are located, run the following five commands to copy the
five CSV files to the Docker container, changing the file paths in both the
source and destination with each new file.
Below is an example of copying the customer.csv file:
docker cp customer.csv <CONTAINER ID>:/customer.csvTo check if the files have indeed been copied run the following command. Make
sure you’ve replaced the CONTAINER ID value with the value of your container id:
docker exec -it <CONTAINER_ID> bashAnd then use the ls command to list all the files and directories in
the container’s root. You should be able to see the CSV files we just copied to
the container.
root@bbbc43620e5c:/# ls
bin   customer.csv          dev  home  lib    lib64  media  opt   product.csv          purchase.csv  run   srv              supervisord.pid  tmp  var
boot  customerpurchase.csv  etc  lab   lib32  mage   mnt    proc  productpurchase.csv  root          sbin  supervisord.log  sys              usr
Run Memgraph Lab
Connect to your Memgraph database using Memgraph Lab.
Place yourself in the Query Execution section where you can execute queries in the Cypher editor to import data into Memgraph.

Gain speed with indexes and analytical storage mode
Although the dataset imported in this tutorial is quite small, one day you might want to import really big datasets with billions of nodes and relationships and you will require all the extra speed you can get.
To gain speed you can create indexes on the id
properties used to connect nodes with relationships.
To create indexes, run:
CREATE INDEX ON :Customer(id);
CREATE INDEX ON :Purchase(id);
CREATE INDEX ON :Product(id);
CREATE INDEX ON :CustomerPurchase(id);
CREATE INDEX ON :ProductPurchase(id);
You can also change the storage mode from IN_MEMORY_TRANSACTIONAL to IN_MEMORY_ANALYTICAL. This will disable the
creation of durability files (snapshots and WAL files), and you will no longer
have any ACID guarantees.
Other transactions will be able to see the changes in ongoing transactions.
Also, transactions will be able to see the changes they are making. This means
that the transactions can be committed in random orders, and the updates to the
data, in the end, might not be correct.
But, if you import on one thread, batch of data after batch of data, there should be absolutely no issues, and you will gain 6 times faster import with 6 times less memory consumption.
If this approach is still too slow for your dataset size, consider importing nodes and then relationships concurrently.
After import, you can switch back to the IN_MEMORY_TRANSACTIONAL storage mode or continue running analytics queries (only read queries) in the IN_MEMORY_ANALYTICAL mode to continue benefiting from low memory consumption.
To switch between modes, run the following queries on a running instance:
STORAGE MODE IN_MEMORY_ANALYTICAL;
STORAGE MODE IN_MEMORY_TRANSACTIONAL;
To check the current storage mode, run the following query and read the
storage_mode field:
SHOW STORAGE INFO ON CURRENT DATABASE;Change the storage mode to analytical before import.
STORAGE MODE IN_MEMORY_ANALYTICAL;Learn more about the shortest path to import data into Memgraph by reading best practices for import.
Import nodes into Memgraph
As we already mentioned, graph databases do not use tables to store data, but nodes with relationships that connect them. If you take a look at the data model we were using in the relational database we can describe it with a single sentence: “Customers make purchases of product.”
Nodes would be the customers, purchases and products while the relationship
between them is that customers MAKE purchases (customerpurchase table)
OF product (productpurchase table).
Let’s start by importing the nodes into Memgraph using the
LOAD CSV Cypher clause. The syntax of the
LOAD CSV clause is:
LOAD CSV from "/file.csv" WITH HEADER AS row
CREATE (n:Node {property1: row.property1, property2: row.property2});
First we need to define the source file path and set the HEADER option to
WITH because our CSV file has headers. The clause will parse each row and
create nodes with properties.
The following query can be used to create Customer nodes.
Copy and paste it in the Cypher editor in Memgraph Lab, then click
Run query:
LOAD CSV from "/customer.csv" WITH HEADER AS row
CREATE (c:Customer {id: row.id, name: row.name, email: row.email});
The count of the nodes should go up by eight newly created Customer nodes.
Let’s repeat the process to create nodes for Purchases.
If the property data type is not defined, the default data type will be a string.
In the following query, the date property when creating Purchase nodes is set
to a Date type:
LOAD CSV from "/purchase.csv" WITH HEADER AS row
CREATE (p:Purchase {id: row.id, date: Date(row.date)});
For node Product, in order to define the type of the price property as a
float, we’ll use the ToFloat function:
LOAD CSV from "/product.csv" WITH HEADER AS row
CREATE (pr:Product {id: row.id, brand: row.brand, name: row.name, price: ToFloat(row.price)});
There should now be 24 new nodes imported into your graph database. Visualize your database in Memgraph Lab by running the following Cypher query:
MATCH (n) RETURN n;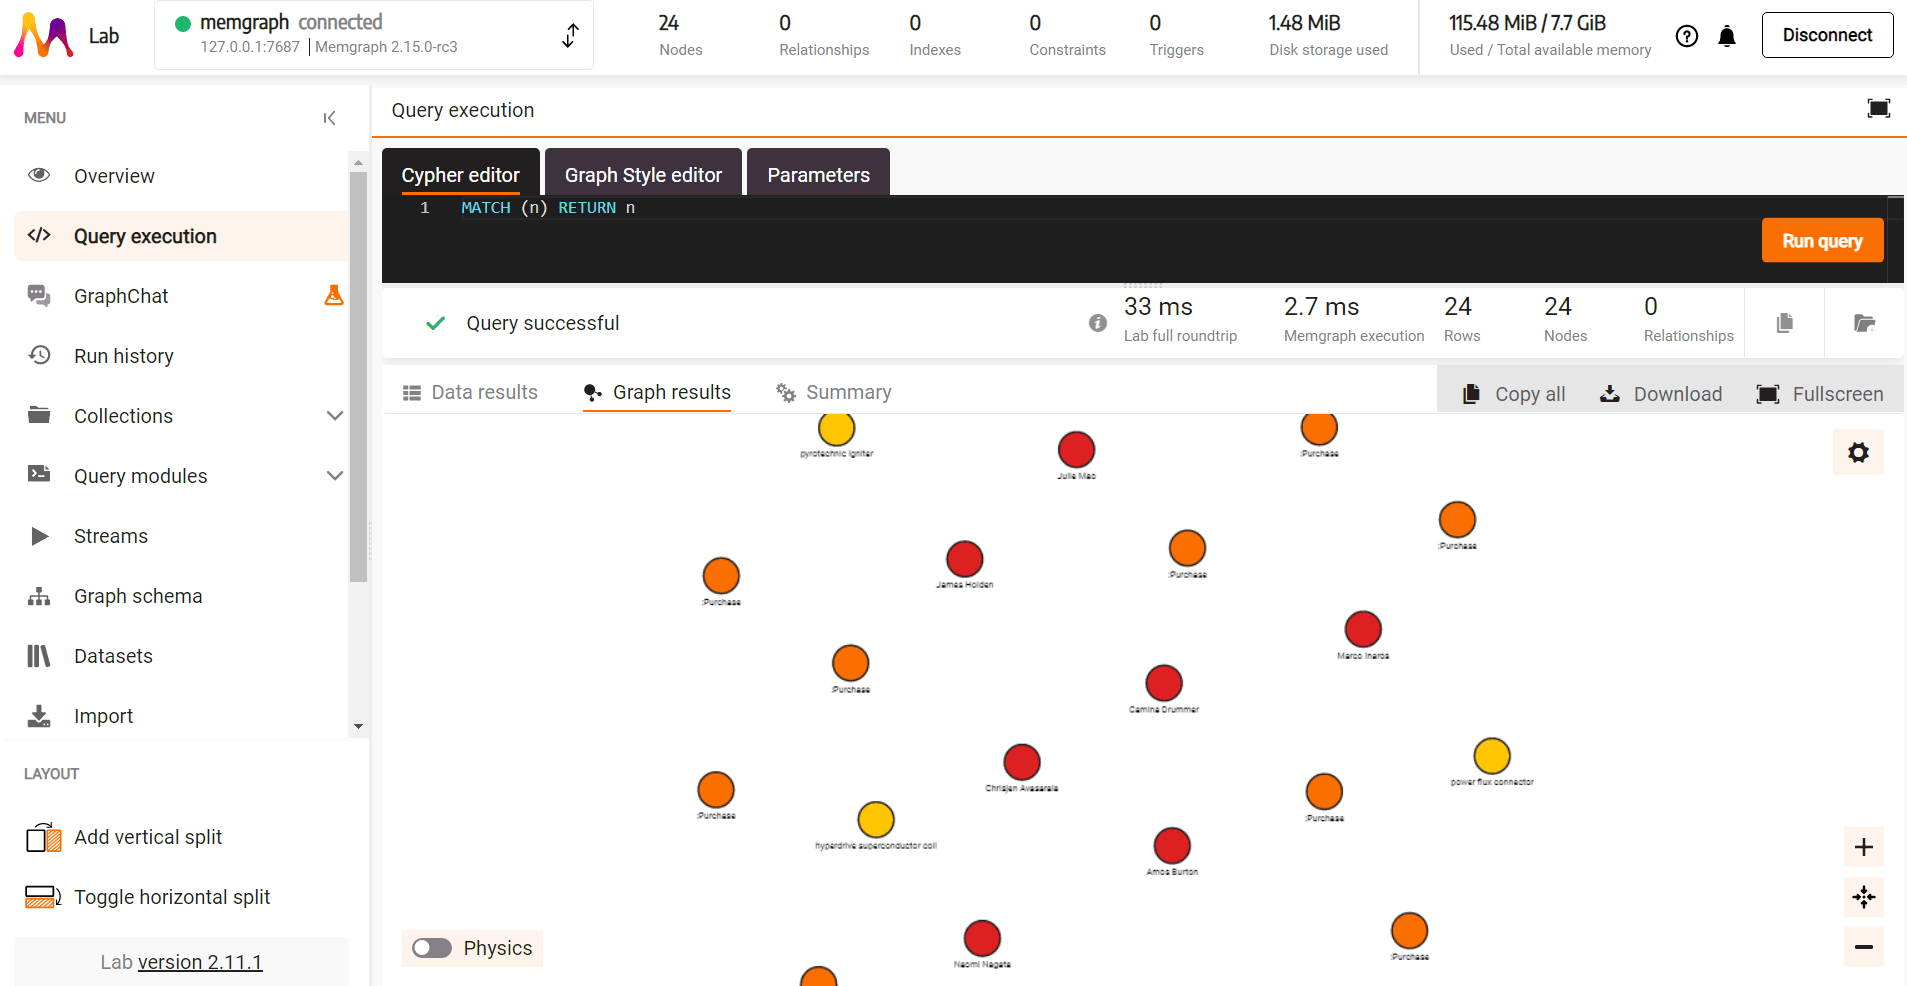
If you click on each node, you can see its properties. The nodes are still not connected to each other, so let’s focus on that by importing the rest of the CSV files.
Import relationships into Memgraph
We’ve imported CSV files containing data about customers, purchases and products. In our graph database, they are represented as nodes. Now we need to show the relationships those nodes have with each other.
We already created indexes
on the id properties which will speed up the creation of relationships by
shortening the time of scanning the database.
Relationships are defined by data in the customerpurchase and
productpurchase tables and CSV files. If you open the customerpurchase.csv
file you can see it is actually connecting two different nodes, customer and
purchase, via their IDs. That is why we’ll use the LOAD CSV clause to match
those IDs with existing nodes and create a relationship between them.
In this example, the relationship is that a customer MADE a purchase. The arrow
of the relationship defines that a customer makes the purchase and not the other
way around. And lastly, we are defining that the row with the customerpurchase
ID is actually the ID of the :MADE relationship.
LOAD CSV FROM "/customerpurchase.csv" WITH HEADER AS row
MATCH (c:Customer {id: row.idcustomer})
MATCH (p:Purchase {id: row.idpurchase})
CREATE (c)-[m:MADE]->(p)
SET m.id = row.id;
Running this query made 12 new relationships between customers and purchases. Let’s now create relationships between products and purchases. Notice how we defined the quantity data type as an integer. Once this last query is run, you should have 24 nodes and 29 relationships (edges).
LOAD CSV FROM "/productpurchase.csv" WITH HEADER AS row
MATCH (pr:Product {id: row.idproduct})
MATCH (p:Purchase {id: row.idpurchase})
CREATE (p)-[o:OF]->(pr)
SET o.id = row.id
SET o.quantity = ToInteger(row.quantity);
Data model and updating the schema
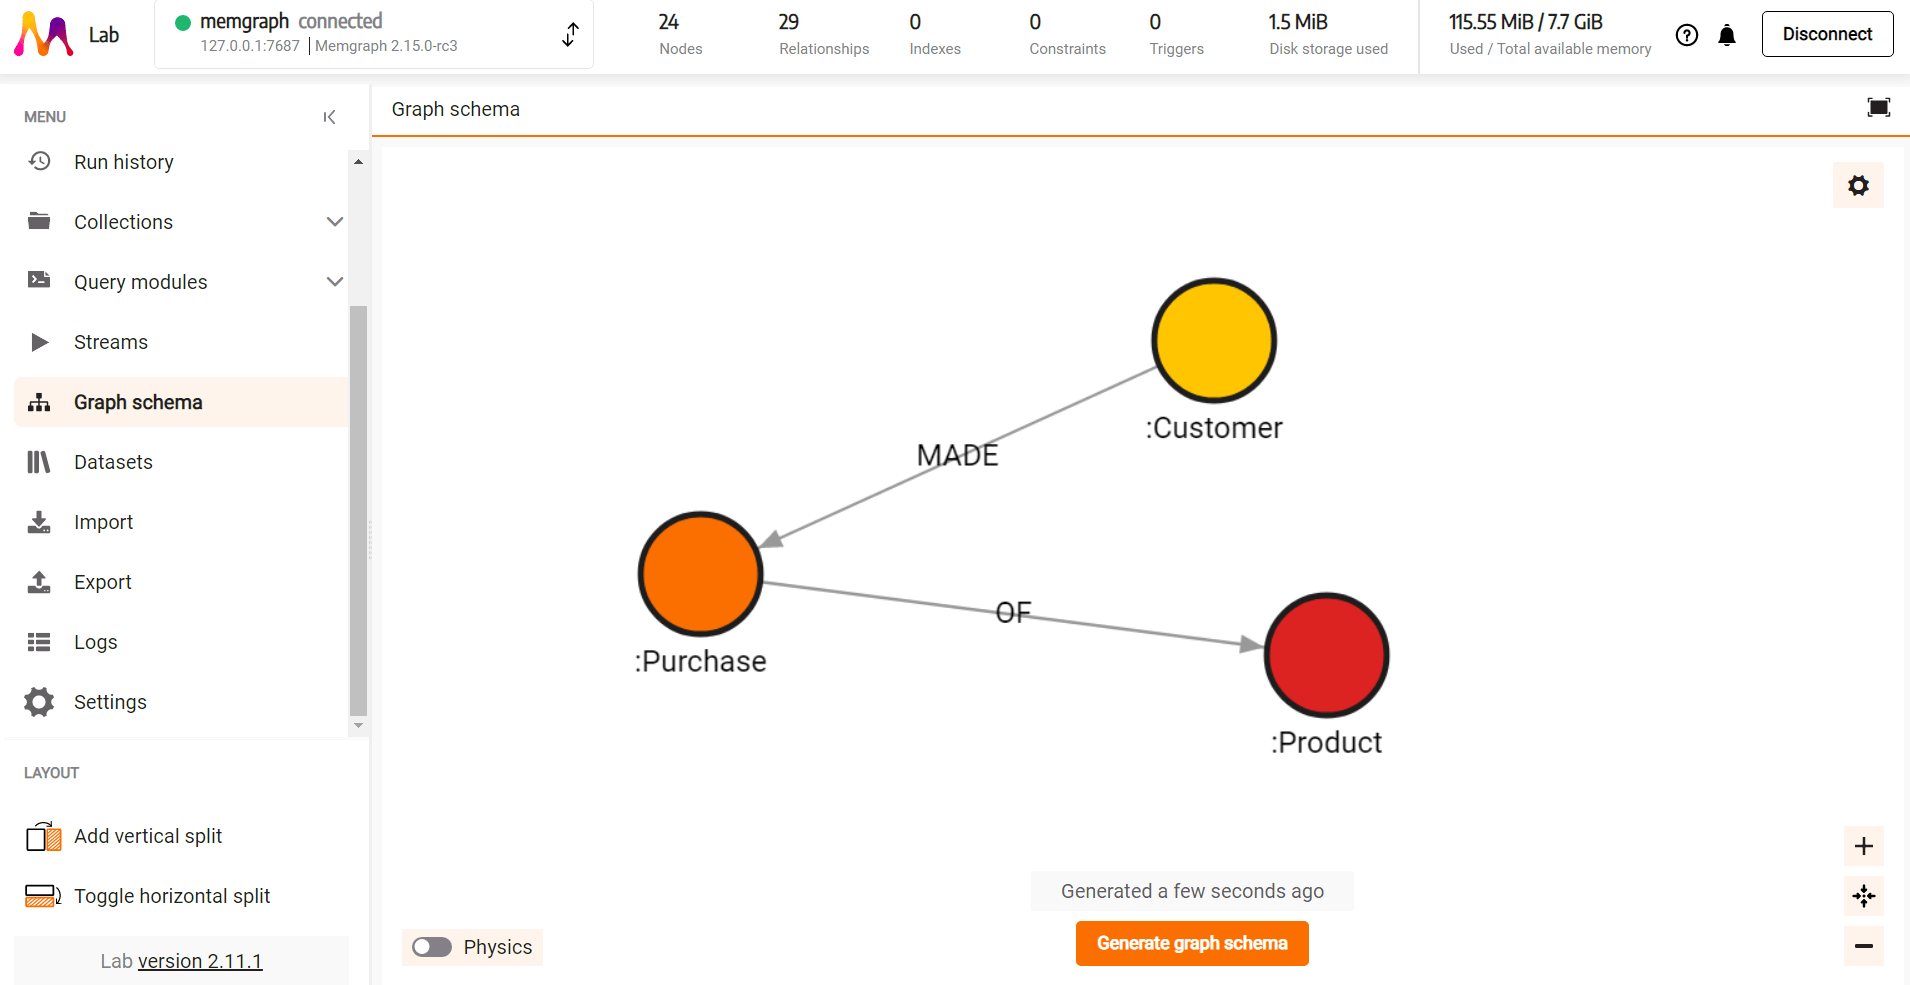
The data model in a graph database now looks like this:
We can also visualize data schema in Memgraph Lab in the Graph schema window:
If you decided you want to add a property to any of the nodes or relationships you can do so at any point without disrupting the schema.
Let’s add the city property to customer 4:
MATCH (c:Customer {id: "4"})
SET c.city = "Zagreb"
RETURN c
You can check if this property has been added by running the following query and clicking on the node in the Graph view:
MATCH (c:Customer {id: "4"})
RETURN c
As the last step of this tutorial let’s check all the nodes and relationships we’ve imported into Memgraph by running the following query:
MATCH (c)-[m]-(p)-[o]-(pr)
RETURN c,m,p,o,pr;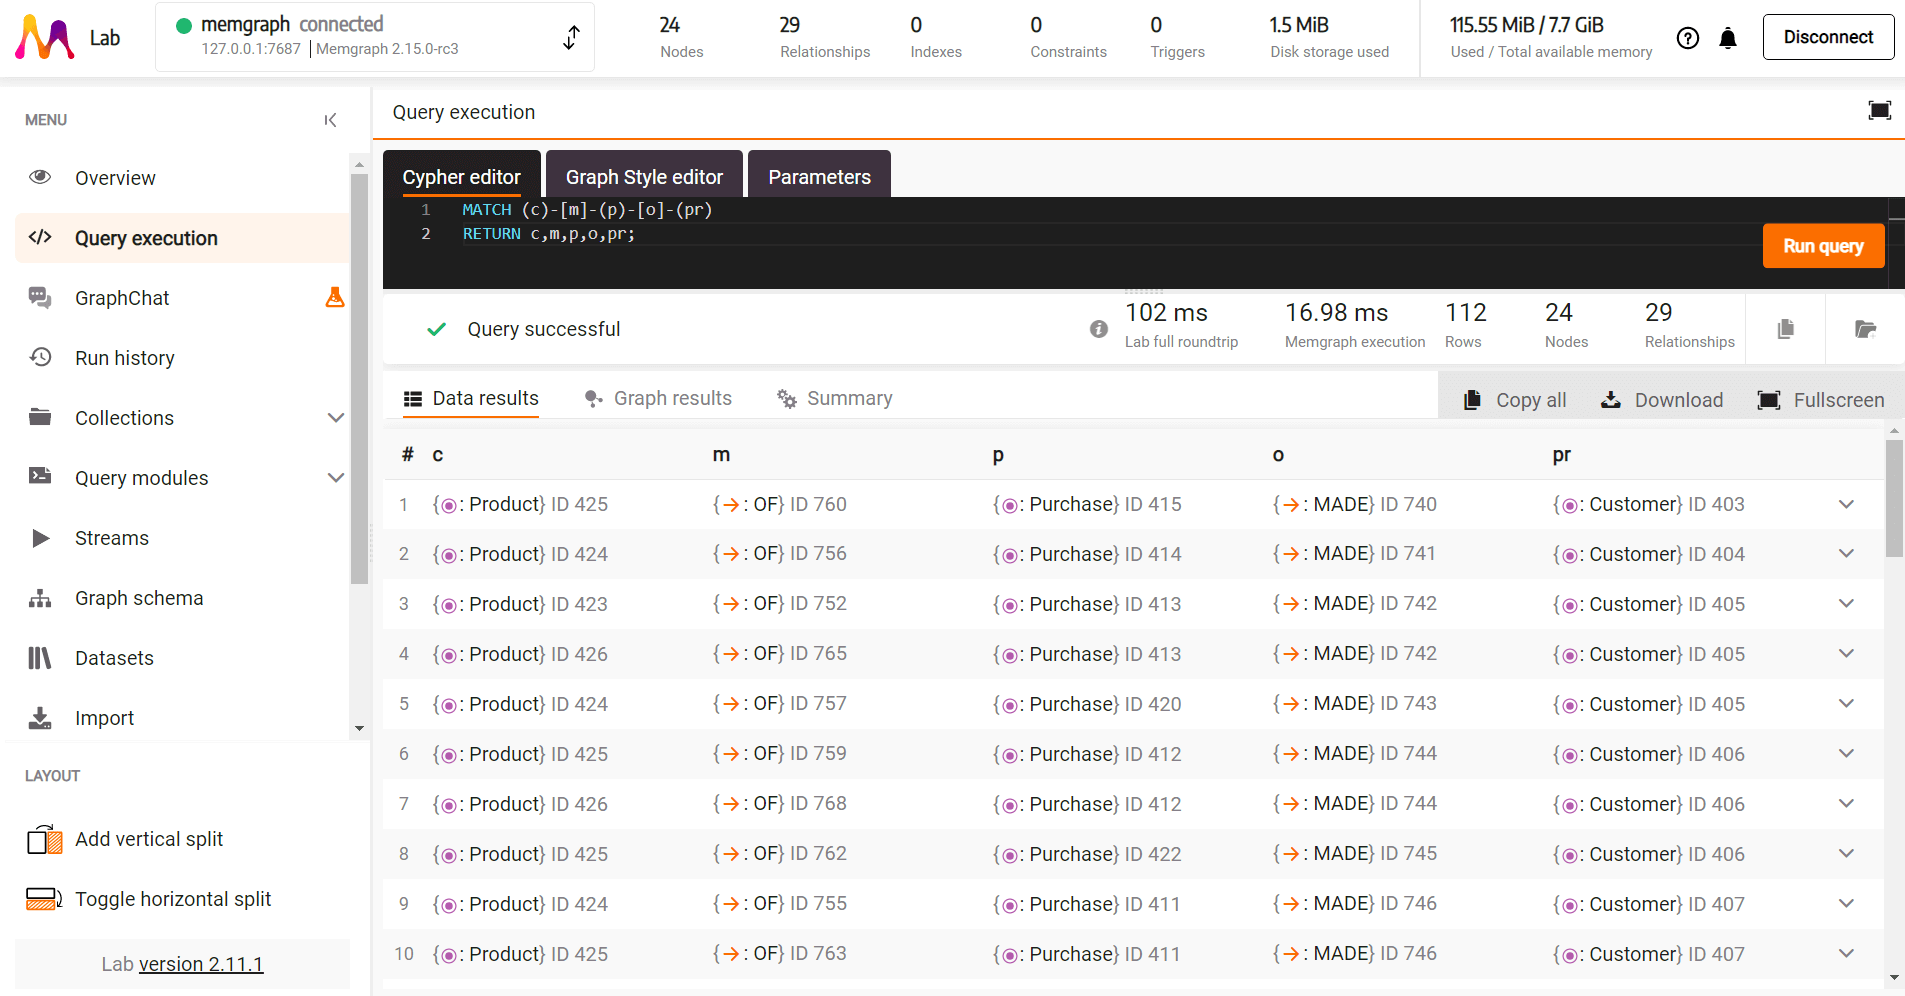
Where to next?
Congratulations! You now have a graph database. You can query it using the Cypher query language, use various graph algorithms and modules from our open-source repository MAGE to solve graph analytics problems, create awesome customized visual displays of your nodes and relationships with Graph Style Script, find out how to connect any streams of data you might have with Memgraph and above all - enjoy your graph database!