Memgraph Cloud
Memgraph Cloud is a cloud service fully managed on AWS and available in 6 geographic regions around the world. Memgraph Cloud allows you to create projects with Enterprise instances of Memgraph from your browser. The instances can use up to 32 GB of RAM and up to 8 CPU cores. You can connect to them using Memgraph Lab, mgconsole or various client libraries. All connections use SSL encryption with a self-signed certificate.
Use Memgraph Cloud to stream data into Memgraph in real-time and run complex graph algorithms and modules developed within the MAGE repository, such as PageRank, Community detection or Betweenness centrality. You can also extend the Cypher query language by developing your own Python procedures within query modules in Memgraph Lab.
Instances can be easily paused to save resources, backed up and cloned by creating snapshots, and they all use the Enterprise Edition of Memgraph which includes the role-base access control.
As a new user, try out Memgraph Cloud in a 14-days free trial and provide us with feedback on Discord:
- Go to Memgraph Cloud.
- Log in with a Google account or create a Memgraph Cloud account.
- Give your project a name and provide a password.
- Your project is up and running - connect to the instance, import data and start querying!
Cloud account
Find out how to sign up for Memgraph Cloud, manage passwords and add payment method.
Create Memgraph Cloud account
To create Memgraph Cloud account:
- Go to Memgraph Cloud sign-up page.
- Provide your personal information, set up a password and accept the terms of service.
- Verify your email address by clicking on the link in the email you got from Memgraph.
- Before you start using Cloud, help us by choosing a programming language you prefer. In return, we can direct our support better, and adding languages that we haven’t listed helps us leave no man behind once a user base is established.
You can also register to Memgraph Cloud with your Google account.
As a new user, you will start using a 14-day free trial version of Memgraph Cloud, in which you can create one project that uses up to 2GB RAM.
If you require more compute power, enter a valid payment method and upgrade your project.
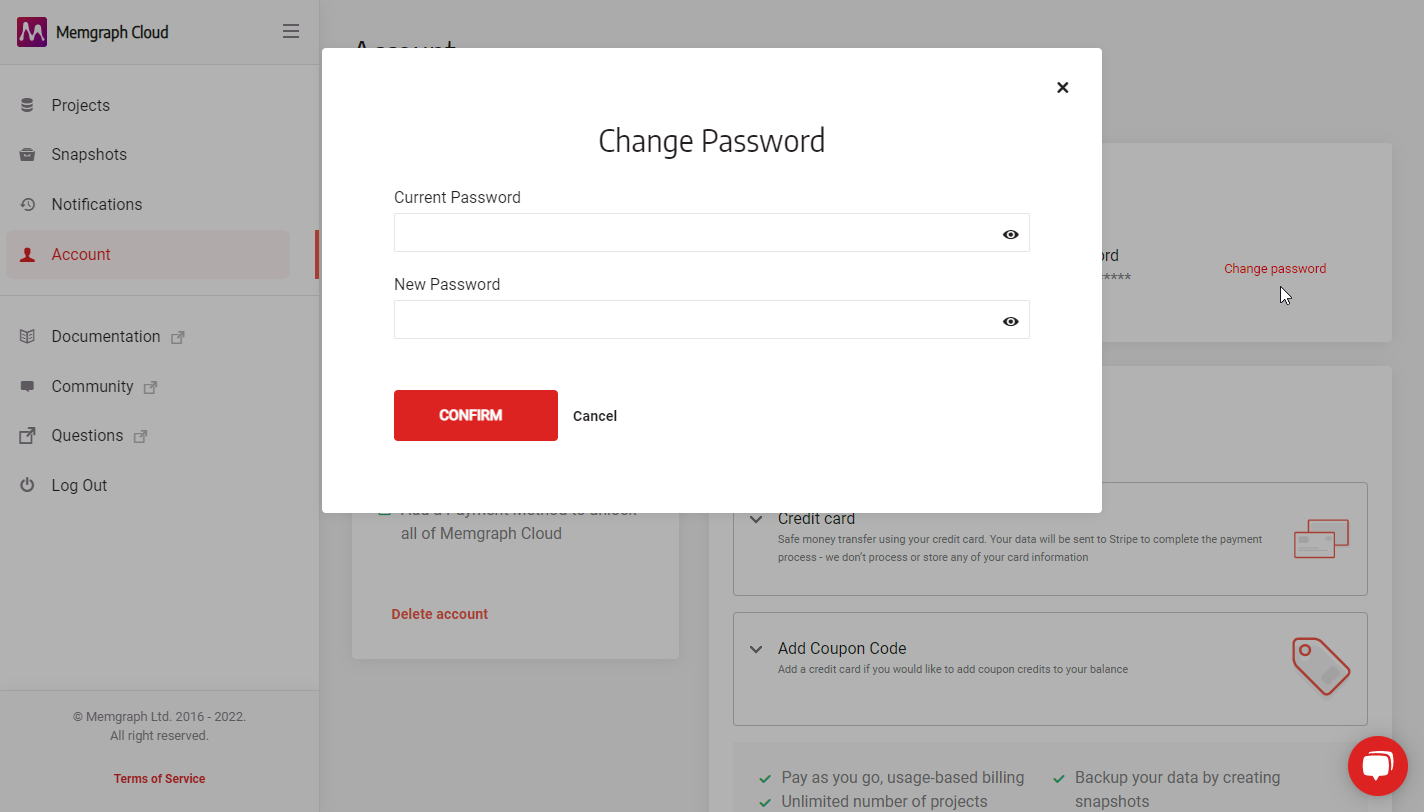
Change Memgraph Cloud password
To change your Memgraph Cloud account password, login into your account and:
- Click Account in the left sidebar.
- In the Payments section tab, locate Personal information section and click the Change password link.
- In the pop-up, fill in the Old Password and New Password.
- Click Confirm to save changes.
Retrieve Memgraph Cloud password
If you forgot your Memgraph Cloud account password, you can reset it:
- Visit Forgot your password page.
- Enter your email address and click Send recovery email.
- Click on the link in the Reset the password for Memgraph Cloud email. It will redirect you to the Reset your password page.
- Enter a new password and Confirm changes.
Retrieve Memgraph Cloud project password
Each project within your Memgraph Cloud has its password. The project password is not the same password you use to log into Memgraph Cloud. Memgraph doesn’t have access to those credentials and can’t retrieve lost credentials for Memgraph Cloud projects.
Manage payment methods
In the Account section of Memgraph Cloud you can Add Credit Card, Redeem Code or switch to the Invoice tab to check paid and due invoices.
For more details and current rates, visit the payment section of the docs.
Cloud projects
After you’ve created a Memgraph Cloud project, you can pause and resume it, delete, backup, restore, clone and resize it.
Memgraph Cloud does not offer the capability to configure secrets or environment variables for projects directly. Modifications to a project’s settings are limited to adjustments to the Memgraph configuration parameters, which can only be made during the project creation process.
Create a new Memgraph Cloud project
If you are using a 14-day free trial version of Memgraph Cloud, you can create one project that uses up to 2GB of RAM.
If you are using a paid version of Memgraph Cloud, you can create a maximum of 3 projects. If you need more projects, feel free to contact us.
To create a new project:
- Click Projects in the left sidebar.
- Click Add new button.
- In the pop-up, enter the project name, choose the cloud region, size and Memgraph version and click Next.
- Add a password to your project to connect to your Memgraph project and click Next. Keep in mind that Memgraph can’t retrieve this password if you lose it.
- Click Go to project to complete the project creation.
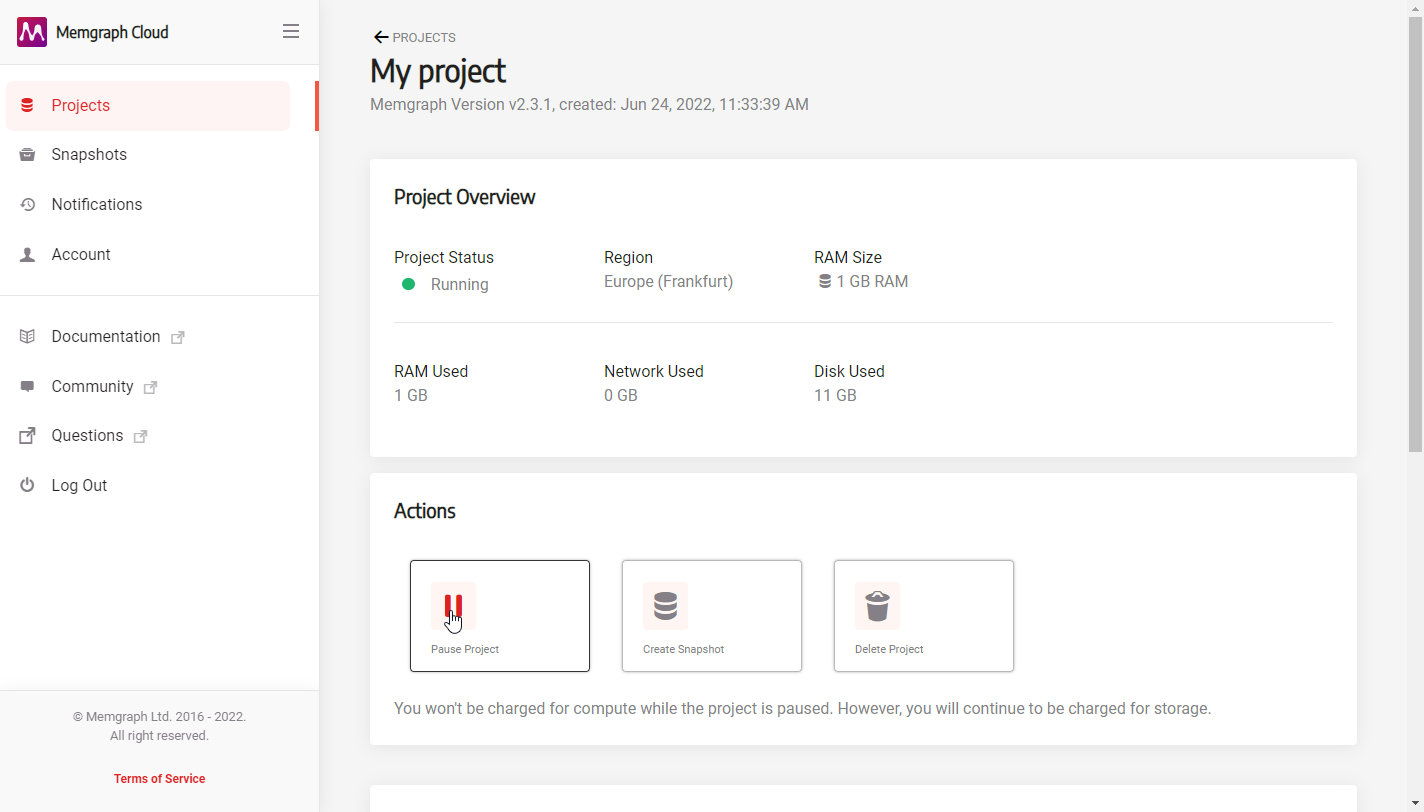
Pause, resume or delete a project
When you don’t need compute you can pause the project and you won’t be charged for compute as long as the project is paused. However, you will continue to be charged for storage.
To pause a project:
- Click Projects in the left sidebar.
- Click on the project you want to pause.
- In the Actions section click Pause Project.
To resume a project:
- Click Projects in the left sidebar.
- Click on the project you want to resume.
- In the Actions section click Resume Project.
Restarting an instance results in a new IP address.
When using Pause/Resume, the resources are released (AWS), and the instance
is removed while only the data is retained until it is resumed. This process
causes the previous IP to be lost.
To stop and start an instance without changing the IP, use the Restart action
in the Cloud UI. This ensures the instance restarts while maintaining the same
parameters, including the IP address.
When you no longer need a specific project, you can delete it. Keep in mind that you can’t undo this action.
To delete a project:
- Click Projects in the left sidebar.
- Click on the project you want to delete.
- In the Actions section, click Delete Project.
- In the confirmation pop-up, click the Confirm button.
Back up a project
A project is backed up by creating a snapshot with Amazon EBS. You cannot create a snapshot if you are using a 14-day free trial version of Memgraph Cloud.
If you are using a paid version of Memgraph Cloud, you can create a maximum of 5 snapshots. If you need more snapshots, feel free to contact us.
The size of the snapshot is 8 GB smaller than the disk size the project is using. If you are using 1 GB of RAM and 11 GB of disk, the snapshot size is 3GB.
To create a snapshot:
- Click Projects in the left sidebar.
- Click on the project you want to back up.
- In the Actions section, click Create Snapshot.
- In the pop-up, give the snapshot a name and Create it.
You can manage your snapshots in the Snapshots view, where you can Edit Name or Delete Snapshot.
Snapshot on the Cloud interface is not the same as the snapshot command in Memgraph: When
you run the CREATE SNAPSHOT command in Memgraph, it creates a snapshot file on the
disk. However, this snapshot won’t automatically show up in the Cloud interface. The
snapshots you see in the Cloud interface are copies of the entire disk (like an AWS
EBS volume), which includes any Memgraph snapshots. Since the Cloud service doesn’t
have access to Memgraph’s internal commands for security reasons, it can’t automatically
create a new disk copy when you use CREATE SNAPSHOT in Memgraph.
So, while the command creates a snapshot locally, it doesn’t trigger a new snapshot in
the Cloud interface.
Restore or clone a project
You can restore or clone projects from the snapshots you’ve created from existing projects.
To restore or clone a project:
- Click Snapshots in the left sidebar.
- Click on the snapshot you want to use.
- In the Actions section, click Reboot as Project.
- In the pop-up, give the new project a name, set password and select project size, then RESTORE.
Resize a project
When your project becomes to big for the current compute, upgrade it:
- Back up the project by creating a snapshot.
- Clone the project to a bigger project.
- Delete the smaller project.
If you feel your project is too small for the current compute, downgrade it:
- Export the database (using Memgraph Lab, mgconsole, GQLAlchemy, driver or any other tool).
- Create a new Memgraph Cloud project.
- Use an appropriate tool to connect to the project and import the database.
Role-base access control
Memgraph Cloud project instances come with 3 roles: admin, readonly,
readwrite
Users can belong to one of these three roles and the admin can grant, deny or revoke a certain set of privileges, thereby eliminating security concerns. Read more how to manage user privileges.
Connect to Cloud instances
You can connect to an instance running within the Memgraph Cloud project via Memgraph Lab, a visual interface, mgconsole, command-line interface, or one of many client libraries.
Connect with Memgraph Lab
Memgraph Lab comes in two flavors, as a desktop application and as an in-browser application.
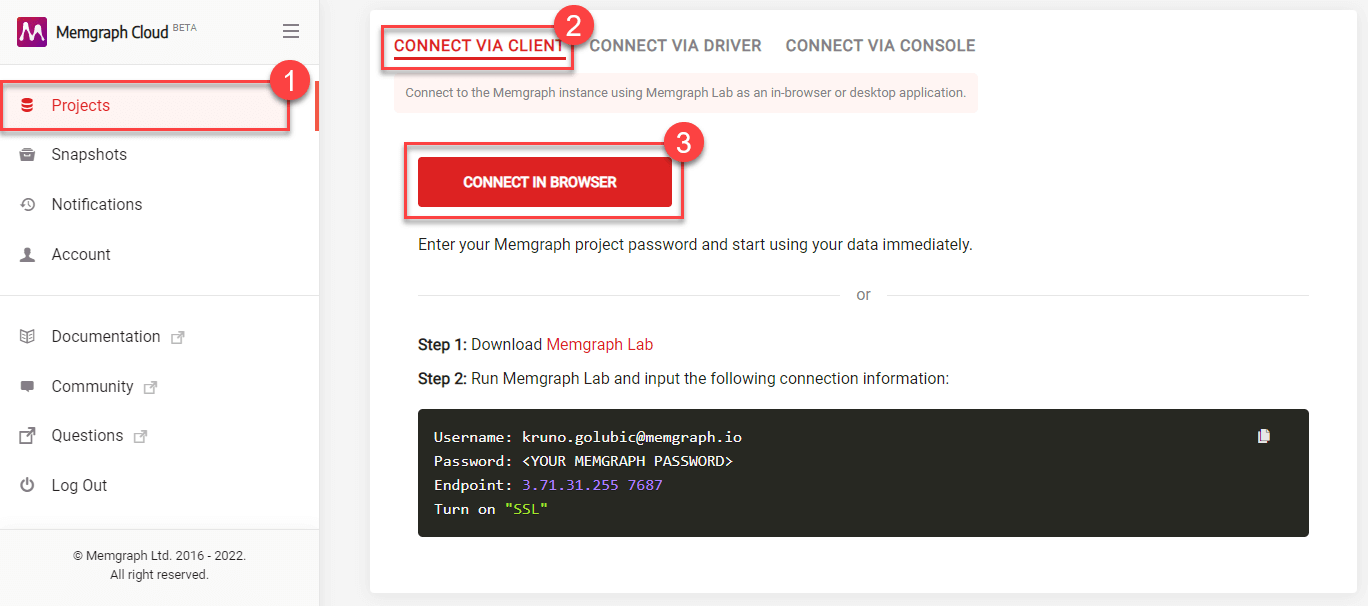
To connect using the in-browser application:
- Click Projects in the left sidebar.
- Locate Connect via client section.
- Click Connect in browser button to open Memgraph Lab in your browser. The login form will be automatically filled with the connection data, except for the password.
To use the desktop version of Memgraph Lab:
- Download Memgraph Lab.
- Open Memgraph Lab and switch to Connect Manually.
- Extend the Advanced Settings and fill out the connection fields with the data from the Connect via client section from the Memgraph Cloud project.
- Enable SSL Encryption and Connect now.
Connect with CLI mgconsole
To connect to Cloud via a command-line interface mgconsole:
- Build mgconsole from source or download it
- Run
mgconsolewith the--host,--port,--username,--passwordanduse-sslparameters set to the values provided in the Connect via console section of the Memgraph Cloud project.
Connect with clients
Python
Step 1: Install the driver with pip or poetry:
pip install gqlalchemy
# or with Poetry: poetry add gqlalchemy
Step 2: Copy the following code and fill out the missing details (YOUR_MEMGRAPH_PASSWORD, YOUR_MEMGRAPH_USERNAME and MEMGRAPH_HOST_ADDRESS) before running it:
from gqlalchemy import Memgraph

MEMGRAPH_HOST = 'MEMGRAPH_HOST_ADDRESS'
MEMGRAPH_PORT = 7687
MEMGRAPH_USERNAME = 'YOUR_MEMGRAPH_USERNAME'
# Place your Memgraph password that was created during Project creation
MEMGRAPH_PASSWORD = 'YOUR_MEMGRAPH_PASSWORD'

def hello_memgraph(host: str, port: int, username: str, password: str):
    connection = Memgraph(host, port, username, password, encrypted=True)
    results = connection.execute_and_fetch(
        'CREATE (n:FirstNode { message: "Hello Memgraph from Python!" }) RETURN n.message AS message'
    )
    print("Created node with message:", next(results)["message"])

if __name__ == "__main__":
    hello_memgraph(MEMGRAPH_HOST, MEMGRAPH_PORT, MEMGRAPH_USERNAME, MEMGRAPH_PASSWORD)
Read more about it on GQLAlchemy Quick Start Guide.
Rust
Rust driver rsmgclient is implemented as a wrapper around mgclient, the official Memgraph client library. You will need to install mgclient before using rsmgclient.
Step 1: Install mgclient, which is a C library interface for the Memgraph database. Follow the installation instructions from GitHub main page.
git clone https://github.com/memgraph/mgclient
# Install the library by following the GitHub installation instructions
Step 2: Add the following line to the Cargo.toml file under the line [dependencies]:
rsmgclient = "2.0.0"Step 3: Copy the following code and fill out the missing details (YOUR_MEMGRAPH_PASSWORD, YOUR_MEMGRAPH_USERNAME and MEMGRAPH_HOST_ADDRESS) before running it:
use rsmgclient::{ConnectParams, Connection, MgError, Value, SSLMode};

fn execute_query() -> Result<(), MgError> {
    // Connect to Memgraph.
    let connect_params = ConnectParams {
        host: Some(String::from("MEMGRAPH_HOST_ADDRESS")),
        port: 7687,
        username: Some(String::from("YOUR_MEMGRAPH_USERNAME")),
        password: Some(String::from("YOUR_MEMGRAPH_PASSWORD")),
        sslmode: SSLMode::Require,
        ..Default::default()
    };
    let mut connection = Connection::connect(&connect_params)?;

    // Create simple graph.
    connection.execute_without_results(
        "CREATE (p1:Person {name: 'Alice'})-[l1:Likes]->(m:Software {name: 'Memgraph'}) \
         CREATE (p2:Person {name: 'John'})-[l2:Likes]->(m);",
    )?;

    // Fetch the graph.
    let columns = connection.execute("MATCH (n)-[r]->(m) RETURN n, r, m;", None)?;
    println!("Columns: {}", columns.join(", "));
    for record in connection.fetchall()? {
        for value in record.values {
            match value {
                Value::Node(node) => print!("{}", node),
                Value::Relationship(edge) => print!("-{}-", edge),
                value => print!("{}", value),
            }
        }
        println!();
    }
    connection.commit()?;

    Ok(())
}

fn main() {
    if let Err(error) = execute_query() {
        panic!("{}", error)
    }
}
Read more about it on Rust Quick Start Guide.
C++
Step 1: Install mgclient, which is a C library interface for the Memgraph database. Follow the installation instructions from GitHub main page.
git clone https://github.com/memgraph/mgclient
# Install the library by following the GitHub installation instructions
Step 2: Copy the following code and fill out the missing details (YOUR_MEMGRAPH_PASSWORD, YOUR_MEMGRAPH_USERNAME and MEMGRAPH_HOST_ADDRESS) before running it:
#include <cstdlib>
#include <iostream>

#include <mgclient.hpp>

int main(int argc, char *argv[]) {
  mg::Client::Init();

  mg::Client::Params params;
  params.host = "MEMGRAPH_HOST_ADDRESS";
  params.port = "7687";
  params.username = "YOUR_MEMGRAPH_USERNAME";
  params.password = "YOUR_MEMGRAPH_PASSWORD";
  params.use_ssl = true;
  auto client = mg::Client::Connect(params);

  if (!client) {
    std::cerr << "Failed to connect!\n";
    return 1;
  }

  if (!client->Execute("CREATE (n:FirstNode {message: 'Hello Memgraph from C++!'}) RETURN n")) {
    std::cerr << "Failed to execute query!\n";
    return 1;
  }

  while (const auto maybe_result = client->FetchOne()) {
    const auto result = *maybe_result;
    if (result.size() < 1) {
      continue;
    }
    const auto value = result[0];
    if (value.type() != mg::Value::Type::Node) {
      continue;
    }
    const auto node = value.ValueNode();
    const auto props = node.properties();
    std::cout << "Created node: " << props["message"].ValueString() << std::endl;
  }

  // Deallocate the client because mg_finalize has to be called globally.
  client.reset(nullptr);

  mg::Client::Finalize();

  return 0;
}
Java
Step 1: Add the following driver dependency in your pom.xml file:
<dependency>
  <groupId>org.neo4j.driver</groupId>
  <artifactId>neo4j-java-driver</artifactId>
  <version>4.1.1</version>
</dependency>
If you want to use neo4j-java-driver v5, please connect to the local instance following the instructions on Java Quick Start Guide.
Step 2: Copy the following code and fill out the missing details (YOUR_MEMGRAPH_PASSWORD, YOUR_MEMGRAPH_USERNAME and MEMGRAPH_HOST_ADDRESS) before running it:
import org.neo4j.driver.AuthTokens;
import org.neo4j.driver.Driver;
import org.neo4j.driver.GraphDatabase;
import org.neo4j.driver.Session;
import org.neo4j.driver.Result;
import org.neo4j.driver.Transaction;
import org.neo4j.driver.TransactionWork;

import static org.neo4j.driver.Values.parameters;

public class HelloMemgraph implements AutoCloseable
{
    private final Driver driver;

    public HelloMemgraph( String uri, String username, String password )
    {
        driver = GraphDatabase.driver( uri, AuthTokens.basic( username, password ) );
    }

    public void close() throws Exception
    {
        driver.close();
    }

    public void createAndPrintNode( final String message )
    {
        try ( Session session = driver.session() )
        {
            String nodeMessage = session.writeTransaction( new TransactionWork<String>()
            {
                @Override
                public String execute( Transaction tx )
                {
                    Result result = tx.run( "CREATE (n:FirstNode {message: $message}) " +
                                            "RETURN id(n) AS nodeId, n.message AS message",
                            parameters( "message", message ) );
                    return result.single().get( 1 ).asString();
                }
            } );
            System.out.println( "Created node:", nodeMessage );
        }
    }

    public static void main( String... args ) throws Exception
    {
        try ( HelloMemgraph program = new HelloMemgraph( "bolt+ssc://MEMGRAPH_HOST_ADDRESS:7687", "YOUR_MEMGRAPH_USERNAME", "YOUR_MEMGRAPH_PASSWORD" ) )
        {
            program.createAndPrintNode( "Hello Memgraph from Java!" );
        }
    }
}
Read more about it on Java Quick Start Guide.
C#
Step 1: Install the driver with Package Manager:
Install-Package Neo4j.Driver.Simple@4.4.0If you want to use Neo4j.Driver.Simple v5, please connect to the local instance following the instructions on C# Quick Start Guide.
Step 2: Copy the following code and fill out the missing details (YOUR_MEMGRAPH_PASSWORD, YOUR_MEMGRAPH_USERNAME and MEMGRAPH_HOST_ADDRESS) before running it:
using System;
using System.Linq;
using Neo4j.Driver;

namespace MemgraphApp
{
    public class Program : IDisposable
    {
        private readonly IDriver _driver;
        public Program(string uri, string user, string password)
        {
            _driver = GraphDatabase.Driver(uri, AuthTokens.Basic(user, password));
        }
        public void CreateAndPrintNode(string message)
        {
            using (var session = _driver.Session())
            {
                var nodeMessage = session.WriteTransaction(tx =>
                {
                    var result = tx.Run("CREATE (n:FirstNode {message: $message}) " +
                                        "RETURN id(n) AS nodeId, n.message AS message",
                        new { message });
                    return result.Single()[1].As<string>();
                });
                Console.WriteLine("Created node:", nodeMessage);
            }
        }
        public void Dispose()
        {
            _driver?.Dispose();
        }
        public static void Main()
        {
            using (var program = new Program("bolt+ssc://MEMGRAPH_HOST_ADDRESS:7687", "YOUR_MEMGRAPH_USERNAME", "YOUR_MEMGRAPH_PASSWORD"))
            {
                program.CreateAndPrintNode("Hello Memgraph from C#!");
            }
        }
    }
}
Read more about it on C# Quick Start Guide.
Golang
Step 1: Make sure your application has been set up to use go modules (there should be a go.mod file in your application root). Add the driver with:
go get github.com/neo4j/neo4j-go-driver/v5Step 2: Copy the following code and fill out the missing details (YOUR_MEMGRAPH_PASSWORD, YOUR_MEMGRAPH_USERNAME and MEMGRAPH_HOST_ADDRESS) before running it:
package main

import (
    "fmt"
    "github.com/neo4j/neo4j-go-driver/v5/neo4j"
)

func main() {
    dbUri := "bolt+ssc://MEMGRAPH_HOST_ADDRESS:7687"
    driver, err := neo4j.NewDriver(dbUri, neo4j.BasicAuth("YOUR_MEMGRAPH_USERNAME", "YOUR_MEMGRAPH_PASSWORD", ""))
    if err != nil {
        panic(err)
    }

    defer driver.Close()
    item, err := insertItem(driver)
    if err != nil {
        panic(err)
    }
    fmt.Printf("%v\n", item.Message)
}

func insertItem(driver neo4j.Driver) (*Item, error) {

    session := driver.NewSession(neo4j.SessionConfig{})
    defer session.Close()
    result, err := session.WriteTransaction(createItemFn)
    if err != nil {
        return nil, err
    }
    return result.(*Item), nil
}

func createItemFn(tx neo4j.Transaction) (interface{}, error) {
    records, err := tx.Run(
        "CREATE (a:Greeting) SET a.message = $message RETURN 'Node ' + id(a) + ': ' + a.message",
        map[string]interface{}{"message": "Hello Memgraph from Go!"})

    if err != nil {
        return nil, err
    }
    record, err := records.Single()
    if err != nil {
        return nil, err
    }

    return &Item{
        Message: record.Values[0].(string),
    }, nil
}

type Item struct {
    Message string
}
Read more about it on Go Quick Start Guide.
PHP
Step 1: Install the driver with composer:
composer require stefanak-michal/memgraph-bolt-wrapperStep 2: Copy the following code and fill out the missing details (YOUR_MEMGRAPH_PASSWORD, YOUR_MEMGRAPH_USERNAME and MEMGRAPH_HOST_ADDRESS) before running it:
<?php
require_once __DIR__ . '/vendor/autoload.php';

// Create a connection class and specify target host and port.
$conn = new \\Bolt\\connection\\StreamSocket('MEMGRAPH_HOST_ADDRESS', '7687');
$conn->setSslContextOptions([
    'peer_name' => 'Memgraph DB',
    'allow_self_signed' => true
]);

// Create a new Bolt instance and provide a connection object.
$bolt = new \\Bolt\\Bolt($conn);

// Set available Bolt versions for Memgraph.
$bolt->setProtocolVersions(4.1, 4, 3);

// Build and get protocol version instance which creates connection and executes a handshake.
$protocol = $bolt->build();

// Login to database with credentials
$protocol->hello(\\Bolt\\helpers\\Auth::basic('YOUR_MEMGRAPH_USERNAME', 'YOUR_MEMGRAPH_PASSWORD'));

// Pipeline two messages. One to execute query with parameters and second to pull records.
$protocol
    ->run('CREATE (a:Greeting) SET a.message = $message RETURN id(a) AS nodeId, a.message AS message', ['message' => 'Hello, World!'])
    ->pull();

// Server responses are waiting to be fetched through iterator.
$rows = iterator_to_array($protocol->getResponses(), false);

// Get content from requested record.
$row = $rows[1]->getContent();
echo 'Node ' . $row[0] . ' says: ' . $row[1];
Read more about it on PHP Quick Start Guide.
node.js
Step 1: Install the driver with npm:
npm install neo4j-driverStep 2: Copy the following code and fill out the missing details( YOUR_MEMGRAPH_PASSWORD, YOUR_MEMGRAPH_USERNAME and MEMGRAPH_HOST_ADDRESS ) before running it:
const neo4j = require('neo4j-driver')

const MEMGRAPH_URI = 'bolt+ssc://MEMGRAPH_HOST_ADDRESS:7687';
const MEMGRAPH_USERNAME = 'YOUR_MEMGRAPH_USERNAME';
// Place your Memgraph password that was created during Project creation
const MEMGRAPH_PASSWORD = 'YOUR_MEMGRAPH_PASSWORD';

const helloMemgraph = async (uri, username, password) => {
    const driver = neo4j.driver(uri, neo4j.auth.basic(username, password));

    const session = driver.session();
    const message = 'Hello Memgraph from Node.js!';

    try {
        const result = await session.run(
            `CREATE (n:FirstNode {message: $message}) RETURN n`,
            { message },
        );

        const singleRecord = result.records[0];
        const node = singleRecord.get(0);

        console.log('Created node:', node.properties.message);
    } finally {
        await session.close()
    }

    await driver.close()
};

helloMemgraph(MEMGRAPH_URI, MEMGRAPH_USERNAME, MEMGRAPH_PASSWORD)
    .catch((error) => console.error(error));
Read more about it on Node.js Quick Start Guide.
Payment
Below are instructions on how to manage Memgraph Cloud payment, and current Cloud rates.
Add a payment method
To add a payment method:
- Go to Account and expand the Add Credit Card section
- Enter Cardholder Name and credit card details and Add Card
- Verify the credit card
You can replace the current credit card with a new credit card by following the same steps, and the Remove button will remove the credit card completely.
Redeem coupon code
To redeem a coupon code you first need to add a payment method, then:
- Go to Account and expand the Add Coupon Code section
- Enter the coupon code and Redeem code
Each code has an expiration date. If you do not create a project or snapshot within that period, the code will expire.
Once you redeem a code, it will be applied to your next invoice, regardless of the amount of fees on the invoice, which means that the whole coupon will applied even if the value of the coupon is higher than the amount of the invoice it is applied to.
Check paid and due invoices
To check pay and due invoices:
- Go to Account and open the Invoices tab
- Check an estimate for the next payment or the amount of paid invoices
You can also download paid invoices as PDF to check the cost breakdown.
Cost calculator
Once your 2-week free trial is finished, the project will become a paid one. Below you can calculate the approximate cost based on your cloud region and instance size. Your actual fees will depend on the usage of Memgraph Cloud and the number of running instances.
BREAKDOWN
Shown prices are only estimates. Your actual fees will depend on the usage of Memgraph Cloud and the number of running projects. Don't worry, you will always be able to check your balance.
If you’re not sure how large of an instance you need, head over to our storage calculator to estimate it. In case you have more questions about pricing, please contact us.