
Running Community Detection With Memgraph and Python NetworkX
Introduction
While the NetworkX package may be enough on its own to learn about graph theory and algorithms, in production, you will often require a permanent storage solution and additional graph analytics capabilities. Using Memgraph, an in-memory graph database, as the storage solution provides additional benefits and functionalities to NetworkX by extending its feature set.
By using the property graph model and the Cypher query language, exploring networks becomes much easier and intuitive. While NetworkX is completely dependant on and limited by Python code, Memgraph offers a way of combining useful NetworkX functionalities with an efficient and simple query language like Cypher.
Through this post, you will learn how to implement a custom Cypher procedure that uses query modules in Memgraph to perform community detection and calculate the betweenness centrality of every node in a graph. This query module will utilize NetworkX to perform the required graph algorithms and it will be called from a Cypher query as a custom procedure.
Prerequisites
To complete this tutorial, you will need:
- An installation of Memgraph DB: a native real-time graph database. Follow the Docker Installation instructions on the Quick Start page to get started.
- An installation of Memgraph Lab: an integrated development environment used to import data, develop, debug and profile database queries and visualize query results.
Creating a Custom Query Module
Memgraph supports extending the query language with user-written procedures. These procedures are grouped into modules (Query Modules), which can then be loaded on startup or later on. We are going to create such a procedure to work with the NetworkX package.
To get started, you need to create and mount a volume to access the query_modules directory. This directory contains all of the built-in query modules and it's where you save new custom query modules. Create an empty directory modules on your host machine and execute the following command:
docker volume create --driver local --opt type=none --opt device=$(pwd)/modules --opt o=bind modulesNow, you can start Memgraph and mount the created volume:
docker run -it --rm -v modules:/usr/lib/memgraph/query_modules -p 7687:7687 memgraphEverything from the directory /usr/lib/memgraph/query_modules will be visible/editable in your mounted modules volume and vice versa. If you take a look at the /query_modules directory, you will find built-in query modules that come prepackaged with Memgraph. To learn more about them, visit the How to Use Query Modules Provided by Memgraph? guide.
Create a file called community.py in the modules directory and copy the code below into it.
import mgp
import networkx as nx
from networkx.algorithms import community
from mgp_networkx import MemgraphDiGraph


@mgp.read_proc
def detect(
    ctx: mgp.ProcCtx
    ) -> mgp.Record(communities=mgp.List[mgp.List[mgp.Vertex]]):

    networkxGraph = nx.DiGraph(MemgraphDiGraph(ctx=ctx))
    communities_generator = community.girvan_newman(networkxGraph)

    return mgp.Record(communities=[
        list(s) for s in next(communities_generator)])
If you are using a Linux machine and don't have the right permissions to create a new file in your modules directory, run the following command:
sudo chown -R <user-name> modulesYou just created a new query module with the procedure detect() that utilizes the Girvan–Newman method for finding communities in a graph. Before you can call it, the newly created query module has to be loaded. Execute the following command in Memgraph Lab:
CALL mg.load_all()In order to try out the detect() procedure, you need data in your database instance. The easiest way to this is by using Memgraph Lab. Navigate to the Datasets tab in the left sidebar and load the Capital cities and borders dataset.
Now, you can call the procedure with:
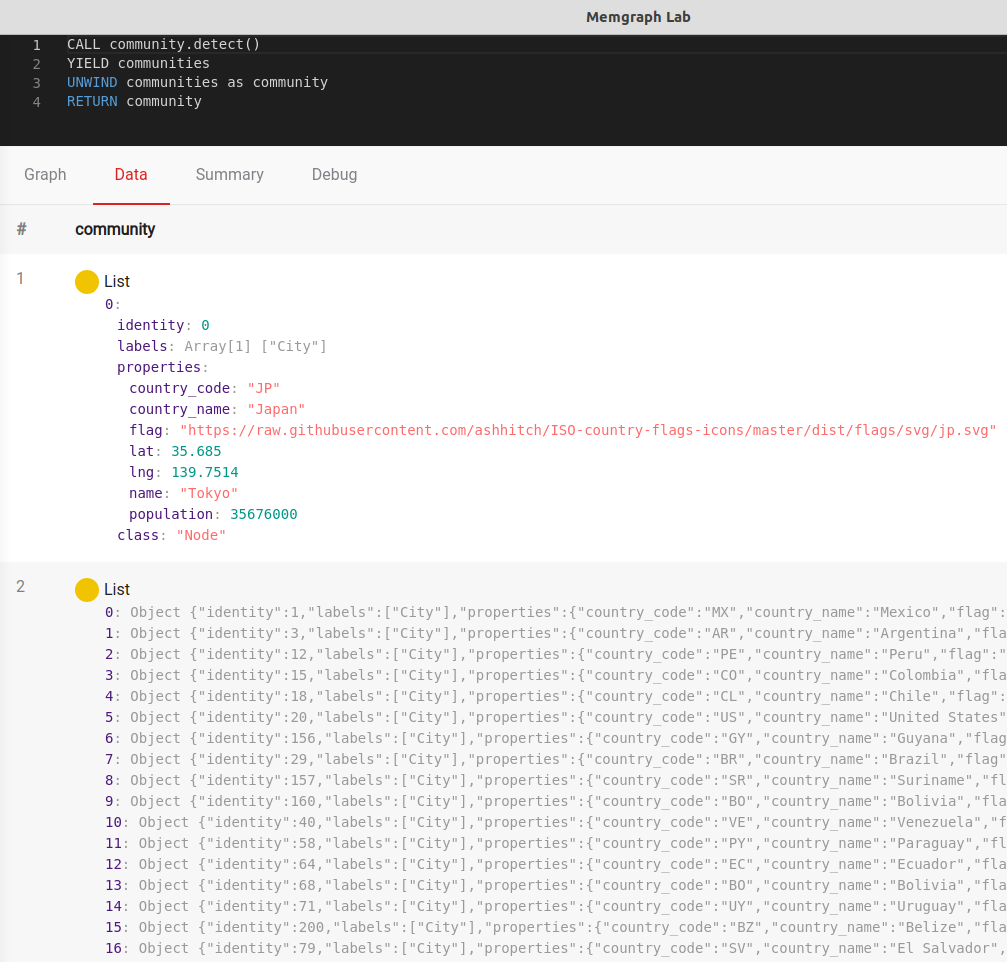
CALL community.detect()
YIELD communities
UNWIND communities as community
RETURN community
The result is 52 communities with varying numbers of components. Some of the cities in the dataset have been grouped by continent, while some are isolated because of their remote island locations.
Computing Betweenness Centrality
One of the more important terms when it comes to community detection is betweenness centrality. It is the measure of how many shortest paths in a graph pass through a specific node or edge. The NetworkX package includes a betweenness centrality algorithm that you can run on your dataset.
First, open Memgraph Lab and navigate to the Dataset tab. Load the Karate club friendship network. In the Query tab execute the following:
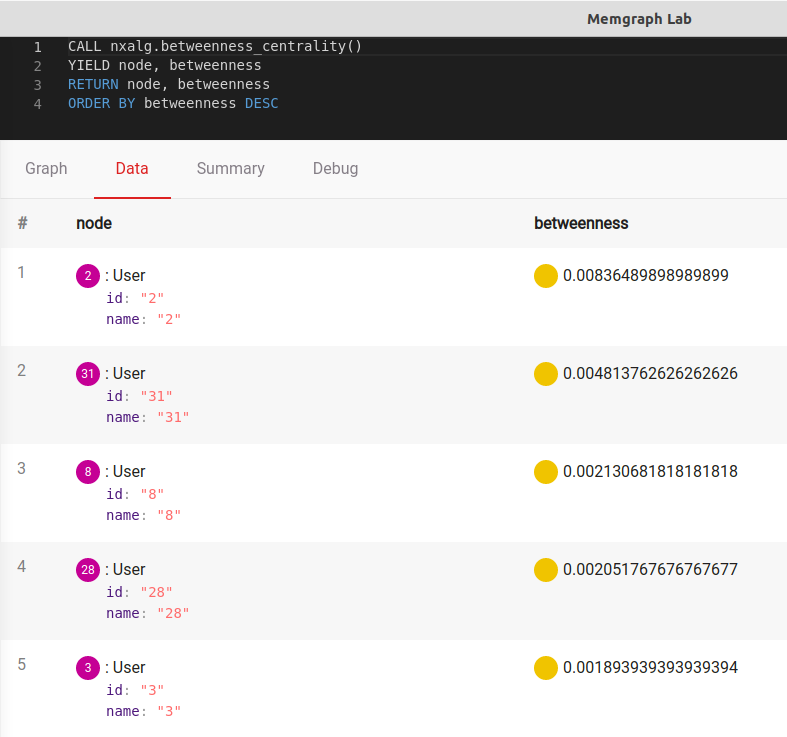
CALL nxalg.betweenness_centrality()
YIELD node, betweenness
RETURN node, betweenness
ORDER BY betweenness DESC
The output should be:

But wait a second. When you take a look at the graph, it's not very hard to notice that User 32 has a lot of connections with other Users. So what's happening here?
The problem is that graph databases like Memgraph usually have to add a direction to edges by default, there isn't a completely undirected type of graph. This is why you have to transform the graph to an undirected one before passing it to the betweenness_centrality() method.
To do so, copy the code of the betweenness centrality algorithm from the nxalg query module and add it to your community.py module. The only change you need to add to it is the conversion to an undirected graph via the .to_undirected() method:
@mgp.read_proc
def betweenness_centrality(ctx: mgp.ProcCtx,
                           k: mgp.Nullable[int] = None,
                           normalized: bool = True,
                           weight: mgp.Nullable[str] = None,
                           endpoints: bool = False,
                           seed: mgp.Nullable[int] = None
                           ) -> mgp.Record(node=mgp.Vertex,
                                           betweenness=mgp.Number):
    return [mgp.Record(node=n, betweenness=b)
            for n, b in nx.betweenness_centrality(
                    MemgraphDiGraph(ctx=ctx).to_undirected(), k=k, normalized=normalized,
                    weight=weight, endpoints=endpoints, seed=seed).items()]
Now, you can call this procedure again by executing:
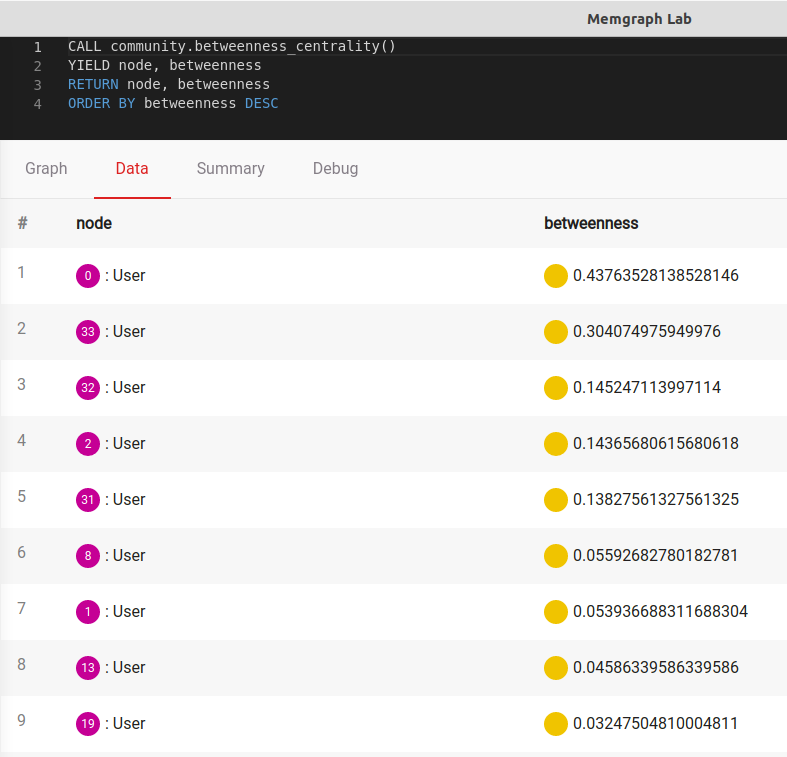
CALL community.betweenness_centrality()
YIELD node, betweenness
RETURN node, betweenness
ORDER BY betweenness DESC
Even though it is the same algorithm, the output is quite different:
Conclusion
The NetworkX Python package is a very powerful and versatile tool when it comes to network analysis. From standard measures like betweenness centrality to fully implemented community detection algorithms like Girvan-Newman, NetworkX contains almost everything a data scientist needs to study graph structures. By combining NetworkX with a graph platform like Memgraph, users get the option of exploring a large number of graph algorithms while also being able to securely and efficiently manage their data.
If you are interested in community detection algorithms in general or would just like to find out how the Girvan-Newman algorithm works, take a look at Understanding Community Detection Algorithms with Python NetworkX.