
How to Develop a Credit Card Fraud Detection Application Using Memgraph, Flask, and D3.js
Introduction
There is a large and ever-growing number of use cases for graph databases and many of them are centered around one important functionality: relationship traversals. While in traditional relational databases the concept of foreign keys seems like a simple and efficient idea, the truth is that they result in very complex joins and self-joins when the dataset becomes too inter-related.
Graph databases offer powerful data modeling and analysis capabilities for many real-world problems such as social networks, business relationships, dependencies, shipping, logistics… and they have been adopted by many of the world's leading tech companies.
The use case you'll be working on is Fraud Detection in large transaction networks. Usually, such networks contain millions of relationships between POS devices, logged transactions, and credit cards which makes it a perfect target for graph database algorithms.
In this tutorial, you will learn how to build a simple Python web application from scratch. You will get a basic understanding of the technologies that are used, and see how easy it is to integrate a graph database in your development process.
You can also find all of the code here if you don't want to work on it as you go through the tutorial. If at any point in this tutorial you have a question or something is not working for you, feel free to post on StackOverflow with the tag memgraphdb.
Prerequisites
Since you will be building a complete web application there is a number of tools that you will need to install before getting started:
- Flask: a very powerful web framework that provides you with tools, libraries and technologies used in web development. A Flask application can be as small as a single web page or as complex as a management interface.
- Docker and Compose: an open platform for developing, shipping, and running applications. It enables you to separate your application from your infrastructure (host machine). If you are installing Docker on Windows, Compose will be already included. For Linux and macOS visit this site.
- Memgraph DB: a native fully distributed in-memory graph database built to handle real-time use-cases at enterprise scale. Follow the Docker Installation instructions. While it's completely optional, I encourage you to also install Memgraph Lab so you can execute Cypher queries on the database directly and see visualized results.
Understanding the Payment Fraud Detection Scenario
First, let's define all the roles in this scenario:
- Card - a credit card used for payment.
- POS - a point of sale device that uses a card to execute transactions.
- Transaction - a stored instance of buying something.
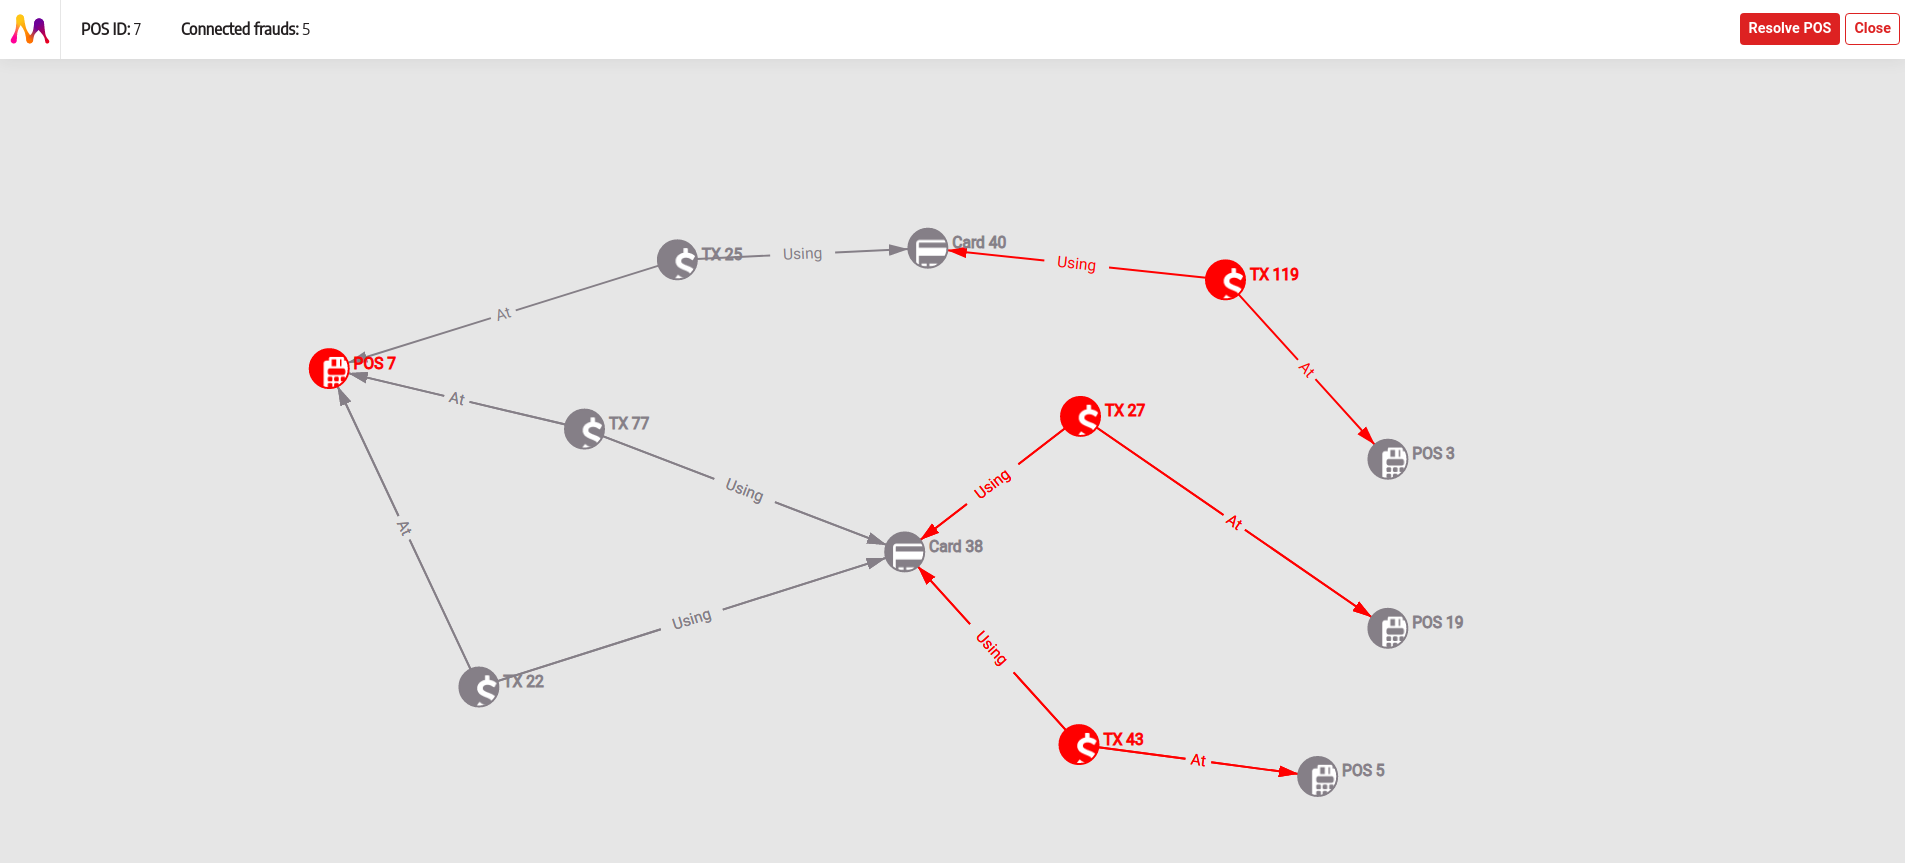
Your application will simulate how a POS device gets compromised, then a card in contact with that POS device gets compromised as well and in the end, a fraudulent transaction is reported. Based on these reported transactions, Memgraph is used to search for the root-cause (a.k.a. the compromised POS) of the reported fraudulent transactions and all the cards that have fallen victim to it as shown below.
Because this is a demo application you will create a set number of random cards, POS devices, and transactions. Some of these POS devices will be marked as compromised. If you find a compromised POS device, while searching for frauds in the network, then you'll mark the card as compromised as well. If the card is compromised, there is a 0.1% chance the transaction is fraudulent and detected (regardless of the POS device). You can then visualize all the transactions and cards connected to that POS device and resolve them as not fraudulent if need be.
Defining the Graph Schema
After we defined the scenario, it's time to create the graph schema!
A graph schema is a "dictionary" that defines the types of entities, vertices, and edges, in the graph and how those types of entities are related to one another.
Ok, so you know that there are three main entities in your model: Card, POS and Transaction.
The next step is to determine how these entities are represented in the graph and how they are connected. If you are not familiar with graph databases, a good rule of thumb is to use a relational analogy to get you started. All of these entities would be separate tables in a relational database and therefore they could be separate types of nodes in a graph. And so it is!
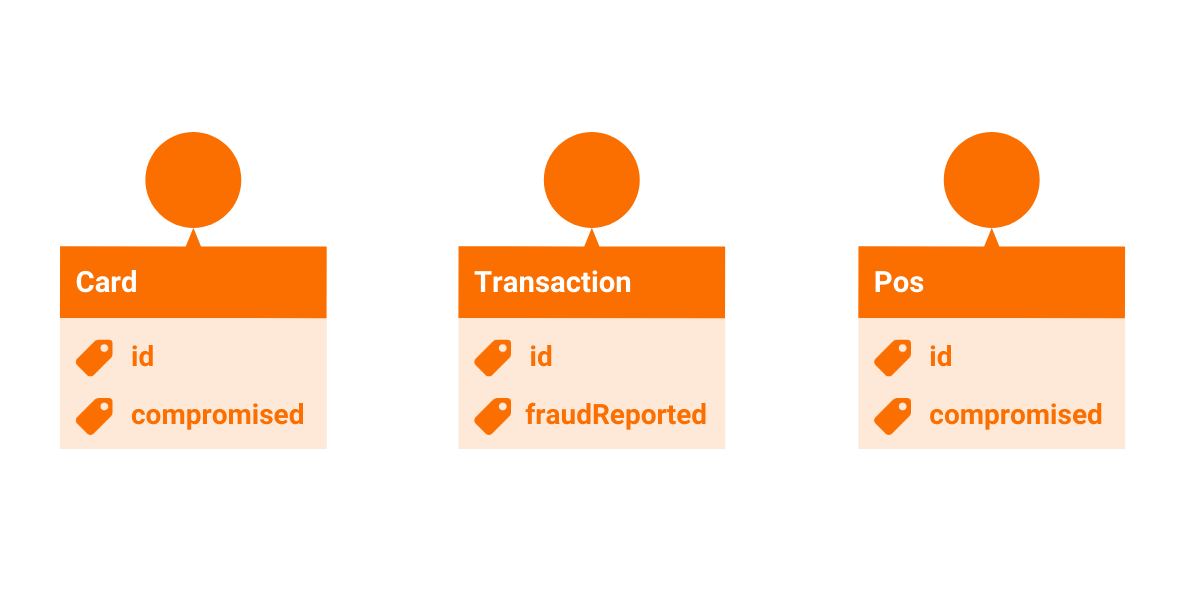
Each type of node has a different label: Card, Pos and Transaction.
All of them have the property id so you can identify them. The nodes Card and Pos also have the boolean property compromised to indicate if fraudulent activity has taken place. The node Transaction has a similar boolean property with the name fraudReported.
But how are these nodes connected? The nodes labeled Card and Transaction are connected via a relationship of type :USING. Internalize the meaning by reading it out loud: a transaction is executed USING a card. In the same fashion, a transaction is executed AT a POS device so the relationship between Transaction and POS is of type :AT.
Using the Cypher query language notation, the data structure when there are no frauds looks like this:
(:Card {compromised:false})<-[:USING]-(:Transaction)-[:AT]->(:Pos {compromised: false})The data structure when frauds occur:
(:Card {compromised:true})<-[:USING]-(:Transaction)-[:AT]->(:Pos {compromised: true})
(:Card {compromised:true})<-[:USING]-(:Transaction {fraudReported:true})-[:AT]->(:Pos)
Building the Web Application Backbone
This is presumably the easy part. You need to create a simple Python web application using Flask to be your server. Let's start by creating a root directory for your project and naming it card_fraud. There you need to create a requirements.txt file containing the necessary PIP installs. For now, only one line is needed:
Flask==1.1.2
You can install the specified package by running:
pip3 install -r requirements.txt
Add a new file to your root directory with the name card_fraud.py and the following code:
from flask import Flask

app = Flask(__name__)


@app.route('/')
@app.route('/index')
def index():
   return "Hello World"
You are probably rolling your eyes while reading this, but don't mock the Hello World example! Let's compile and run your server to see if everything works as expected. Open a terminal, position yourself in the root directory and execute the following two commands:
export FLASK_APP=card_fraud.py
export FLASK_ENV=development
This way, you have defined the entry point of your app and set the environment to development. This will enable development features like automatic code reloading. Don't forget to change this to production when you're ready to deploy your app. To run the server, execute:
flask run --host 0.0.0.0
You should see a message similar to the following, indicating that your server is up and running:
* Serving Flask app "card_fraud"
* Running on http://0.0.0.0:5000/
Dockerizing the Application
In the root directory of the project create two files, Dockerfile and docker-compose.yml. At the beginning of the Dockerfile, you specify the parent image and instruct the container to install CMake, mgclient, and pymgclient. CMake and mgclient are necessary to install pymgclient, the Python driver for Memgraph DB.
You don’t have to focus too much on this part, just copy the code to your Dockerfile:
FROM python:3.8

# Install CMake
RUN apt-get update && /
  apt-get --yes install cmake

# Install mgclient
RUN apt-get install -y git cmake make gcc g++ libssl-dev && /
  git clone https://github.com/memgraph/mgclient.git /mgclient && /
  cd mgclient && /
  git checkout dd5dcaaed5d7c8b275fbfd5d2ecbfc5006fa5826 && /
  mkdir build && /
  cd build && /
  cmake .. && /
  make && /
  make install

# Install pymgclient
RUN git clone https://github.com/memgraph/pymgclient /pymgclient && /
  cd pymgclient && /
  python3 setup.py build && /
  python3 setup.py install

# Install packages
COPY requirements.txt ./
RUN pip3 install -r requirements.txt

COPY card_fraud.py /app/card_fraud.py
WORKDIR /app

ENV FLASK_ENV=development
ENV LC_ALL=C.UTF-8
ENV LANG=C.UTF-8

ENTRYPOINT ["python3", "card_fraud.py"]
If you are not familiar with Docker, do yourself a favor and take look at this: Getting started with Docker.
Next, you need to create a docker-compose.yml file. Compose is a tool for defining and running multi-container Docker applications. With Compose, you use a YAML file to configure your application’s services. Then, with a single command, you create and start all the services from your configuration. For this project, you'll need two services. One is the web application (sng_demo) and the other a database instance (memgraph).
If you followed the instructions on how to setup Memgraph DB with Docker correctly you only need to add the following code to your docker-compose.yml file to run the container:
version: "3"
services:
  memgraph:
    image: "memgraph"
    ports:
      - "7687:7687"
  card_fraud:
    build: .
    volumes:
      - .:/app
    ports:
      - "5000:5000"
    environment:
      MG_HOST: memgraph
      MG_PORT: 7687
    depends_on:
      - memgraph
When it comes to the ports key, there is an important distinction between the HOST_PORT and the CONTAINER_PORT. The first number in the key is the HOST_PORT and it can be used to connect from your host machine to the service (for example with Memgraph Lab). The second number specifies the CONTAINER_PORT which is used for service-to-service communication. More specifically, your service card_fraud can use this port to access the service memgraph and connect to the database.
The environment key contains MG_HOST and MG_PORT which represent environment variables in the service’s container. They store the memgraph service address and port which are needed to establish a database connection.
The depends_on key is used to start services in dependency order because
need the database to start before the web application.
The build key allows us to tell Compose where to find the build instructions as well as the files and/or folders used during the build process. By using the volumes key, you bypass the need to constantly restart your image to load new changes to it from the host machine.
Congratulations, you now have a dockerized app! This approach is great for development because it enables you to run your project on completely different operating systems and environments without having to worry about compatibility issues.
To make sure we are on the same page, your project structure should look like this:
card_fraud
├── card_fraud.py
├── docker-compose.yml
├── Dockerfile
└── requirements.txt
Let’s start your app to make sure you don’t have any errors. In the project root directory execute:
docker-compose buildThe first build will take some time because Docker has to download and install a lot of dependencies. After it finishes run:
docker-compose upThe URL of your web application is 0.0.0.0:5000. You should see the message Hello World which means that the app is up and running correctly.
Defining the Bussines Logic
At this point, you have a basic web server and a database instance. It's time to add some useful functionalities to your app. To communicate with the database, your app needs some kind of OGM - Object Graph Mapping system. You can just reuse this one: custom OGM. Add the database directory with all of its contents to the root directory of your project.
Also, delete the contents of card_fraud.py because you are starting from scratch.
Let's fetch the environment variables you defined in the docker-compose.yml file by adding the following code in card_fraud.py:
import os

MG_HOST = os.getenv('MG_HOST', '127.0.0.1')
MG_PORT = int(os.getenv('MG_PORT', '7687'))
MG_USERNAME = os.getenv('MG_USERNAME', '')
MG_PASSWORD = os.getenv('MG_PASSWORD', '')
MG_ENCRYPTED = os.getenv('MG_ENCRYPT', 'false').lower() == 'true'
No web application is complete without logging, so let's at least add the bare minimum:
import logging
import time

log = logging.getLogger(__name__)

def init_log():
    logging.basicConfig(level=logging.INFO)
    log.info("Logging enabled")
    logging.getLogger("werkzeug").setLevel(logging.WARNING)

init_log()
It would also be convenient to add an input argument parser so you can run the app with different configurations without hardcoding them. Add the following import and function:
from argparse import ArgumentParser

def parse_args():
    '''
    Parse command-line arguments.
    '''
    parser = ArgumentParser(description=__doc__)
    parser.add_argument("--app-host", default="0.0.0.0",
                        help="Allowed host addresses.")
    parser.add_argument("--app-port", default=5000, type=int,
                        help="App port.")
    parser.add_argument("--template-folder", default="public/template",
                        help="The folder with flask templates.")
    parser.add_argument("--static-folder", default="public",
                        help="The folder with flask static files.")
    parser.add_argument("--debug", default=True, action="store_true",
                        help="Run web server in debug mode")
    parser.add_argument('--clean-on-start', action='store_true',
                        help='Should the DB be emptied on script start')
    print(__doc__)
    return parser.parse_args()


    args = parse_args()
Now, you can connect to your database and create an instance of a Flask server by adding the following code:
from flask import Flask, Response, request, render_template
from database import Memgraph

db = Memgraph(host=MG_HOST, port=MG_PORT, username=MG_USERNAME,
              password=MG_PASSWORD, encrypted=MG_ENCRYPTED)
app = Flask(__name__,
            template_folder=args.template_folder,
            static_folder=args.static_folder,
            static_url_path='')
Finally, you come to the business logic and all the interesting functions. Get ready because there are many things you need to implement. If you'd rather just copy them and read their descriptions later, that's fine too. You can find the complete card_fraud.py script here and can continue the tutorial on this section.
Clearing the Database
You need to start with an empty database so let's implement a function to drop all the existing data from it:
def clear_db():
    """Clear the database."""

    db.execute_query("MATCH (n) DETACH DELETE n")
    log.info("Database cleared")
Adding Initial Cards and POS Devices
There is a fixed number of initial cards and POS devices that need to be added to the database at the beginning.
def init_data(card_count, pos_count):
    """Populate the database with initial Card and POS device entries."""

    log.info("Initializing {} cards and {} POS devices".format(
        card_count, pos_count))
    start_time = time.time()

    db.execute_query("UNWIND range(0, {} - 1) AS id "
                     "CREATE (:Card {{id: id, compromised: false}})".format(
                         card_count))
    db.execute_query("UNWIND range(0, {} - 1) AS id "
                     "CREATE (:Pos {{id: id, compromised: false}})".format(
                         pos_count))

    log.info("Initialized data in %.2f sec", time.time() - start_time)
Adding a Single Compromised POS Device
You need the option of changing the property compromised of a POS device to true given that all of them are initialized as false at the beginning.
def compromise_pos(pos_id):
    """Mark a POS device as compromised."""

    db.execute_query(
        "MATCH (p:Pos {{id: {}}}) SET p.compromised = true".format(pos_id))
    log.info("Point of sale %d is compromised", pos_id)
Adding Multiple Random Compromised POS Devices
You can also compromise a set number of randomly selected POS devices at once.
from random import sample

def compromise_pos_devices(pos_count, fraud_count):
    """Compromise a number of random POS devices."""

    log.info("Compromising {} out of {} POS devices".format(
        fraud_count, pos_count))
    start_time = time.time()

    compromised_devices = sample(range(pos_count), fraud_count)
    for pos_id in compromised_devices:
        compromise_pos(pos_id)

    log.info("Compromisation took %.2f sec", time.time() - start_time)
Adding Credit Card Transactions
This is where the main analysis for fraud detection happens. If the POS device is compromised, then the card in the transaction gets compromised too. If the card is compromised, there is a 0.1% chance the transaction is fraudulent and detected (regardless of the POS device).
from random import randint

def pump_transactions(card_count, pos_count, tx_count, report_pct):
    """Create transactions. If the POS device is compromised,
    then the card in the transaction gets compromised too.
    If the card is compromised, there is a 0.1% chance the
    The transaction is fraudulent and detected (regardless of
    the POS device)."""

    log.info("Creating {} transactions".format(tx_count))
    start_time = time.time()

    query = ("MATCH (c:Card {{id: {}}}), (p:Pos {{id: {}}}) "
             "CREATE (t:Transaction "
             "{{id: {}, fraudReported: c.compromised AND (rand() < %f)}}) "
             "CREATE (c)<-[:Using]-(t)-[:At]->(p) "
             "SET c.compromised = p.compromised" % report_pct)

    def rint(max): return randint(0, max - 1)
    for i in range(tx_count):
        db.execute_query(query.format(rint(card_count),
                                      rint(pos_count),
                                      i))

    duration = time.time() - start_time
    log.info("Created %d transactions in %.2f seconds", tx_count, duration)
Resolving Transactions and Cards on a POS Device
You also need to have the functionality to resolve suspected fraud cases. This means marking all the connected components of a POS device as not compromised if they are cards and not fraudulent if they are transactions. This function is triggered by a POST request to the URL /resolve-pos. The request body contains the variable pos which specifies the id of the POS device.
import json

@app.route('/resolve-pos', methods=['POST'])
def resolve_pos():
    """Resolve a POS device and card as not compromised."""

    data = request.get_json(silent=True)
    start_time = time.time()

    db.execute_query("MATCH (p:Pos {{id: {}}}) "
                     "SET p.compromised = false "
                     "WITH p MATCH (p)--(t:Transaction)--(c:Card) "
                     "SET t.fraudReported = false, c.compromised = false".format(data['pos']))

    duration = time.time() - start_time
    log.info("Compromised Point of sale %s has been resolved in %.2f sec",
             data['pos'], duration)

    response = {"duration": duration}
    return Response(
        json.dumps(response),
        status=201,
        mimetype='application/json')
Fetching all Compromised POS Devices
This function searches the database for all POS devices that have more than one fraudulent transaction connected to them. It's is triggered by a GET request to the URL /get-compromised-pos.
@app.route('/get-compromised-pos', methods=['GET'])
def get_compromised_pos():
    """Get compromised POS devices."""

    log.info("Getting compromised Point Of Service IDs")
    start_time = time.time()

    data = db.execute_and_fetch("MATCH (t:Transaction {fraudReported: true})-[:Using]->(:Card)"
                                "<-[:Using]-(:Transaction)-[:At]->(p:Pos) "
                                "WITH p.id as pos, count(t) as connected_frauds "
                                "WHERE connected_frauds > 1 "
                                "RETURN pos, connected_frauds ORDER BY connected_frauds DESC")
    data = list(data)

    log.info("Found %d POS with more then one fraud in %.2f sec",
             len(data), time.time() - start_time)

    return json.dumps(data)
Fetching all Fraudulent Transaction
With a very simple query, you can return all the transactions that are marked as fraudulent. The function is triggered by a GET request to the URL /get-fraudulent-transactions.
@app.route('/get-fraudulent-transactions', methods=['GET'])
def get_fraudulent_transactions():
    """Get fraudulent transactions."""

    log.info("Getting fraudulent transactions")
    start_time = time.time()

    data = db.execute_and_fetch(
        "MATCH (t:Transaction {fraudReported: true}) RETURN t.id as id")
    data = list(data)

    duration = time.time() - start_time
    log.info("Found %d fraudulent transactions in %.2f",
             len(data), duration)

    response = {"duration": duration, "fraudulent_txs": data}
    return Response(
        json.dumps(response),
        status=201,
        mimetype='application/json')
Generating Demo Data
Your app will have an option to generate a specified number of cards, POS devices, and transactions, so you need a function that will be responsible for creating them and marking a number of them as compromised/fraudulent. It's triggered by a POST request to the URL /generate-data. The request body contains the variables:
pos: specifies the number of the POS device.frauds: specifies the number of compromised POS devices.cards: specifies the number of the cards.transactions: specifies the number of the transactions.reports: specifies the number of reported transactions.
@app.route('/generate-data', methods=['POST'])
def generate_data():
    """Initialize the database."""

    data = request.get_json(silent=True)

    if data['pos'] < data['frauds']:
        return Response(
            json.dumps(
                {'error': "There can't be more frauds than devices"}),
            status=418,
            mimetype='application/json')

    start_time = time.time()

    clear_db()
    init_data(data['cards'], data['pos'])
    compromise_pos_devices(data['pos'], data['frauds'])
    pump_transactions(data['cards'], data['pos'],
                      data['transactions'], data['reports'])

    duration = time.time() - start_time

    response = {"duration": duration}
    return Response(
        json.dumps(response),
        status=201,
        mimetype='application/json')
Fetching POS device Connected Components
This function finds all the connected components of a compromised POS device and returns them to the client. It's triggered by a POST request to the URL /pos-graph.
@app.route('/pos-graph', methods=['POST'])
def host():
    log.info("Client fetching POS connected components")

    request_data = request.get_json(silent=True)

    data = db.execute_and_fetch("MATCH (p1:Pos)<-[:At]-(t1:Transaction {{fraudReported: true}})-[:Using] "
                                "->(c:Card)<-[:Using]-(t2:Transaction)-[:At]->(p2:Pos {{id: {}}})"
                                "RETURN p1, t1, c, t2, p2".format(request_data['pos']))
    data = list(data)

    output = []
    for item in data:
        p1 = item['p1'].properties
        t1 = item['t1'].properties
        c = item['c'].properties
        t2 = item['t2'].properties
        p2 = item['p2'].properties
        print(p2)
        output.append({'p1': p1, 't1': t1, 'c': c, 't2': t2, 'p2': p2})

    return Response(
        json.dumps(output),
        status=200,
        mimetype='application/json')
Rendering Views
These functions will return the requested view. More on them in the Client-side Logic section. They are triggered by GET requests to the URLs / and /graph.
@app.route('/', methods=['GET'])
def index():
    return render_template('index.html')


@app.route('/graph', methods=['GET'])
def graph():
    return render_template('graph.html',
                           pos=request.args.get('pos'),
                           frauds=request.args.get('frauds'))
Creating the Main Function
The function main() has three jobs:
- Clear the database if so specified in the input arguments.
- Create indexes for the nodes
Card,PosandTransaction. You can learn more about indexing here. - Start the Flask server with the specified arguments.
def main():

    if args.clean_on_start:
        clear_db()

    db.execute_query("CREATE INDEX ON :Card(id)")
    db.execute_query("CREATE INDEX ON :Pos(id)")
    db.execute_query("CREATE INDEX ON :Transaction(fraudReported)")

    app.run(host=args.app_host, port=args.app_port, debug=args.debug)


if __name__ == "__main__":
    main()
Adding the Client-Side Logic
Now, that your server is ready, let's create the client-side logic for your web application.
I'm sure that you're not here for a front-end tutorial and therefore I leave it up to you to experiment and get to know the individual components. Just copy this public directory with all of its contents to the root directory of your project and add the following code to the Dockerfile under the line RUN pip3 install -r requirements.txt:
COPY public /app/publicJust to get you started, here is a basic summary of the main components in the public directory:
img: this directory contains images and animations.js: this directory contains the JavaScript scripts.graph.js: this script handles thegraph.htmlpage. It fetches all the connected components of a POS device, renders them in the form of a graph, and can resolve a POS device and all of its connected components as not fraudulent/compromised.index.js: this script handles theindex.htmlpage. It initializes all of the necessary components, tells the server to generate the initial data, and fetches the fraudulent transactions.render.js: this script handles the graph rendering on thegraph.htmlpage using the D3.js library.
libs: this directory contains all the locally stored libraries your application uses. For the purpose of this tutorial we only included thememgraph-designlibrary to style your pages.template: this directory contains the HTML pages.graph.html: this is the page that renders a graph of a compromised POS device with all of its connected components.index.html: this is the main page of the application. In it, you can generate new demo data and retrieve the compromised POS devices.
Starting the App
It's time to test your app. First, you need to build the Docker image by executing:
docker-compose build
Now, you can run the app with the following command:
docker-compose up
The app is available on the address 0.0.0.0:5000.
Hopefully, you see a screen similar to the image below and are smiling because you just finished your graph-powered credit card fraud detection web application!

Conclusion
Relational database-management systems model data as a set of predetermined structures. Complex joins and self-joins are necessary when the dataset becomes too inter-related. Modern datasets require technically complex queries which are often very inefficient in real-time scenarios.
A graph database is the perfect solution for such complex and large networks. From the underlying storage capabilities to the built-in graph algorithms, every aspect of a graph database is fine-tuned to deliver the best experience and performance when dealing with such problems.
In this, you built a graph-powered credit card fraud detection application from scratch using Memgraph, Flask, and D3.js. You got a good overview of the end-to-end development process using a graph database, and hopefully some ideas for your own projects. We can't wait to see what other graph applications you come up with!
As mentioned at the beginning of this tutorial, feel free to ask us any questions about this tutorial or Memgraph in general on StackOverflow with the tag memgraphdb or on our Discord server.
Happy coding!