
Data Import from Neo4j: Preserving relationships
Facing the race between graph and relational databases, graph databases are increasingly making their mark in various applications and industries. More and more developers are opting to migrate to Memgraph - a more cost-effective and high-performing database. Its use cases extend from fraud detection and optimizing supply chains to fueling advancements in machine learning and artificial intelligence. In this article, we'll also demonstrate the seamless process of exporting data from Neo4j and importing it into Memgraph using the efficient import CSV file feature.
Export data from Neo4j
If your data is already stored in a CSV file, feel free to skip ahead to the upcoming section, where we’ll guide you through preparing the data and importing it to Memgraph.
To export your dataset from Neo4j, go to your Neo4j instance and execute the following query:
CALL apoc.export.csv.all(“fileName.csv”, {})
Before running any APOC procedures, ensure that your APOC library is both enabled and installed. If you need detailed instructions on this, visit our tutorial in the Migrate from Neo4j YouTube video where we provided step-by-step guidance.
Once your dataset is exported, the resulting CSV file will be automatically saved in the Import folder of your Neo4j instance. To locate this folder, click on the three dots next to your project and select the Import button. Once you’ve located your file, make sure you copy it to a location with quick access to it.
Now that we’ve successfully exported our dataset, let’s move on to preparing the data for the import process.
Prepare data for import
There are two options for importing a CSV file into Memgraph. The first option involves using the LOAD CSV clause in Cypher to directly import your data. Alternatively, you can use the Import CSV file feature within Memgraph Lab. While this article focuses on showcasing an example using the Import CSV file feature, feel free to check our documentation for guidance on using the LOAD CSV feature.
When using the import feature in Memgraph Lab, CSV files are imported separately based on the label assigned to a node and the relationship types so the first step to the importing is separating those files.
After you’ve separated your export, you will end up with multiple CSV files, each containing data for nodes with specific labels and relationship types. In my case, these files will include one file for nodes with the "Person" label, another for the "COLLEAGUE" relationship type, one for "FAMILY_MEMBER," another for "FRIENDS_WITH," and finally, one for the "WORKS_WITH" relationship type.
Before proceeding with the import, a good practice is to clean up the data by removing any unnecessary columns and fields. Here's an example of a small cleaned-up CSV file for a Person label:
| _id | _labels | age | name |
|---|---|---|---|
| 0 | :Person | 25 | Alice |
| 1 | :Person | 30 | Bob |
| 2 | :Person | 22 | Charlie |
| 3 | :Person | 38 | David |
| 4 | :Person | 35 | Eva |
With the data organized and cleaned, you are now ready to begin the import process with Memgraph.
Import data to Memgraph
Before proceeding with the import, ensure that you have a running Memgraph instance.
Run Memgraph
The easiest way to run Memgraph is by using Docker. If you’re unfamiliar with Docker, visit our documentation on First steps with Docker.
With the Docker running in the background, run the following command in your terminal:
docker run -p 7687:7687 -p 7444:7444 -p 3000:3000 --name memgraph memgraph/memgraph-platform
This command starts your Memgraph instance using the memgraph-plaftorm Docker image. This image, besides the database, also includes all the tools you might need to analyze your data, such as command-line interface mgconsole, web interface Memgraph Lab and a complete set of algorithms within a MAGE library.
Once your instance is up and running, you can either visit localhost:3000 in your browser to access our visualization tool, Memgraph Lab, or install the desktop version of the app. With the quick connect button, establish a connection to your instance and you are now prepared to initiate the import process.
Data import
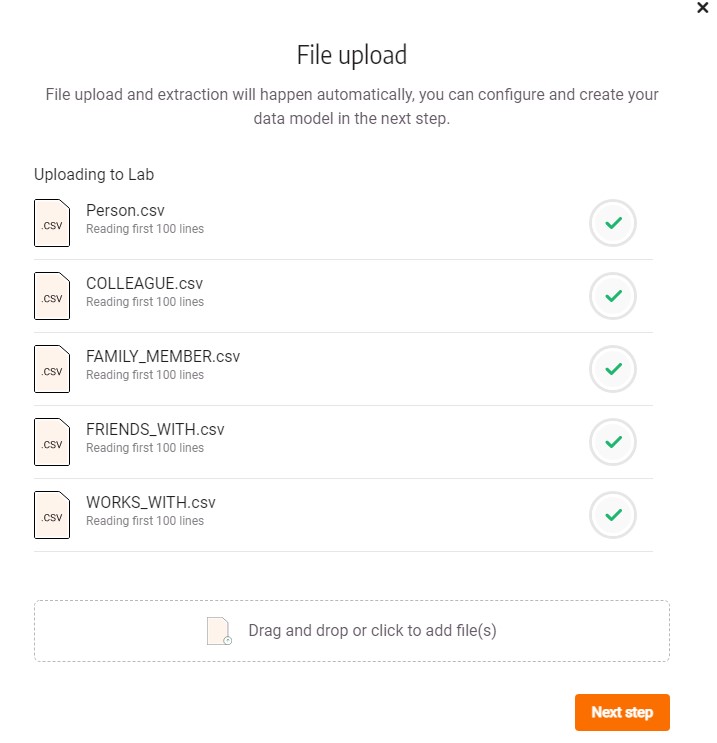
In Memgraph Lab, navigate to the Import window and select the CSV file import method. Memgraph Lab also supports connecting to a Kafka or Pulsar stream or importing a CYPHERL file. Once you’ve chosen the CSV file import, you’ll be presented with the choice to either merge the newly imported data with the existing dataset or drop the database and start from scratch. Select all of the files you intend to import. Your interface should look something like this:
Configuring nodes
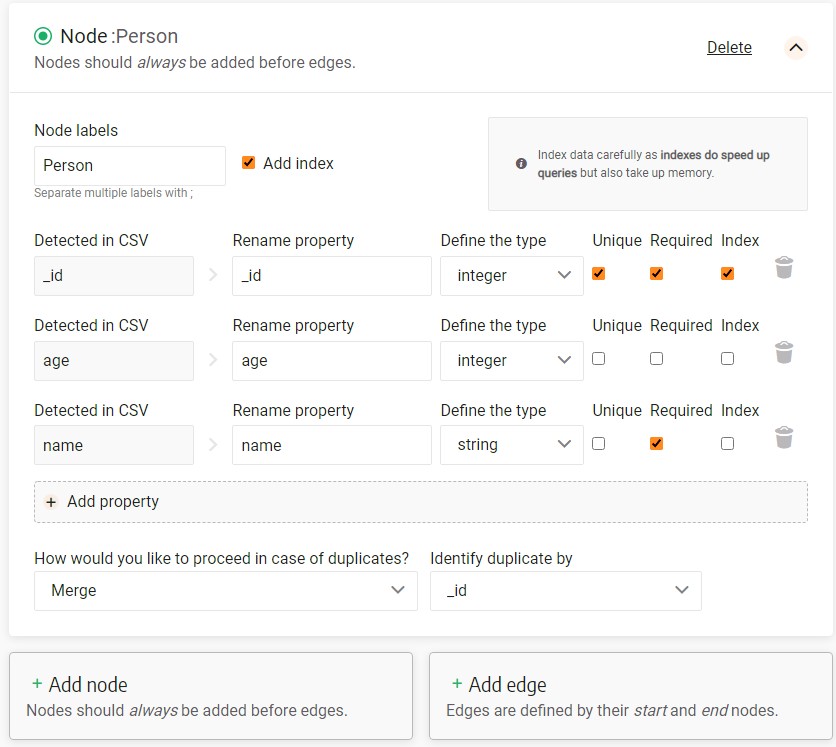
When configuring files containing nodes and node properties, it’s important to choose a label for each node. After choosing a label, you have an option to add an index to the label. Creating indexes is a good practice to improve performance of your database and shorten the scanning time.
Following that, choose all of the properties you’d like to import along with their respective types. For each property, there are three checkboxes: “Unique”, “Required” and “Index”.
The “Unique” checkbox signifies that no two nodes can have the same value for the selected property. If you check the "required" checkbox, you enforce that all nodes must possess this property. Checking the "index" checkbox indicates that an index should be created for the specified property.
In the image below, you can see an example of a node configuration, showing how these options can be applied:
Configuring relationships
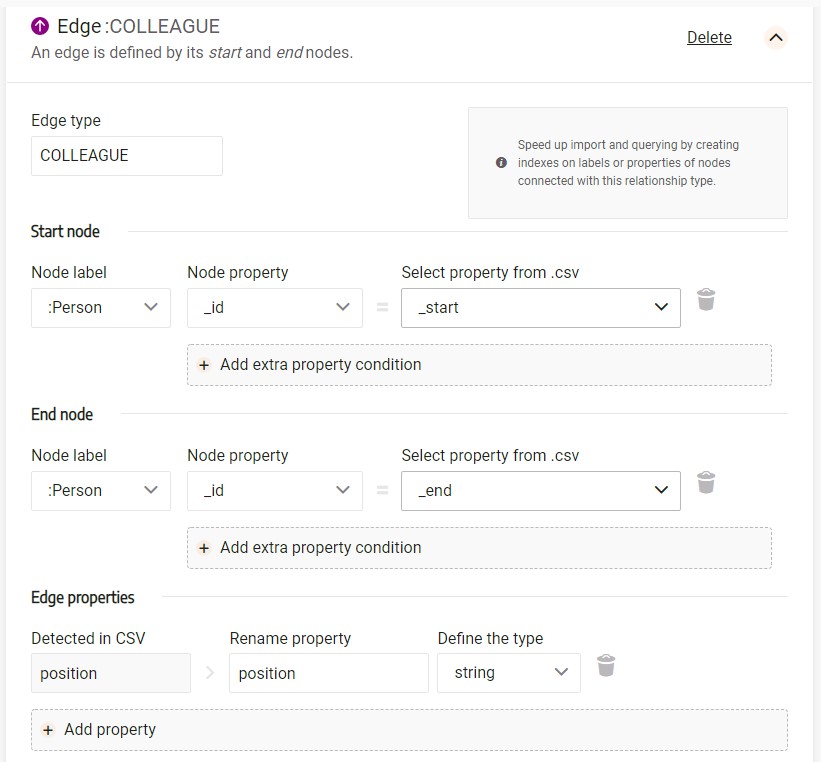
When configuring files containing relationships and relationship properties, it’s important to choose a label of the start node and end node. Having a data schema is beneficial in this case since it gives you a clear picture of what the structure of your dataset is. After choosing a label, you need to choose the start and the end node property of a relationship that will correspond to a certain property from a node. For example, if your CSV file contains columns that indicate the id of the start and the end node, then you’ll select the id property of a node to correspond to that.
Following that, choose all of the properties you’d like to import along with their respective types.
In the image below, you can see an example of an edge configuration:
Import data
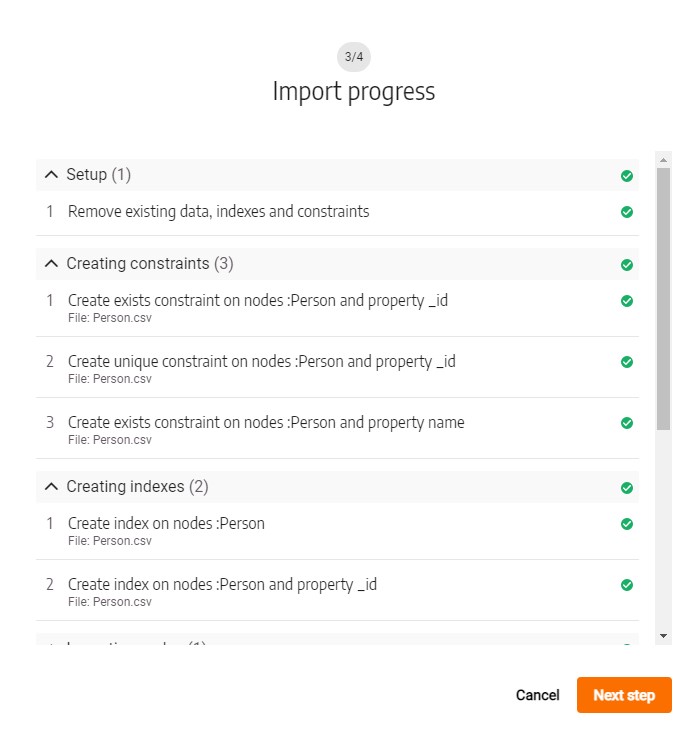
Once all the CSV files have been configured, it's time to initiate the import process in Memgraph Lab. After clicking on the "Preview import" button and selecting "Start import", the system will undergo a two-step process of validating the files before importing them into Memgraph.
In the images below, you can see the following steps:
Preview Import: The system previews the import, allowing you to review the configuration and ensure everything is set up correctly before proceeding with the actual import.
Start Import: After confirming the import settings, clicking on "Next step" triggers the validation and import process.
The progress demonstrates the system's activity, showing how your files are first validated and then seamlessly imported into Memgraph.
Explore the dataset
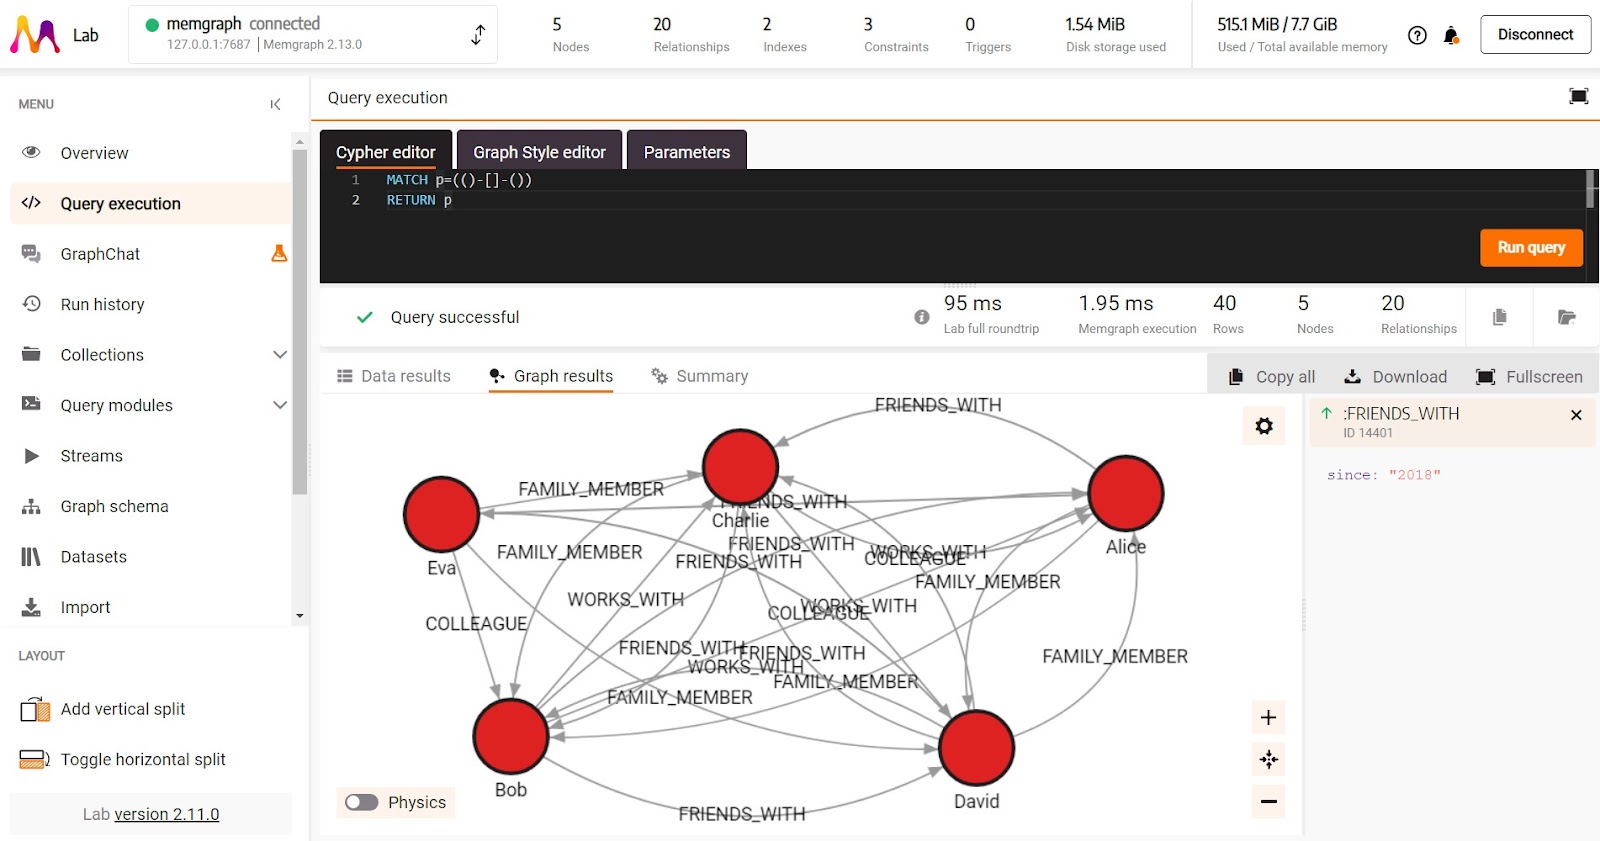
After successfully importing our dataset into Memgraph, we can now begin exploring the data. If you wish to visualize the entire dataset, all of the nodes and relationships, run the following query in the Query execution window in Memgraph Lab:
MATCH p=(()-[]-())
RETURN p;
Now, let's consider specific queries to retrieve relevant information from our database.
If you wish to retrieve all of the people from the database who are colleagues we need to run a query that returns all of the nodes labeled with :Person connected by the :COLLEAGUES relationship:
MATCH (n:Person)-[e:COLLEAGUE]-()
RETURN n, e;
Alternatively, let’s say you want to retrieve all of “Charlie’s friends” who are older than 25.
In other words, we need to filter the nodes labeled with :Person that have a :FRIENDS_WITH relationship with the node with the value of the property name being ‘Charlie’ and value of the property age being bigger than 25.
To achieve that, use the following query:
MATCH (n:Person)
WHERE exists((n)-[:FRIENDS_WITH]-(:Person {name:'Charlie'})) AND n.age > 25
RETURN n;
The capabilities for querying a database, visualizing and retrieving data, and running algorithms are extensive. To explore more possibilities and gain a deeper understanding of Memgraph's functionalities, we recommend visiting our documentation. The documentation provides detailed insights, examples, and explanations to help you leverage the full potential of Memgraph for your specific use cases. Visit our docs for a more in-depth exploration of the features and functionalities available.
Takeaway
Hopefully, this article was successful in guiding you through the process of migrating data from Neo4j to Memgraph, showcasing the simplicity of exporting and importing data and preserving your relationships and relationship properties along the way. Once data is successfully imported, users can explore it using queries in Memgraph Lab, making it easy to visualize and retrieve specific information. If something remains unclear, feel free to join our Discord community, engage with fellow users, share experiences, and ask away!