Importing Table Data Into a Graph Database With GQLAlchemy
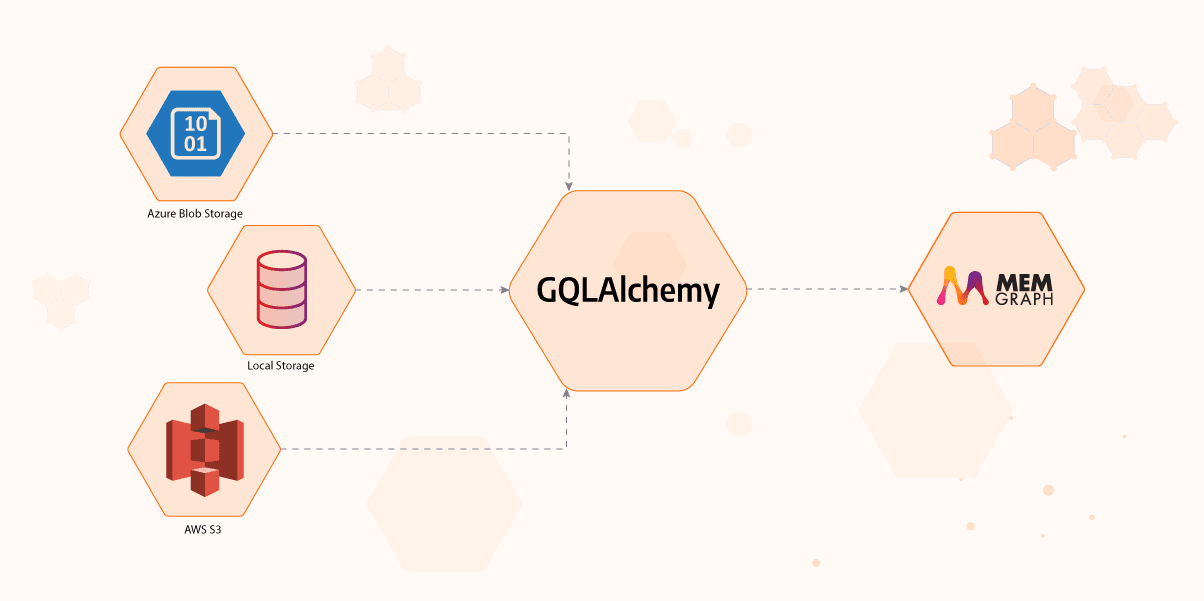
Are you considering moving from table data to a graph database, but it seems like a complicated migration? With this short tutorial, we are going to show you how to do just that using GQLAlchemy. You will learn how to import table data from files stored in local or online storage to a Memgraph graph database. You can find the original Jupyter Notebook in our open-source GitHub repository.
If at any point you experience problems with this tutorial or something is unclear to you, reach out on our Discord server.
1. Prerequisites
For this tutorial, you will need to install:
- Jupyter: Jupyter is needed if you want to run this tutorial as a notebook.
- Docker: Docker is used because Memgraph is a native Linux application and cannot be installed on Windows and macOS.
- GQLAlchemy: A Python OGM (Object Graph Mapper) that connects to Memgraph
2. Installation using Docker
After you install Docker, you can set up Memgraph by running:
docker run -it -p 7687:7687 -p 7444:7444 -p 3000:3000 memgraph/memgraph-platform:2.2.6
This command will start the download and after it finishes, run the Memgraph container.
3. Connecting to Memgraph with GQLAlchemy
We will be using the GQLAlchemy object graph mapper (OGM) to connect to Memgraph and execute Cypher queries easily. GQLAlchemy also serves as a Python driver/client for Memgraph. You can install it using:
pip install gqlalchemy
Hint: You may need to install CMake before installing GQLAlchemy.
Maybe you got confused when I mentioned Cypher. You can think of Cypher as SQL for graph databases. It contains many of the same language constructs like CREATE, UPDATE, DELETE... and it's used to query the database.
from gqlalchemy import Memgraph

memgraph = Memgraph("127.0.0.1", 7687)
Let's make sure that Memgraph is empty before we start with anything else.
memgraph.drop_database()

results = memgraph.execute_and_fetch(
    """
    MATCH (n) RETURN count(n) AS number_of_nodes ;
    """
)
print(next(results))
4. Making mock table data file
For this tutorial, we are going to create CSV files to represent our data. Using two files, you can also model a relationship between them with a foreign key. But more on that later, for now, you can run the following code to make two CSV files, individual.csv and address.csv.
import csv

header = ["ind_id", "name", "surname", "add_id"]
data = [
    [1, "Tomislav", "Petrov", 1],
    [2, "Ivan", "Horvat", 3],
    [3, "Marko", "Horvat", 3],
    [4, "John", "Doe", 2],
    [5, "John", "Though", 4],
]

with open("individual.csv", "w", encoding="UTF8", newline="") as f:
    writer = csv.writer(f)
    writer.writerow(header)
    writer.writerows(data)
header = ["add_id", "street", "street_num", "city"]
data = [
[1, "Ilica", 2, "Zagreb"],
[2, "Death Valley", 0, "Knowhere"],
[3, "Horvacanska", 3, "Horvati"],
[4, "Broadway", 12, "New York"],
]
with open("address.csv", "w", encoding="UTF8", newline="") as f:
writer = csv.writer(f)
writer.writerow(header)
writer.writerows(data)5. Defining a translation
In order to translate the table data into graph form, you need to give the importer instructions on how to do that. For this, you should define a data configuration object which can be a dictionary in Python code or a YAML file.
Here is a general structure of a data configuration YAML file:
indices:    # indices to be created for each table
  individuals:    # name of the table containing individuals with ind_id
  - ind_id
  address:
  - add_id


name_mappings:    # how we want to name node labels
  individuals:
    label: INDIVIDUAL    # nodes made from the individuals table will have the label INDIVIDUAL
  address:
    label: ADDRESS
    column_names_mapping: {"current_column_name": "mapped_name"}    # (optional) map column names


one_to_many_relations:
  address: []    # currently needed, leave [] if no relations to define
  individuals:
    - foreign_key:                # foreign key used for mapping;
      column_name: add_id         # specifies its column
      reference_table: address    # name of table from which the foreign key is taken
      reference_key: add_id       # column name in reference table from which the foreign key is taken
    label: LIVES_IN               # label applied to relationship created
      from_entity: False          # (optional) define direction of relationship created


many_to_many_relations:      # intended to be used in case of associative tables
  example:
    foreign_key_from:        # describes the source of the relationship
      column_name:
      reference_table:
      reference_key:
    foreign_key_to:          # describes the destination of the relationship
      column_name:
      reference_table:
      reference_key:
    label:
For our example, we will use a dictionary to simplify the input process. We want to create nodes for all rows in both tables and a relationship LIVES_IN between an INDIVIDUAL and ADDRESS nodes. Also, you will not be using the many_to_many_relations field, so your data configuration object is:
data_conf = {
    "indices": {"address": ["add_id"], "individual": ["ind_id"]},
    "name_mappings": {
        "individual": {"label": "INDIVIDUAL"},
        "address": {"label": "ADDRESS"},
    },
    "one_to_many_relations": {
        "address": [],
        "individual": [
            {
                "foreign_key": {
                    "column_name": "add_id",
                    "reference_table": "address",
                    "reference_key": "add_id",
                },
                "label": "LIVES_IN",
            }
        ],
    },
}
6. Importing from the local file system
Finally, to import the data into Memgraph, all you need to do is make an instance of LocalFileSystemImporter and call its translate() method.
from gqlalchemy.loaders import CSVLocalFileSystemImporter

importer = CSVLocalFileSystemImporter(
    data_configuration=data_conf,
    path="./",
)

importer.translate(drop_database_on_start=True)
7. Importing from online file storage
Furthermore, we offer support for reading data from online storage providers Amazon S3 and Azure Blob via AmazonS3Importer and AzureBlobImporter. To use the Azure storage, for example, simply use the following snippet:
importer = CSVAzureBlobFileSystemImporter(
    container_name="<your_container_name>",
    data_configuration=data_conf,
    account_name="<your_account_name>",
    account_key="<your_account_key>",
)
For any other service provider, it is possible to implement your custom importer class, here's how. Don't forget that GQLAlchemy is an open source project, so you can submit your extended functionality on our GitHub repository.
8. Querying the database and retrieving results
Let's make sure that our data was imported correctly by retrieving it:
results = memgraph.execute_and_fetch(
    """
    MATCH (n) RETURN n;
    """
)

results = list(results)

for result in results:
    print(result["n"])
If you want to do more with your graph data, visit the Memgraph MAGE graph library (and throw us a star ⭐) and take a look at all of the graph algorithms that have been implemented. You can also implement and submit your own algorithms and utility procedures.
10. Visualizing the graph in Memgraph Lab
Open Memgraph Lab in your browser on the address localhost:3000. Execute the following Cypher query:
MATCH (n)-[r]-()
RETURN n, r;
What's next?
Now it's time for you to import your data into Memgraph and start using it!
You can always check out Memgraph Playground for some cool use cases and examples. If you have any questions or want to share your work with the rest of the community, join our Discord Server.