
How to Install Memgraph With Docker on macOS
Introduction
Memgraph is an end-to-end platform designed to solve complex graph problems in real-time and accelerate graph application development. Memgraph supports strongly-consistent ACID transactions and uses the Cypher query language for structuring, manipulating, and exploring data.
Memgraph Platform includes:
- Memgraph DB - in-memory graph database built for real-time business-critical applications
- Memgraph Lab - lightweight and intuitive Cypher and Bolt compatible visual user interface running in browser designed to help you import data, develop, debug, and profile database queries and visualize query results.
- mgconsole - command-line interface for running queries
- MAGE - open-source repository that contains graph algorithms and modules that extend the Cypher query language and help tackle the most interesting and challenging graph analytics problems.
In this tutorial, you will install Memgraph Platform on your Mac with Docker and Memgraph Lab as a desktop application. You will then test each installation by running basic Cypher queries to make sure that everything is working correctly.
Prerequisites
For a seamless installation of Memgraph and Memgraph Lab on your Mac, ensure that you have:
- A computer running macOS version 10.13 (High Sierra) or higher.
- Administrative rights to your macOS and an internet connection.
- Docker Desktop for Mac version 1.12 or higher installed on your computer.
- Basic knowledge of working with the command line.
Step 1 — Downloading and Installing Memgraph
Before we go on, it's essential that you have Docker installed on your system so you are able to install and run Memgraph.
Open iTerm or Terminal, then use the following command to download the Memgraph Platform Docker image and load it.
docker pull memgraph/memgraph-platform
Now, start the Memgraph server by issuing this command:
docker run -it -p 7687:7687 -p 3000:3000 -p 7444:7444 -v mg_lib:/var/lib/memgraph memgraph/memgraph-platform
The -it flag allows us to communicate with the database using command-line
tool mgconsole. Memgraph DB is exposed on port 7678, Memgraph Lab on port 3000,
and to be able to read logs from Memgraph Lab the port 7444 also needs to be
exposed.
With the -v mg_lib:/var/lib/memgraph flag we enable data persistance by mounting a
volume where snapshots of the database will be saved. This means that data won't
be lost if the database instance is stopped.
If successful, you should be greeted with the following message:
Memgraph Lab is running at localhost:3000

mgconsole 1.1
Connected to 'memgraph://127.0.0.1:7678'
Type :help for shell usage
Quit the shell by typing Ctrl-D(eof) or :quit
memgraph>
As you can see, mgconsole opened in the terminal and you can access Memgraph Lab
by opening localhost:3000 in your browser.
The next step is to play around by executing some queries using the CLI (command-line interface) tool.
Step 2 — Querying Memgraph Using a Command-Line Tool
Memgraph comes with a CLI tool named mgconsole. It allows you to execute
Cypher queries against the Memgraph DB using the command line.
Memgraph supports the Cypher query through the openCypher project. Cypher is a SQL-like declarative query language purposely designed to efficiently query and update property graphs.
We'll now test Memgraph by executing two basic queries that demonstrate the
creation and retrieval of data from the database. Each query needs to end with
the ; (semicolon) character.
Execute this query in mgconsole:
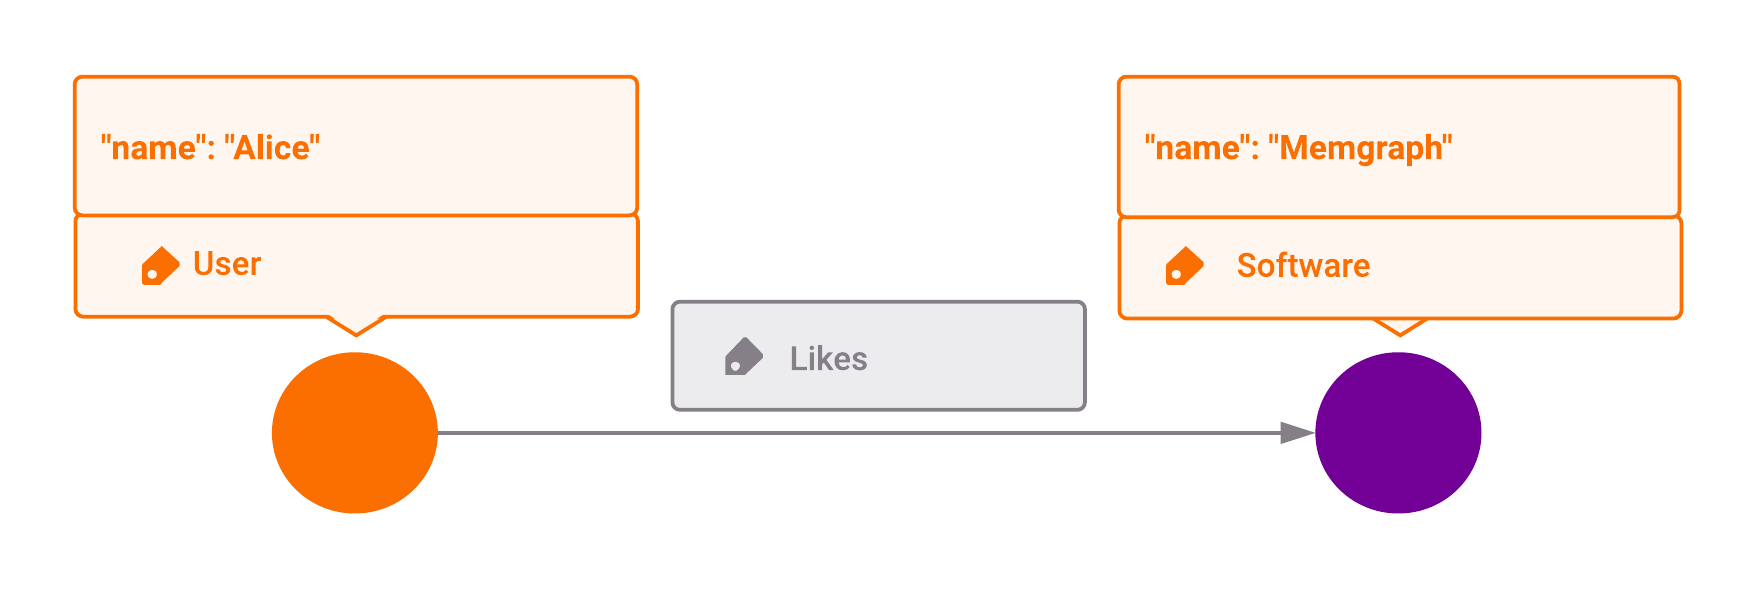
CREATE (u:User {name: "Alice"})-[:Likes]->(s:Software {name: "Memgraph"});
The above will create 2 nodes in the database, one labeled "User" with the name "Alice" and the other labeled "Software" with the name "Memgraph". It will also create a relationship that "Alice" likes "Memgraph".
Next, lets find the created nodes and relationships by executing this second query:
MATCH (u:User)-[l]->(s) RETURN u, l, s;
The query returns the following result:
| u                      | l      | s                             |
| ---------------------- | -------| ------------------------------|
| (:User {name: "Alice"})| [Likes]| (:Software {name: "Memgraph"})|
Lastly, type :quit in the prompt, or press CTRL + D or CTRL + C to exit the mgconsole tool.
Excellent! You have now installed Memgraph and used its command-line tool mgconsole to run a simple query.
Now, aside from a CLI tool, Memgraph also has an integrated development environment called Memgraph Lab to help you manage and execute various tasks on your databases.
When you install and run Memgraph Platform, Memgraph Lab is available at
localhost:3000. If you need Memgraph Lab to connect to a remote server you
can also install it as a desktop application.
In the next step we will show you how to install Memgraph Lab as a desktop application. If you don't need it, skip to Step 4 where you will learn how to connect to Memgraph DB and execute queries using Memgraph Lab.
Step 3 — Installing Memgraph Lab
Start by selecting and downloading the Memgraph Lab build for macOS from Memgraph's Download Hub.
Once downloaded, installing the app on your system is similar to how you would
install most Mac apps — by opening the .dmg file and dragging the app
(Memgraph Lab) into the /Applications folder.
Make sure that Memgraph is running as explained on Step 1. You won't be able to connect if the server is not running in the first place!
Open the Memgraph Lab app.
Now, depending on your macOS' security preferences, it might block the app from running the first time. This is because it can't recognize the developer of the app, which in this case, is Memgraph.
This is normal and nothing you should worry about. Just press the OK button to dismiss the dialog box.
What you need to do next is to allow macOS to run Memgraph Lab. To do this, open your system's System Preferences and then click Security & Privacy preferences.
Now, inside the Security & Privacy preference pane, ensure that the General tab is active and look to the Allow apps downloaded from: section. Any option or setting that will allow Memgraph Lab to run will be available there.
For more information about allowing unidentified apps to run on macOS, see the articles Open an app from an unidentified developer and the Safely open apps on your Mac.
After updating your security preferences, try rerunning Memgraph Lab. Just click Open if macOS asks you if you really want to open it. This is again part of macOS' security precautions.
Memgraph Lab will now open, and you should be presented with the Home screen. It
looks the same as Home screen of Memgraph Lab that is running in the browser at
localhost:3000.
Now that we have Memgraph Lab installed, lets connect to Memgraph DB and run a few basic queries to make sure everything works properly.
Step 4 — Testing the Memgraph Lab Installation
Memgraph Lab Home screen should look tha same if the database is up and running
regardless if you are using Memgraph Lab as a desktop app, or it is running in
browser at localhost:3000.
If Memgraph Lab cannot find a running database instance run Memgraph like we did in Step 1.
Click CONNECT NOW to start connecting to the Memgraph server using default
values for username and password (those values are empty by default), and
endpoint (default values for Host is localhost and default Port is 7687).
If you need to change any of those values click Connect Manually.
In the Overview tab you should be able to see there are 2 nodes and 1
relationship present because we created them via mgconsole. You can also find
out how much memory those entities are using.
If you go to the Graph Schema tab and click Generate graph schema you can see the existing node labels, edge types, their properties and how they interact with each other.
Let's test Memgraph Lab by running a similar query we ran in Step 2.
-
First, click the Query tab on the left sidebar.
-
Next, enter this query at the query editor which is located at the top of the screen:
CREATE (u:User {name: "Sean"})-[:Likes]->(s:Software {name: "MemgraphLab"});The query above creates 2 new nodes and a relationship between them.
-
Lastly, click Run or press
Cmd + Enterto execute the query.
If no error message appeared, that means your query executed successfully and in the Summary tab you check the times and cost estimates of the query.
We will now retrieve all the nodes and relationships we've created by executing the following Cypher query:
MATCH (u:User)-[l]->(s) RETURN u, l, s;
You should get a result that looks similar to this:
You now have Memgraph Lab working correctly on your system. Memgraph Lab's
visual presentation of query results is one of its best features. It helps you
understand the relationships of your nodes compared to the tabular format
presented by the mgconsole tool we introduced in Step 2. This makes Memgraph
Lab the preferred tool for both beginners learning Memgraph and the Cypher query
language, and advanced Memgraph users working on complex queries.
Conclusion
In this tutorial, you installed Memgraph Platform and Memgraph Lab on macOS. You
tested Memgraph by executing Cypher queries using a command-line tool
mgconsole and a visual interface Memgraph Lab.
If you are interested in learning more about each product, please consult the respective Memgraph and Memgraph Lab.
If you are new to Memgraph or graph databases in general, finishing this tutorial marks an excellent starting point for further learning and something you should build upon. Here are our other tutorials you can follow:
- Exploring the Marvel comic universe social network with Memgraph.
- Exploring Game of Thrones deaths with Memgraph
If you have any questions or would like to get any help with Memgraph, please check out our community.