
End-to-End Agents over Graphs with Memgraph’s AI Toolkit, LangGraph & MCP
When you connect LangGraph's control logic with Memgraph's AI toolkit and MCP’s protocol layer, you create agents that can dynamically think, act, and query at runtime.
In this article, we’ll walk through building and running an intelligent agent powered by the LangGraph framework and Memgraph AI Toolkit, and explore how to integrate Memgraph via Model Context Protocol (MCP) for seamless, real-time LLM interactions.
These tools together allow you to query and reason over complex graph data, build structured, reactive agents and easily plug Memgraph into LLM interfaces like Claude using MCP.
What we'll cover
- Set up Memgraph and load the data
- Build a LangGraph agent that uses Memgraph tools
- Visualize, test, and debug with LangGraph Studio and LangSmith
- Interact with Memgraph through Claude Desktop via MCP
Start Memgraph
First, spin up a local Memgraph instance with MAGE enabled:
docker run -p 7687:7687 \
--name memgraph \
memgraph/memgraph-mage:latest \
--schema-info-enabled=true
Once Memgraph is running, load the data. In this example, the Game of Thrones dataset is loaded from Memgraph Lab.
Set up your LangGraph project
The next step is to create a local LangGraph server. We’ll follow the Quickstart instructions from the LangGraph documentation.
LangGraph lets you build agents using a graph-based control flow. It’s ideal when your app needs to act differently based on context or tool outputs.
Before starting:
- Install Python 3.11+
- Get a LangSmith API key (for logging/debugging)
Then:
pip install --upgrade "langgraph-cli[inmem]"
langgraph new path/to/your/app --template new-langgraph-project-python
Next, install the needed dependencies. To make sure you have everything required for this example, include the following libraries in your pyproject.toml:
"langchain-memgraph==0.1.3",
"langchain==0.3.25",
"langchain-openai==0.3.17"
And run:
cd path/to/your/app
pip install -e .
Configure your environment
After setting up your app, configure your .env file. Copy the contents of .env.example provided in your project, and update it with your API keys. Your .env might look like this:
# To separate your traces from other application
LANGSMITH_PROJECT=new-agent

# Add API keys for connecting to LLM providers, data sources, and other integrations here
OPENAI_API_KEY=""
LANGSMITH_TRACING=""
LANGSMITH_API_KEY=""
Stick to the steps: install the CLI, generate your app, install dependencies, and configure your environment. Once this is complete, you’re ready to build and run your LangGraph application.
Build your agent
To define the agent’s behavior, we modify the graph.py file. This is where we construct the core logic of our LangGraph application by wiring together the language model, the tools from the Memgraph AI Toolkit, and the agent's control flow.
We start by connecting to a local Memgraph instance using the MemgraphLangChain client. This sets up the interface for querying the graph database. We then initialize a GPT-4.1 model through init_chat_model, and bind it to a set of tools provided by the MemgraphToolkit. These tools give the agent access to database introspection capabilities like run_cypher, show_schema_info, and show_config.
url = "bolt://localhost:7687"
username = "memgraph"
password = "memgraph"

db = MemgraphLangChain(
    url=url, username=username, password=password, refresh_schema=False
)

llm = init_chat_model("openai:gpt-4.1")
toolkit = MemgraphToolkit(db=db, llm=llm)
tools = toolkit.get_tools()
llm_with_tools = llm.bind_tools(tools)
Next, we define a simple state structure using a TypedDict called State, which contains a list of messages representing the ongoing conversation. The main function of the agent, chatbot, uses the language model (with tools bound) to generate the next response based on this conversation history.
class State(TypedDict):
messages: Annotated[list, add_messages]
def chatbot(state: State):
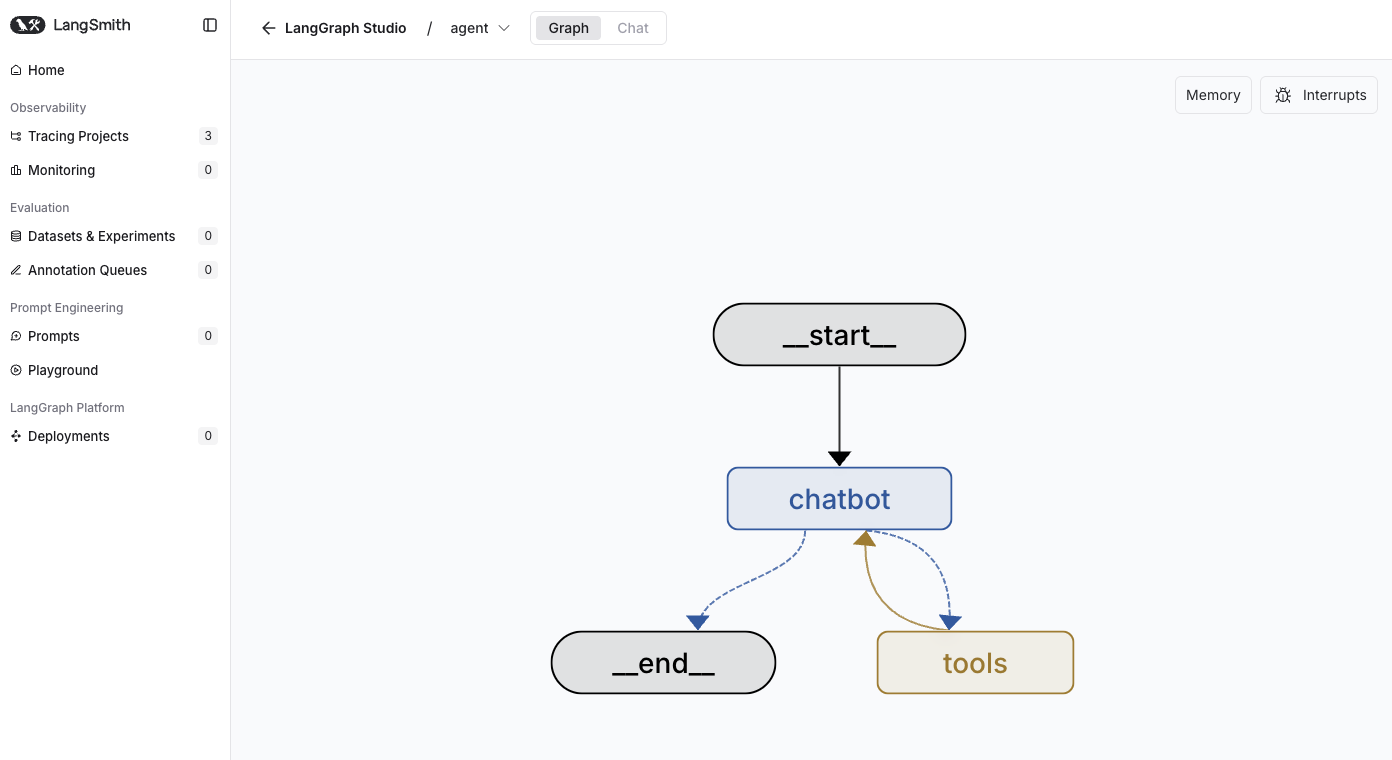
return {"messages": [llm_with_tools.invoke(state["messages"])]}The LangGraph StateGraph is then assembled by adding two main nodes: "chatbot" for LLM-based reasoning, and "tools" for executing external actions when the model determines that a tool is needed. These nodes are connected using a conditional edge (tools_condition) which evaluates whether the agent’s response requires invoking a tool. If so, control passes to the "tools" node, and afterward loops back to "chatbot" to continue the dialogue with the tool’s output included.
graph_builder = StateGraph(State)
graph_builder.add_node("chatbot", chatbot)

tool_node = ToolNode(tools=tools, name="tools")
graph_builder.add_node("tools", tool_node)
graph_builder.add_conditional_edges(
    "chatbot",
    tools_condition,
)
# Any time a tool is called, we return to the chatbot to decide the next step
graph_builder.add_edge("tools", "chatbot")
graph_builder.add_edge(START, "chatbot")
graph = graph_builder.compile()
This flow forms a basic but powerful loop: the agent thinks (chatbot), acts if needed (tools), and then thinks again, enabling dynamic and interactive workflows.
Once compiled, this graph defines your agent’s logic and can be run directly in the LangGraph development server. From here, you can experiment with different tool integrations, extend the graph with custom logic, or add memory and routing for more advanced behaviors.
Try out LangGraph server
To test your agent, launch the LangGraph development server with:
langgraph devThis opens LangGraph Studio in your browser. You can:
- Chat with your agent
- Watch state transitions
- Test tool invocations
It’s an excellent environment for development and experimentation, making it easier to refine your agent’s behavior before deploying it in production.
Once the Studio is running, you can interact with your agent directly from the interface. For example, try asking:
“How many nodes are there in the database?”
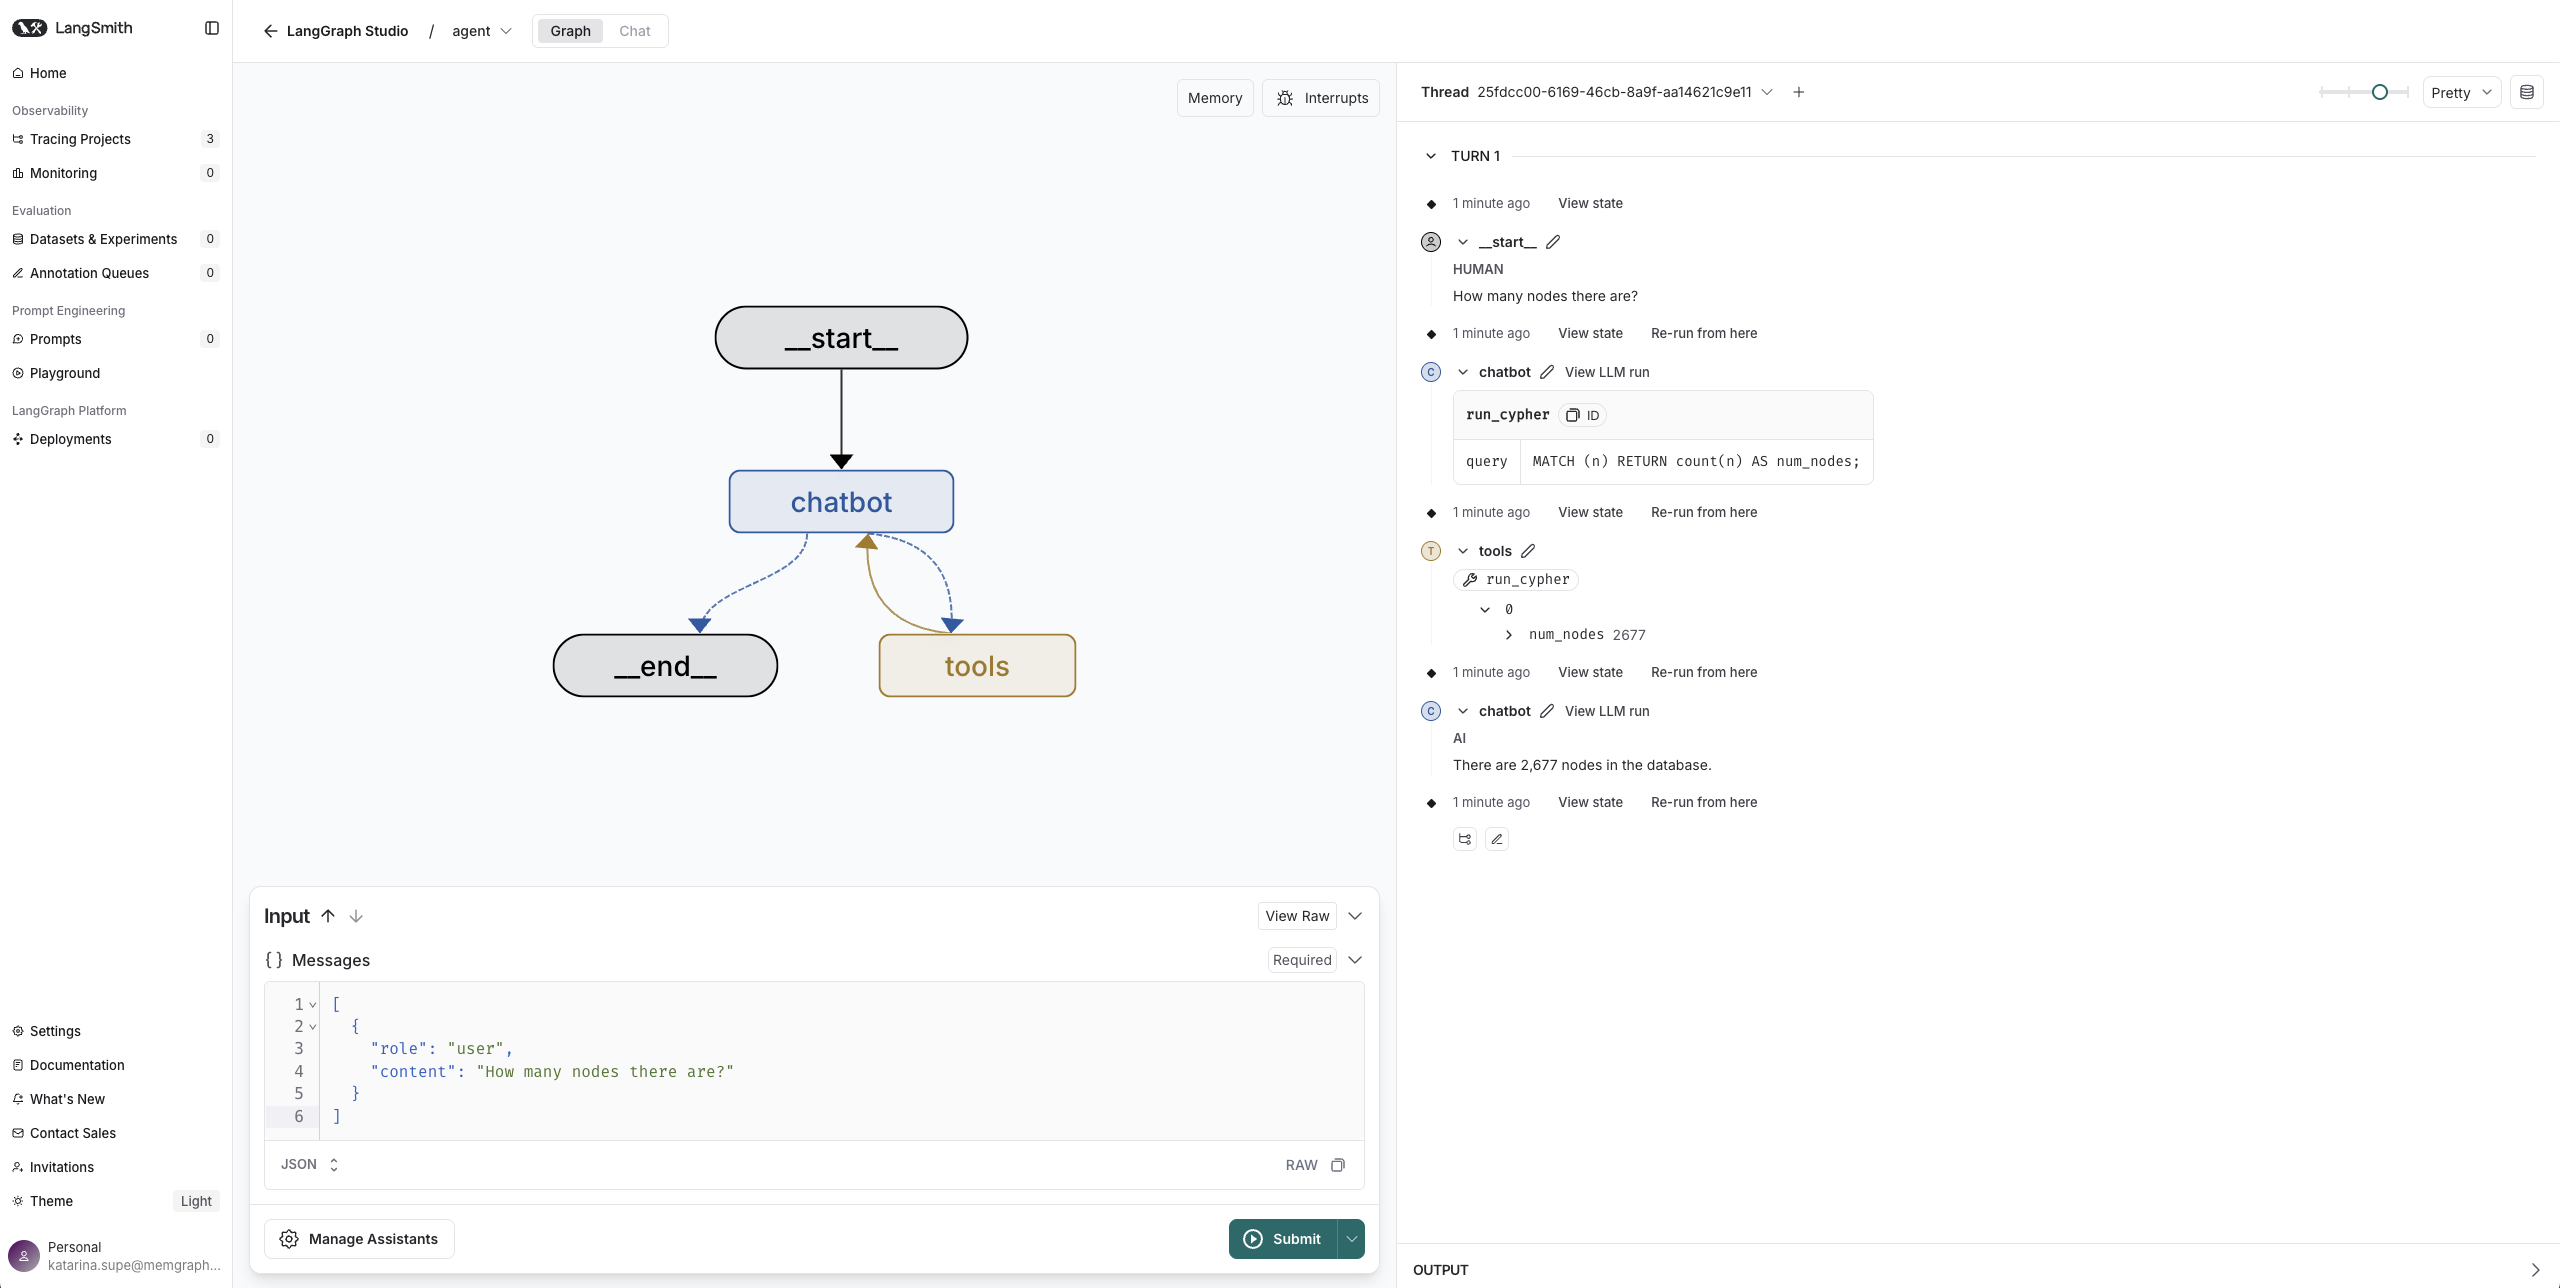
The agent will correctly invoke the run_cypher() tool from the Memgraph Toolkit and return the count. You can verify the answer by connecting to Memgraph using Memgraph Lab.

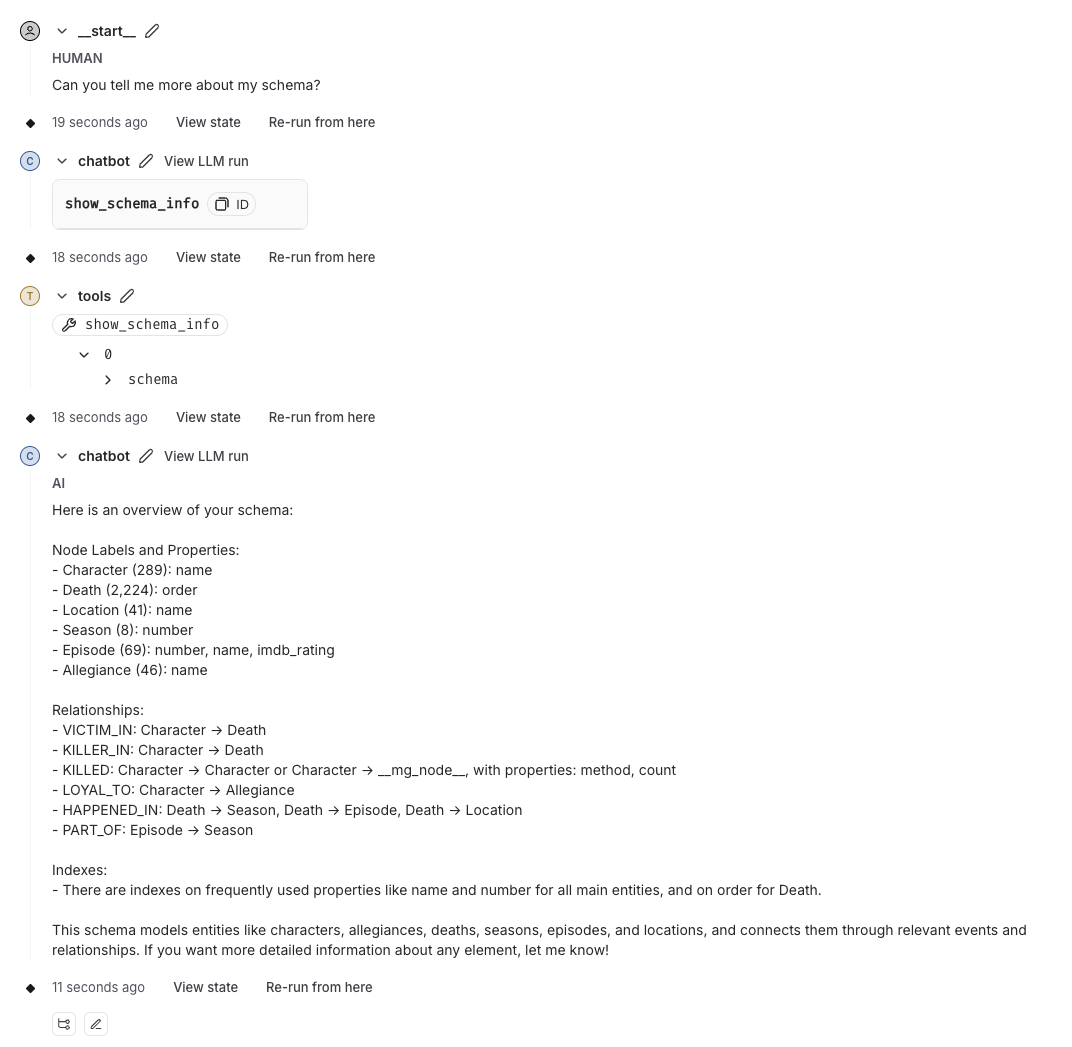
Another useful example is asking about the database schema:
[
	{
		"role": "user",
		"content": "Can you tell me more about my schema?"
	}
]
The agent will choose the show_schema_info() tool to provide the necessary details.
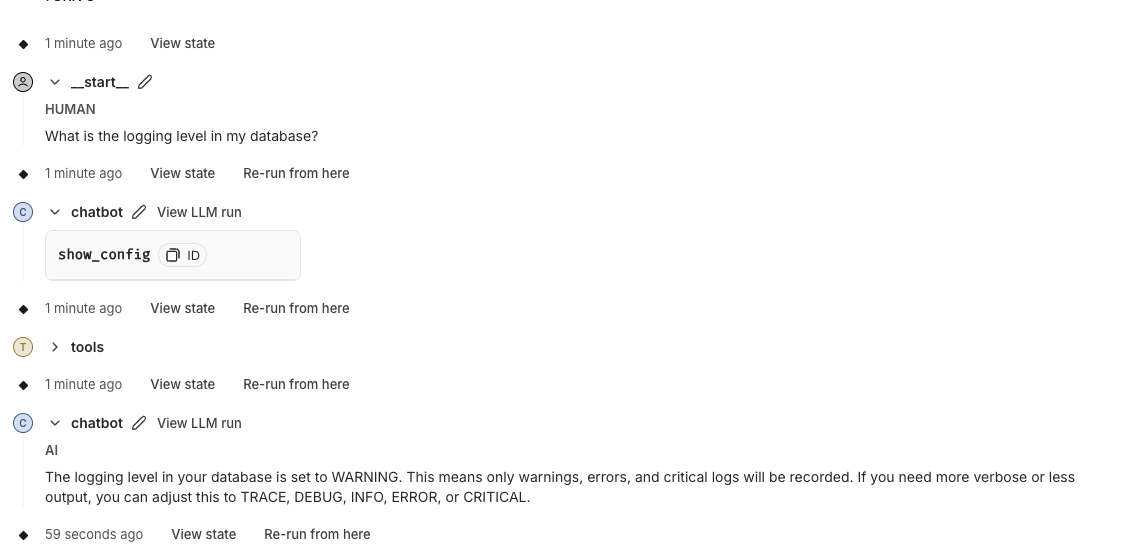
The Memgraph toolkit has tools for database-specific tasks, so we can ask questions such as:
[
	{
		"role": "user",
		"content": "What is the logging level in my database?"
	}
]
In this case, the agent invokes the show_config() tool and delivers a correct and relevant answer.
Observing and debugging with LangSmith
If you want to observe how your agent makes decisions behind the scenes, LangSmith offers full tracing and evaluation capabilities.
It integrates seamlessly with LangGraph and allows you to view every step the agent takes—each tool call, LLM response, state transition, and final output.
You can analyze latency, trace token usage, and understand why a particular tool was selected in response to a query. This level of observability is crucial when building agents for real-world tasks where interpretability, reliability, and accuracy matter.
MCP: Chat with Memgraph from Claude
With the Model Context Protocol (MCP), you can expose Memgraph tools directly to LLMs like Claude. This allows large language models to interact with Memgraph in real-time by executing Cypher queries, inspecting schema, retrieving stats, and more, without custom backend code or bespoke APIs.
Think of MCP as an interface layer that translates LLM outputs into structured tool calls, and vice versa. The Memgraph MCP server wraps the Memgraph AI Toolkit into a protocol-compatible interface that Claude (and other MCP-compatible clients) can understand and use automatically.
MCP enables seamless integration between your graph database and general-purpose LLMs. You get:
- Structured access: The LLM can only use the tools you expose—keeping control tight and safe.
- Zero boilerplate: No need to build a custom tool wrapper or backend.
- Out-of-the-box reasoning: LLMs automatically understand which tools to use, based on user queries.
- Pluggability: Works with any MCP-compatible model—Claude today, others tomorrow.
Setup: Run Memgraph MCP Server
If you're interested in exploring Memgraph's MCP server, which is available as part of the AI Toolkit repository, you can get started by following the steps below:
-
Install uv
-
Install Claude for Desktop.
-
Start Memgraph (as done earlier) with MAGE enabled.
-
Add the Memgraph server to Claude desktop
Go to:
Claude Desktop → Settings → Developer → Edit Config, and add:
{
  "mcpServers": {
    "mcp-memgraph": {
      "command": "uv",
      "args": [
        "run",
        "--with",
        "mcp-memgraph",
        "--python",
        "3.13",
        "mcp-memgraph"
      ]
    }
  }
}
Claude will automatically detect and register the tools once the MCP server is running.
Or you can open the config file in your favorite text editor. The location of the config file depends on your operating system:
MacOS/Linux
~/Library/Application\ Support/Claude/claude_desktop_config.jsonWindows
%APPDATA%/Claude/claude_desktop_config.json
What tools are exposed?
When connected via the MCP server integration, Claude can now invoke a set of Memgraph tools. The MCP server acts as a bridge between Claude and Memgraph, wrapping key functionality from the Memgraph Toolbox section of the AI Toolkit and exposing it as callable tools through the Claude interface.
This allows Claude to understand natural language instructions, intelligently select the appropriate tool, and execute it on your behalf.
Here are the tools currently exposed:
| Tool | Description |
|---|---|
run_query(query) | Execute any Cypher query |
get_schema() | Show schema: labels, relationships, and properties |
get_configuration() | Show Memgraph config settings |
get_storage() | Get stats on storage usage |
get_index() | List indexes |
get_constraint() | Show constraints |
get_triggers() | List all triggers |
get_page_rank() | Compute PageRank for nodes |
get_betweenness_centrality() | Compute centrality metrics |
For example, you can ask Claude:
Show me the schema of the graph.
What’s the PageRank of the character nodes?
And Claude will intelligently pick the correct tool, run it, and show the results.
Conclusion
Memgraph’s AI Toolkit, LangGraph and MCP open up powerful new ways to build and test graph-aware agents by bridging graph data with language models.
At the heart of this stack is our core toolbox, a growing set of Memgraph functionalities that we've wrapped using LangChain and the MCP server. This makes it possible for LLMs to interact with Memgraph in a structured, tool-driven way.
Here's how you can leverage the full stack:
- Use LangGraph for structured agent workflows.
- Use LangSmith and LangGraph Studio for full observability.
- Use MCP to plug Memgraph into any LLM interface.
This is just the beginning. We’re continuously expanding our toolbox to improve how LLMs reason over connected data so you can build more innovative internal tools, analytics dashboards or next-gen data applications that truly understand the shape and structure of your data.