Link Prediction With node2vec in Physics Collaboration Network
Introduction
After you have successfully created a dynamic recommendation system, this time, MAGE will teach you how to generate link predictions by using a new spell called node2vec.
If you don't know what node2vec is or what node embeddings are, we got you covered with two blog posts for deeper understanding:
- Introduction to node embedding - In this article, you can check out what node embeddings are, where we use them, why we use them, and how we can get embeddings from a graph.
- How node2vec works - After the first blog post, you should have an idea of how node2vec works. But if you want to fully understand the algorithm, its benefits and check out how it works on a few examples, take a look at this node2vec blog post which covers everything mentioned.
As already mentioned, link prediction refers to the task of predicting missing links or links that are likely to occur in the future. In this tutorial, we will make use the of MAGE spell called node2vec. Also, we will use Memgraph to store data, and gqlalchemy to connect from a Python application. The dataset will be similar to the one used in this paper: Graph Embedding Techniques, Applications, and Performance: A Survey.
Don't worry, you are in safe hands, MAGE will guide you through dataset parsing, the creation of queries that will be used to import data into Memgraph, embeddings calculation with the node2vec algorithm in MAGE, and metrics report.
Now let's get to the fun part.
Prerequisites
For this to work, you will need:
- The MAGE graph library
- Memgraph Lab - the graph explorer for querying Memgraph and visualizing graphs
- gqlalchemy - a Python driver and object graph mapper (OGM)
You can also try out MAGE on Memgraph Playground.
Contents
This is how we will set up our tutorial:
- Dataset and query import
- Splitting edges into test and train sets
- Run node2vec on the train set to generate node embeddings
- Get potential edges from embeddings
- Rank potential edges to get top K predictions
- Compare predicted edges with the test set
1. Dataset and query import
We will work on the High Energy Physics Collaboration Network. The dataset contains 12008 nodes and 118521 edges. MAGE has prepared a script that will help you parse the dataset and import it into Memgraph.
After you have downloaded the dataset from the link above, you should see the following contents:
# Directed graph (each unordered pair of nodes is saved once): CA-HepPh.txt
# Collaboration network of Arxiv High Energy Physics category (there is an edge if authors co-authored at least one paper)
# Nodes: 12008 Edges: 237010
# FromNodeId	ToNodeId
17010	1943
17010	2489
17010	3426
17010	4049
17010	16961
17010	17897
The dataset description says it's a directed graph and that it contains 237010 edges. But earlier we mentioned it contains 118521 edges. Actually, both are true. Depends on your view.
The graph in question is directed, but it contains edges in both directions: from node u to node v and from node v to node u, u⟶v and u⟵v. The direction means that author u co-authored at least one paper with author v. Since co-authoring goes both ways we can act as if the graph is undirected with only one edge, u - v. The script below will create exactly 118521 undirected edges. So all is good. Phew.
We will import these 118521 edges, and act as if they are undirected. The Node2Vec algorithm in MAGE accepts parameters whether to treat graph from Memgraph as directed or undirected.
Note: Memgraph only accepts directed graphs, but the Node2Vec algorithm saves the day for us in this case.
Here is the function to parse edges from the file. It will return a List of int Tuples, which will represent undirected edges.
FILENAME = "CA-HepPh.txt"

def parse_edges_dataset(filename=FILENAME) -> List[Tuple[int, int]]:
    with open(filename) as file:
        lines = file.readlines()
    edges: Dict[Tuple[int, int]] = {}
    for line in lines:
        if line.startswith("#"):
            continue
        line = line.strip()
        line_parts = line.split("/t")
        edge = (int(line_parts[0]), int(line_parts[1]))
        if (edge[1], edge[0]) in edges:
            continue
        edges[edge] = 1

    return list(edges.keys())
We need to create Cypher queries from the given undirected edges. If you don't know anything about Cypher, here is a short getting started guide. You can also learn a lot about graph algorithms and Cypher queries on Memgraph Playground.
We need to create queries from edges so that we can run each query and import data into Memgraph.Let's use the MERGE clause, which ensures that a pattern we are looking for will exist only once in the database after a query is run. That means that if the pattern (node or edge) is not found, it will be created.
Now, let's create the queries:
NODE_NAME = "Collaborator"
EDGE_NAME = "COLLABORATED_WITH"

edge_template = Template(
    'MERGE (a:$node_name_a {id: $id_a}) MERGE (b:$node_name_b {id: $id_b}) CREATE (a)-[:$edge_name]->(b);')


def create_queries(edges: List[Tuple[int, int]]):
    queries: List[str] = ["CREATE INDEX ON :{node_name}(id);".format(node_name=NODE_NAME)]
    for source, target in edges:
        queries.append(edge_template.substitute(id_a=source,
                                                id_b=target,
                                                node_name_a=NODE_NAME,
                                                node_name_b = NODE_NAME,
                                                edge_name= EDGE_NAME))
    return queries


def main():
    edges = parse_edges_dataset()
    queries = create_queries(edges)

    file = open(OUTPUT_FILE, 'w')
    file.write("/n".join(queries))
    file.close()


if __name__ == '__main__':
    main()
This function create_queries() will return a list of strings. Each string represents a query we can run against our database.
Note: you can import datasets through one of the querying tools. We have developed our drivers using the Bolt protocol to deliver better performance. You can use Memgraph Lab, mgconsole or even one of our drivers, like the Python driver used in this tutorial.
We recommend you use Memgraph Lab due to the simple visualization, ease of use, export and import features, and memory usage. But here, we will use a Python driver in the form of gqlalchemy.
2. Splitting edges into test and train sets
Theory
First, we need to split our edges into a testing (test) and training (train) set. Let's explain why.
Our goal is to perform link prediction. This means that we need to be able to correctly predict new edges that might appear from existing ones. Since this is a definitive dataset, there will be no new edges. In order to test the algorithm we remove a part of the existing edges and make predictions based on the remaining ones. A correct prediction would recreate the edges we have removed. In the best case scenario, we would get the original dataset.
We will randomly remove 20% percent of edges. This will represent our test set. We will leave all the nodes in the graph, it doesn't matter that some of them could be completely disconnected from the graph. Next, we will run node2vec on the remaining edges (80% of them, in our case that would be something like 94000 edges) to get node embeddings. We will use these node embeddings to predict new edges.
You can imagine this case as a Twitter web, where new connections (follows) appear every second, and we want to be able to predict new connections from connections we already have.
How exactly we will predict which edges will appear is still left to explain, but we hope that you understand the WHY part of removing 20% of the edges. 🤞
Practical
Firstly, we need a connection to Memgraph so we can get edges, split them into two parts (train set and test set). For edge splitting, we will use scikit-learn. In order to make a connection towards Memgraph, we will use gqlalchemy.
From GitHub description of gqlalchemy: "GQLAlchemy is a library developed to assist in writing and running queries on Memgraph. GQLAlchemy supports high-level connection to Memgraph as well as modular query builder."
And after we create a connection towards Memgraph, we will call these two functions down below in order to run a query. This query can be anything from getting edges, removing edges, running a node2vec procedure.
memgraph = gqlalchemy.Memgraph("127.0.0.1", 7687)
def call_a_query_and_fetch(query: str) -> Iterator[Dict[str, Any]]:
    return memgraph.execute_and_fetch(query)


def call_a_query(query: str) -> None:
    memgraph.execute(query)
Okay, so to get edges we need to make a query. With the connection we have, we will get edges, split them into two sets, and then make queries (plural) to remove each one of them in the test set from the graph.
edge_remove_template = Template(
    'MATCH (a:$node_a_name{id: $node_a_id})-[edge]-(b:$node_b_name{id: $node_b_id}) DELETE edge;')

def get_all_edges() -> List[Tuple[gqlalchemy.Node, gqlalchemy.Node]]:
    results = Match() /
        .node(dataset_parser.NODE_NAME, variable="node_a") /
        .to(dataset_parser.EDGE_NAME, variable="edge") /
        .node(dataset_parser.NODE_NAME, variable="node_b") /
        .execute()

    return [(result["node_a"], result["node_b"]) for result in results]

def remove_edges(edges: List[Tuple[gqlalchemy.Node, gqlalchemy.Node]]) -> None:
    queries = [edge_remove_template.substitute(node_a_name=dataset_parser.NODE_NAME,
                                               node_a_id=edge[0].properties["id"],
                                               node_b_name=dataset_parser.NODE_NAME,
                                               node_b_id=edge[1].properties["id"]) for edge in edges]
    for query in queries:
        call_a_query(query)


def split_edges_train_test(edges: List[Tuple[gqlalchemy.Node, gqlalchemy.Node]], test_size: float = 0.2) -> (
        List[Tuple[gqlalchemy.Node, gqlalchemy.Node]], List[Tuple[gqlalchemy.Node, gqlalchemy.Node]]):
    edges_train, edges_test = train_test_split(edges, test_size=test_size, random_state=int(time.time()))

    return edges_train, edges_test
This will be the "main" part of our program. We want you to notice a few things from here:
- When getting all edges with a query, instead of edge object we got two nodes (
gqlalchemy.Vertexobject), one represents the head and the other represents the tail of the edge, but we will treat it as an undirected graph. - The
split_edges_train_test()function accepts these edges and splits them into a train and test set. - We received an object, but it will be easier to work with the
idproperty of the node We will just map from our list of edges, to a list of int tuples, where one pair will represent an undirected edge
def main():
    print("Getting all edges...")
    edges = get_all_edges()
    print("Current number of edges is {}".format(len(edges)))

    print("Splitting edges in train, test group...")
    edges_train, edges_test = split_edges_train_test(edges=edges, test_size=0.2)
    print("Splitting edges done.")

    print("Removing edges from graph.")
    remove_edges(edges_test)
    print("Edges removed.")
    train_edges_dict = {(node_from.properties["id"], node_to.properties["id"]): 1 for node_from, node_to in edges_train}
    test_edges_dict = {(node_from.properties["id"], node_to.properties["id"]): 1 for node_from, node_to in edges_test}
3. Run node2vec on the train set to generate node embeddings
Theory
After we have removed edges, we need to run the node2vec algorithm. Node embeddings will be calculated just from a train set of edges.
Repeat: we will get embeddings for every node, but for that, we will only use a certain amount of edges (80%) from the original graph. If a new node was to appear in the graph, we can't predict anything for that node, since we don't know it exists yet. We can only make predictions for the nodes we have in the graph.
Practical
Here we will call the node2vec query module to calculate node embeddings. There is a procedure called set_embeddings() in the node2vec module, which we will use to set embeddings in the graph as properties. So even if we lose power on the computer, we will still have those embeddings, since Memgraph acts as an in-memory database.
Node2Vec has some crucial hyperparameters like num_walks and walk_length. When we set them on higher value, they will cause the algorithm to run longer, but we should get better predictions if embeddings don't overfit to data we have.

Another problem we need to handle is to set proper p and q parameters. Since we are dealing here with a collaboration network, we will try to predict connections inside natural clusters. We can obtain clusters by sampling walks in more DFS like manner. If all these terms sound confusing to you, we would suggest checking out the blog post on node2vec where we have explained those terms. 💪
If we were to set node2vec params in a more BFS manner, so that hyperparameter p is smaller than hyperparameter q, then we would be looking for hubs, which isn't our intention.
# NODE2VEC PARAMS
is_directed: bool = False
p = 1  # return parameter
q = 1 / 256  # in-out parameter
num_walks = 10
walk_length = 80
vector_size = 100
alpha = 0.02
window = 5
min_count = 1
seed = int(time.time())
workers = 4
min_alpha = 0.0001
sg = 1
hs = 0
negative = 5
epochs = 5

def set_node_embeddings() -> None:
    call_a_query("""CALL node2vec.set_embeddings({is_directed},{p}, {q}, {num_walks}, {walk_length}, {vector_size},
    {alpha}, {window}, {min_count}, {seed}, {workers}, {min_alpha}, {sg}, {hs}, {negative}) YIELD *""".format(
        is_directed=is_directed, p=p, q=q, num_walks=num_walks, walk_length=walk_length, vector_size=vector_size,
        alpha=alpha, window=window, min_count=min_count, seed=seed, workers=workers, min_alpha=min_alpha, sg=sg,
        hs=hs, negative=negative))


def get_embeddings_as_properties():
    embeddings: Dict[int, List[float]] = {}
    results = Match() /
        .node(dataset_parser.NODE_NAME, variable="node") /
        .execute()

    for result in results:
        node: gqlalchemy.Node = result["node"]
        if not "embedding" in node.properties:
            continue
        embeddings[node.properties["id"]] = node.properties["embedding"]

    return embeddings
And this is our main part. After the node2vec query module finishes with calculations, we can get those embeddings directly from the graph, which is awesome.
def main():
    test_edges_dict = {(edge[0].properties["id"], edge[1].properties["id"]): 1 for edge in edges_test}

    # Calculate and get node embeddings
    print("Setting node embeddings as graph property...")
    set_node_embeddings()
    print("Embedding for every node set.")

    node_emeddings = get_embeddings_as_properties()
4. Get potential edges from embeddings
Theory
And now to the most important section ⟶ edge prediction.
How do we predict edges exactly? What is the idea behind it?
We expect nodes that have similar embeddings and still don't have an edge between them to form a new edge in the future. It's as simple as that.
We just need to find a good measure to be able to check whether two nodes have similar embeddings. One such measure is cosine similarity.
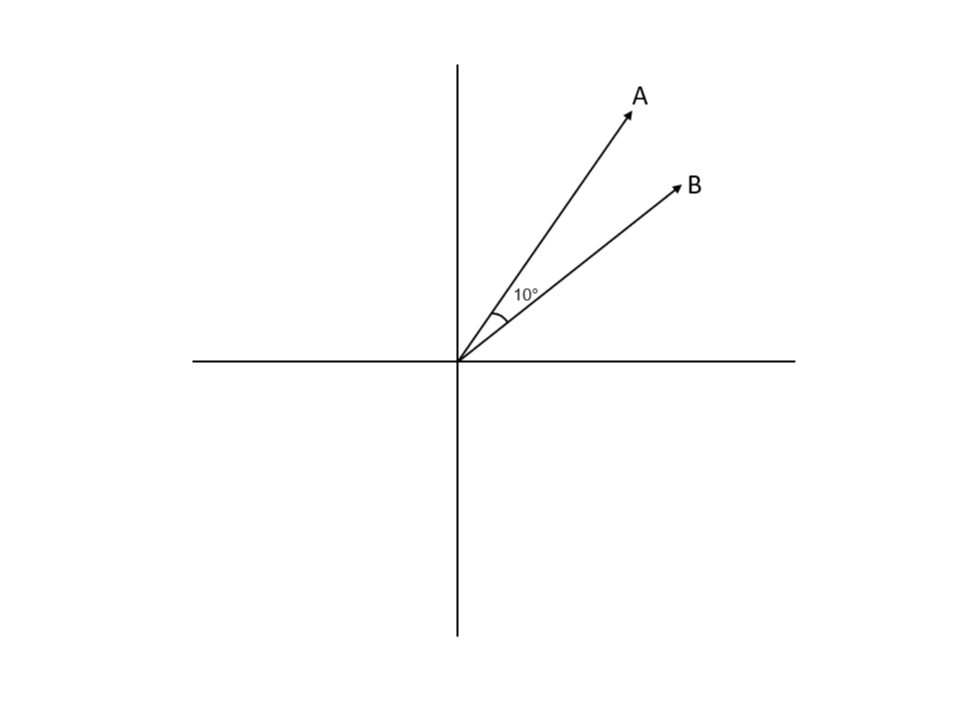
The Image 3 above contains an explanation of cosine similarity, the measure that will calculate how similar two vectors are. It's essentially the cosine angle between two vectors. Notice that node embeddings also represent vectors in multi-dimensional space.
Practical
So for every pair of node embeddings, we will calculate the cosine similarity to check how similar two-node embeddings are. The problem with 12000 nodes is that there will be around 72 million pairs (72 000 000), which means that an average computer with 16GB of RAM would die at some point (open up a Chrome tab if you dare). To fix that, we will only hold a maximum of 2 million pairs in memory at any given point in time. We will also run a sorting algorithm to only keep the top K pairs.
What would be this top K number?
We will answer this question shortly and it's related to the precision@K measurement method.
def calculate_adjacency_matrix(embeddings: Dict[int, List[float]], threshold=0.0) -> Dict[Tuple[int, int], float]:
    def get_edge_weight(i, j) -> float:
        return np.dot(embeddings[i], embeddings[j])

    nodes = list(embeddings.keys())
    nodes = sorted(nodes)
    adj_mtx_r = {}
    cnt = 0
    for pair in itertools.combinations(nodes, 2):

        if cnt % 1000000 == 0:
            adj_mtx_r = {k: v for k, v in sorted(adj_mtx_r.items(), key=lambda item: -1 * item[1])}
            adj_mtx_r = {k: adj_mtx_r[k] for k in list(adj_mtx_r)[:3*PRECISION_AT_K_CONST]}
            gc.collect()

        if cnt % 10000 == 0:
            print(cnt)

        weight = get_edge_weight(pair[0], pair[1])
        if weight <= threshold:
            continue
        cnt += 1
        adj_mtx_r[(pair[0], pair[1])] = get_edge_weight(pair[0], pair[1])

    return adj_mtx_r
5. Rank potential edges to get top K predictions
To calculate the accuracy of our implementation, we will use a famous precision method called precision@K.
Some nodes (their embeddings) will be more similar than others, meaning the cosine similarity value will be larger. And let's say our manager arrives and says, give me the top 10 predictions. Would you give him pairs with lower or higher similarities? Probably the best ones.
The same principle can be applied here. We will take the top K predictions, and evaluate our model. At every point, we will remember how many guesses we had until then. And we will divide the number of our guesses by the number of tries we had until then.
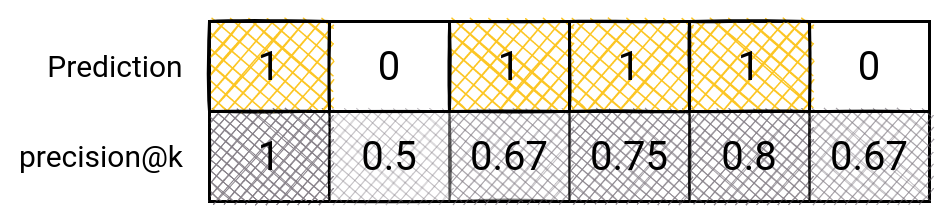
This is how it would work for precision@6: The first one is easy: 1 guess / 1 try. For the second one, we have: 1 guess / 2 tries. The rest is clear.
def compute_precision_at_k(predicted_edges: Dict[Tuple[int, int], float],
                           test_edges: Dict[Tuple[int, int], int], max_k):
    precision_scores = []  # precision at k
    delta_factors = []
    correct_edge = 0
    count = 0
    for edge in predicted_edges:
        if count > max_k:
            break

        # if our guessed edge is really in graph
        # this is due representation problem: (2,1) edge in undirected graph is saved in memory as (2,1)
        # but in adj matrix it is calculated as (1,2)
        if edge in test_edges or (edge[1], edge[0]) in test_edges:
            correct_edge += 1
            delta_factors.append(1.0)
        else:
            delta_factors.append(0.0)
        precision_scores.append(1.0 * correct_edge / (count + 1))  # (number of correct guesses) / (number of attempts)
        count += 1

    return precision_scores, delta_factors
Here is the main part of the code:
    # Calculate adjacency matrix
    print("Calculating adjacency matrix from embeddings.")
    adj_matrix = calculate_adjacency_matrix(embeddings=node_emeddings, threshold=0.0)
    print("Adjacency matrix calculated")
    # print(adj_matrix)

    print("Getting predicted edges...")
    predicted_edge_list = adj_matrix
    print("Predicted edge list is of length:", len(predicted_edge_list), "/n")

    print("Sorting predicted edge list")

    # We need to sort predicted edges so that ones that are most likely to appear are first in list
    sorted_predicted_edges = {k: v for k, v in sorted(predicted_edge_list.items(), key=lambda item: -1 * item[1])}
    print("Predicted edges sorted...")

    print("Filtering predicted edges that are not in train list...")
    # taking only edges that we are predicting to appear, not ones that are already in the graph
    sorted_predicted_edges = {k: v for k, v in sorted_predicted_edges.items() if k not in train_edges_dict}
    # print(sorted_predicted_edges)

    print("Calculating precision@k...")
    precision_scores, delta_factors = compute_precision_at_k(predicted_edges=sorted_predicted_edges,
                                                             test_edges=test_edges_dict,
                                                             max_k=PRECISION_AT_K_CONST)
    print("precision score", precision_scores)

    with open("../results.txt", 'a+') as fh:
        fh.write(" ".join(str(precision) for precision in precision_scores))
        fh.write("/n")
6. Compare predicted edges with the test set
from matplotlib import pyplot as plt
import numpy as np

#tribute to https://stackoverflow.com/questions/12957582/plot-yerr-xerr-as-shaded-region-rather-than-error-bars
with open('../results.txt', 'r') as fh:
    lines = fh.readlines()


parsed_results=[]
for line in lines:
    values = line.split(" ")
    parsed_list=[float(value) for value in values]
    parsed_results.append(parsed_list[:2**5])

stddev = np.std(parsed_results, axis=0)
mean = np.mean(parsed_results, axis=0)
print(parsed_results)
x = np.arange(1,len(parsed_results[0])+1)
y = mean
error = stddev


plt.plot(x, y, 'k-')
plt.fill_between(x, y-error, y+error)
plt.show()
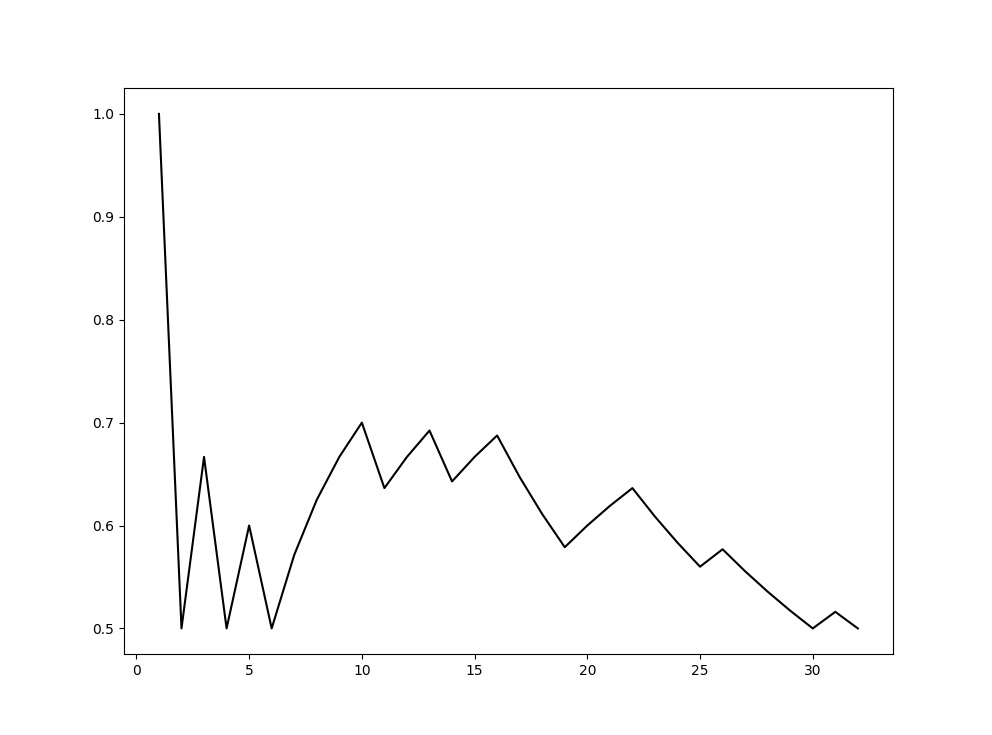
After running our code a couple of times, we can plot our results. Since we didn't take any features into account and only worked with the graph structure when doing link prediction, we can say that our results are good. It can be a lot better, but for 16 edges we have a precision of around 70%. MAGE is satisfied at the moment.
Conclusion
So that's it for the real-time link prediction tutorial. Hope that you learned something and that we got you interested in graph analytics even more. If you got lost during the tutorial at any point, here is a link to the GitHub repository for link prediction with MAGE.
Our team of engineers is currently tackling the problem of graph analytics algorithms on real-time data. If you want to discuss how to apply online/streaming algorithms on connected data, feel free to join our Discord server and message us.
MAGE shares his wisdom on a Twitter account. Get to know him better by following him 🐦

Last but not least, check out MAGE and don’t hesitate to give a star ⭐ or contribute with new ideas.